Hardscape Installation: 7 Essential Steps for Stunning Results 2025
Understanding Hardscape Installation: Building Your Outdoor Dream
Hardscape installation is the process of adding non-living elements like patios, walkways, retaining walls, and driveways to your outdoor space using materials such as stone, concrete, or brick. If you’re looking to transform your property, here’s what you need to know:
What is Hardscape Installation?
– Installation of permanent, non-living landscape features
– Includes patios, walkways, walls, driveways, and steps
– Uses materials like stone, pavers, brick, and concrete
– Requires proper planning, site preparation, and installation techniques
Hardscapes add structure and functionality to your outdoor areas, creating usable spaces for entertaining, relaxing, and enhancing your property’s appearance. When done correctly, these installations can last for decades with minimal maintenance, making them a worthwhile investment for your home or commercial property.
Planning a hardscape project involves several important considerations. First, you’ll need to evaluate your space and determine what features will best meet your needs. Next, proper site preparation—including grading, drainage planning, and base installation—is crucial for long-term stability. As one landscape designer noted, “Ignoring drainage is the leading cause of hardscape failures; proper runoff planning prevents structural damage and allows on-site water reuse.”
The right materials make all the difference in your hardscape’s appearance and durability. Whether you choose the timeless appeal of natural stone, the versatility of concrete pavers, or the modern look of porcelain, selecting materials that complement your home’s architecture ensures a cohesive design. Most hardscape projects are 80% the same in terms of required tools and materials, making proper planning and preparation essential for success.
I’m Sal Musto, owner of SalCorp Landscaping & Construction, with over two decades of experience changing outdoor spaces through expert hardscape installation throughout Massachusetts. Our specialized division, PatioScapes, focuses exclusively on creating beautiful, functional hardscapes that improve your property’s value and your enjoyment of outdoor living.
Hardscape installation helpful reading:
– hardscape maintenance service
– landscape and hardscape design
– brick patio contractors
Visualizing & Planning Your Outdoor Space
The magic of a successful hardscape installation happens long before the first shovel breaks ground. As I often tell my clients, “The time you spend planning will save you twice as much time during installation.”
Start by defining clear project goals. Are you dreaming of hosting summer barbecues on a new patio? Need a solution for that troublesome slope in your backyard? Or perhaps you’re looking to boost your home’s curb appeal with an neat front walkway? Your specific objectives will guide every decision that follows.
Take time to walk your property and really observe it. Note where the sun hits throughout the day, identify drainage patterns after a rainstorm, and consider which views you want to highlight or screen. This intimate knowledge of your space is invaluable when planning your hardscape project.
Before any digging begins, call 811 – the free “Call Before You Dig” service that marks all underground utilities on your property. This simple step prevents potentially dangerous and costly accidents during excavation. Trust me, hitting a gas line is not something you want to experience!
Check with your local building department about zoning regulations and permit requirements. Many towns in Massachusetts have specific rules about impervious coverage (how much of your lot can be paved), setbacks from property lines, and other restrictions that could impact your project.
For more complex projects, 3D design software can be incredibly helpful. At SalCorp Landscaping & Construction, we provide detailed renderings that help our clients visualize the finished space before we begin work. This often reveals potential issues or inspires design improvements that wouldn’t be apparent from a simple sketch.
A helpful designer’s trick is creating a “style phrase” – two or three words that capture the essence of what you’re trying to achieve. Whether it’s “modern farmhouse,” “coastal elegance,” or “natural woodland,” this phrase keeps your material selections and design decisions consistent for a cohesive look.
Don’t forget to consider future phases in your initial plan. If you’re thinking about adding an outdoor kitchen next year or a fire pit down the road, ensure your initial installation accommodates these additions without requiring major rework.
For inspiration on visualizing your ideal outdoor space, check out Pinterest Inspiration Gallery– The first step is to visualize how you want to use your space. and Hardscaping Ideas for creative approaches to transform your property.
Sketch & Layout Basics
Begin with a simple base map of your property. This doesn’t need to be fancy – graph paper with measurements works great for many homeowners, though a professional survey provides the most accuracy.
Identify natural focal points in your yard – perhaps a beautiful maple tree, a garden statue, or a view of the pond beyond your property line. Design your hardscape to frame and improve these special features rather than competing with them.
Pay attention to flow lines – the natural paths people take through your space. I’ve seen too many beautiful patios that go unused because they’re awkwardly placed. Your walkways should follow these intuitive routes, avoiding awkward corners or dead ends that disrupt the natural movement through your yard.
Sun and shade patterns dramatically affect how comfortable your outdoor spaces will be. That west-facing patio might look perfect on paper, but without shade elements, it could become unbearably hot on summer afternoons. Similarly, heavily shaded areas might require special drainage considerations or different plant selections.
Integrating Softscapes
While hardscape installation focuses on non-living elements, the most successful outdoor spaces balance hardscapes with softscapes – the living elements like plants, trees, and lawn areas. This balance creates visual interest, softens hard edges, and makes spaces feel more inviting and natural.
Plan for plant beds adjacent to patios and walkways to add color, texture, and seasonal interest. Consider how plants will mature over time – that cute little ornamental grass might grow into a 5-foot monster that blocks your walkway in a few years!
Include small lawn pockets where appropriate. Even in predominantly hardscaped spaces, a touch of green provides a visual break and a place for children or pets to play. These green spaces also help with drainage by absorbing rainwater that runs off your hardscape surfaces.
Designate pollinator zones with native plants to support local ecosystems while adding movement and life to your landscape. These areas require less maintenance than traditional gardens while providing important environmental benefits. The butterflies and hummingbirds they attract will bring your outdoor space to life!
Consider adding seasonal color through carefully placed perennials and flowering shrubs. This ensures your landscape remains interesting throughout the year, from spring bulbs to summer perennials to fall foliage and even winter berries.
Master Drainage Plan
Improper drainage is the number one cause of hardscape failures – I’ve seen beautiful patios turn into unusable puddles because drainage wasn’t properly addressed. Before installation begins, develop a comprehensive drainage plan addressing both surface runoff and subsurface water movement.
Ensure all hardscape surfaces slope away from building foundations, typically at a minimum grade of 1/4 inch per foot. This prevents water from pooling against structures and causing potentially expensive damage.
Consider incorporating French drains – gravel-filled trenches with perforated pipes – to collect and redirect water away from problem areas. These can be disguised with decorative river rock or integrated into the overall design so they become an asset rather than an eyesore.
Dry creek beds serve both practical and aesthetic purposes. When properly designed, they channel water during heavy rain while adding visual interest during dry periods. Use varying sizes of stone and appropriate plantings along the edges to create a natural appearance that looks like it’s always been part of your landscape.
For comprehensive water management, connect your drainage features to rain gardens where water can slowly infiltrate while supporting moisture-loving plants. This approach not only manages water on-site but also reduces the need for irrigation – a win-win for both your wallet and the environment.
Choosing Materials & Tools
Picking the right materials for your hardscape installation isn’t just about looks—it’s about creating something that will stand the test of time while complementing your home’s character. I’ve seen how the right materials can transform an ordinary backyard into something truly special.
Natural stone remains one of our clients’ favorites, and for good reason. There’s something timeless about bluestone patios or granite steps that synthetic materials just can’t match. While natural stone might cost more initially, I always remind homeowners that these materials often last generations with minimal upkeep. That limestone walkway isn’t just beautiful today—your grandkids might enjoy it too!
Concrete pavers have come a long way in recent years. The variety of colors, textures, and patterns available today is truly impressive. Many of our Massachusetts clients love how modern pavers can mimic the look of natural stone while offering easier installation and often a gentler price point. They’re particularly fantastic for driveways where you need durability without breaking the bank.

Porcelain pavers are the new kids on the block, and they’re making quite an impression! These dense, non-porous materials resist staining beautifully—perfect for around pools or outdoor kitchens where spills happen. I love recommending porcelain when clients want a clean, contemporary look with minimal maintenance. The colors won’t fade, even in our harsh New England sun.
For environmentally conscious homeowners, permeable paving systems are a game-changer. These clever systems allow rainwater to filter through rather than run off, helping recharge groundwater and reducing puddles. They’re particularly valuable if you’re concerned about stormwater management or want to do your part for the environment.
Recycled brick brings character and history to your landscape. There’s something special about walking on materials that might have been part of a historic Boston building a century ago. These weathered bricks tell a story while creating a warm, established feel that new materials simply can’t replicate.
Don’t overlook gravel! This humble material offers tremendous versatility at a budget-friendly price point. From neat crushed marble pathways to rustic pea stone garden paths, the right gravel can improve your design while providing excellent drainage. For best results, choose angular gravel that locks together underfoot rather than round pebbles that shift when walked on.
Beyond what you see on the surface, every successful hardscape installation relies on quality base materials. You’ll need proper compaction base (typically 3/4″ crushed stone), geotextile fabric to prevent materials mixing, bedding sand for setting pavers, and edge restraints to keep everything in place. Think of these as the foundation of your project—skimp here, and you’ll regret it later!
As for tools, you’ll need both hand tools and power equipment for most projects. Essential hand tools include shovels, rakes, levels, string lines, and measuring tapes. For cutting materials, you’ll need tools appropriate for your chosen material—wet saws for pavers and stone, masonry blades for concrete, etc.
Larger projects benefit enormously from rented equipment like plate compactors and mini excavators. A good plate compactor alone can save days of manual labor while ensuring proper compaction—critical for preventing settling over time. Many of our clients are surprised by how much proper equipment improves both the process and the final result.
Never compromise on safety gear. Work gloves, safety glasses, ear protection, dust masks, and proper footwear aren’t optional—they’re essential. I’ve seen too many DIYers skip these basics only to regret it later. At SalCorp, our crews are fully equipped and trained in safety protocols for every job.
| Material | Durability | Maintenance | Cost Range (per sq ft) | Best Uses |
|---|---|---|---|---|
| Natural Stone | Excellent | Low-Medium | $15-$50 | Patios, walkways, steps |
| Concrete Pavers | Very Good | Low | $8-$25 | Driveways, patios, walkways |
| Porcelain Pavers | Excellent | Very Low | $15-$45 | Patios, pool decks |
| Permeable Pavers | Good | Medium | $10-$30 | Driveways, environmental areas |
| Recycled Brick | Good | Medium | $7-$21 | Walkways, garden borders |
| Gravel | Good | Medium-High | $1-$15 | Pathways, driveways |
Note: Price ranges shown reflect average internet data and not actual costs for SalCorp Landscaping & Construction services.
When you’re ready to explore material options for your project, check out our guide on How to Choose the Right Paver for Your Patio or Walkway. And remember, the best tool in your arsenal might be an experienced contractor who brings professional equipment and know-how to ensure your hardscape installation lasts for decades to come.
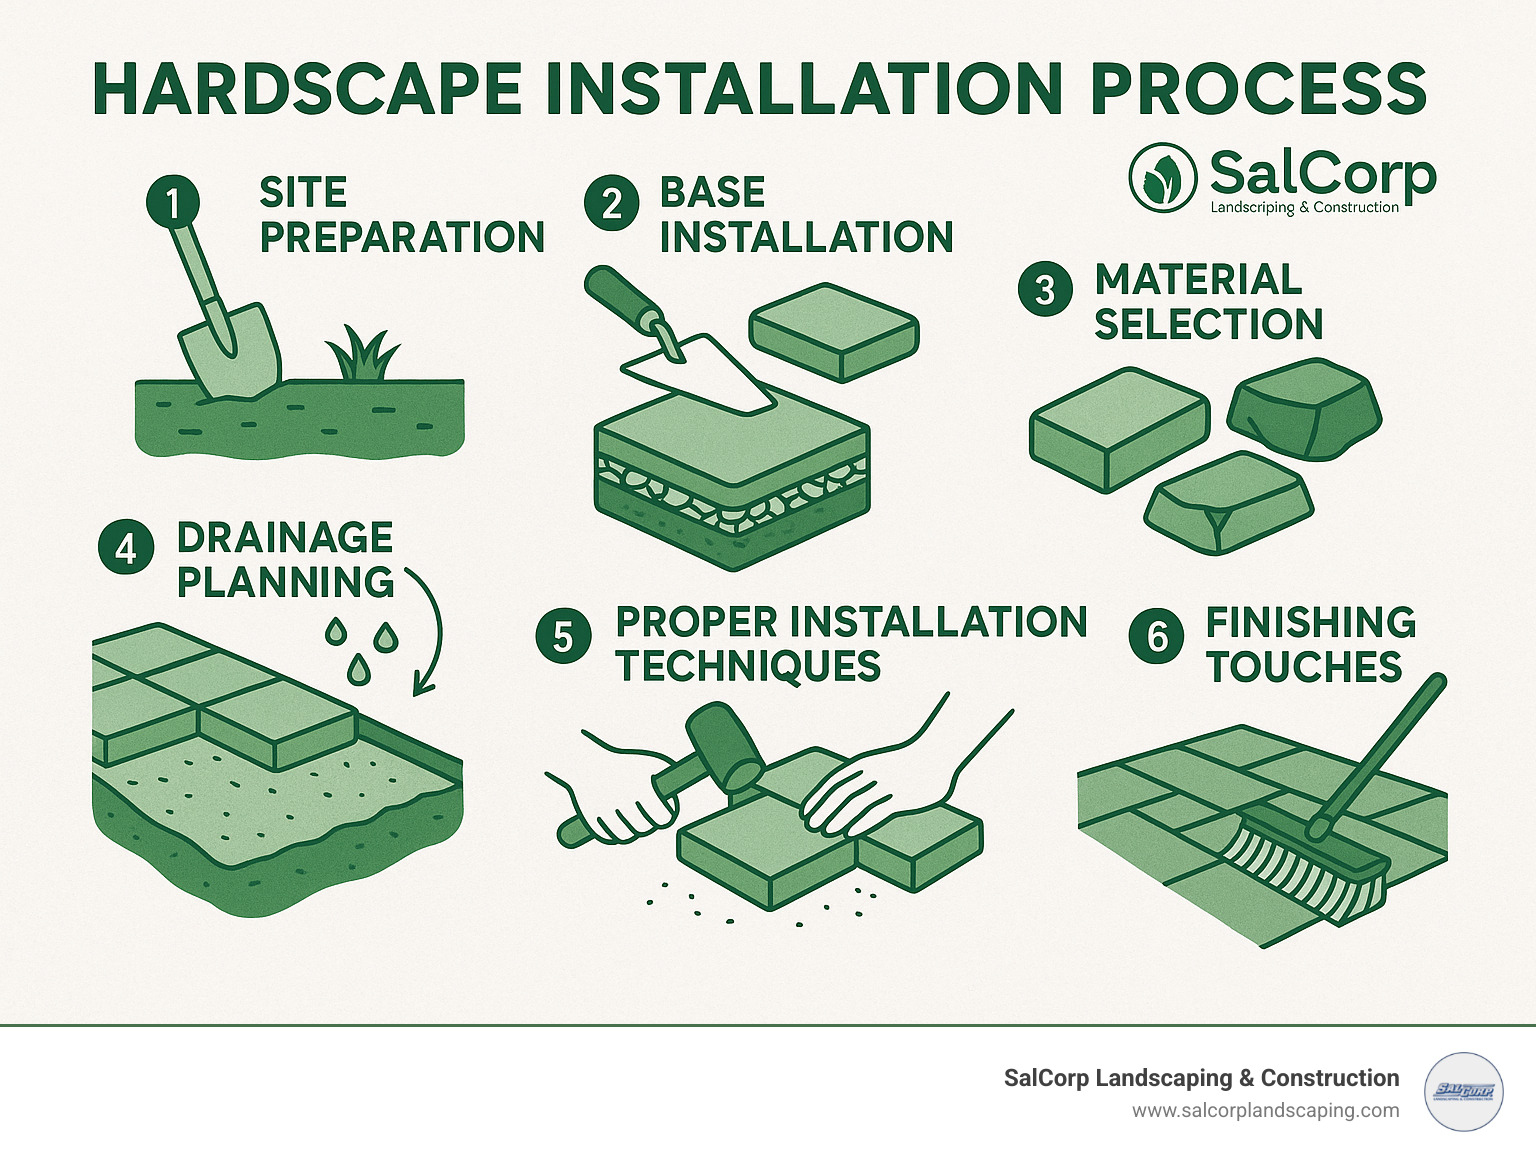
Hardscape Installation Step-by-Step
The success of any hardscape installation largely depends on proper execution of each step in the process. Cutting corners during installation will inevitably lead to problems down the road, including settling, shifting, and premature deterioration. Here’s our professional approach to ensuring long-lasting results:
- Mark out the project area using stakes and string lines to clearly define the boundaries of your hardscape. This visual guide helps ensure accurate dimensions and proper alignment with existing structures.
- Remove existing vegetation and topsoil to the required depth. For patios and walkways, this typically means excavating 7-8 inches below your desired finished height. For driveways, you’ll need to dig deeper—usually 9-10 inches—to accommodate heavier loads.
- Evaluate the exposed subsoil for stability. Soft, wet, or loose soil may require additional excavation and reinforcement with geotextile fabric or grid to prevent future settling.
- Install proper drainage solutions based on your master drainage plan. This might include sloping the excavated area, installing drain pipes, or creating gravel drainage channels.
- Add and compact the base material in layers. We use 3/4″ crushed stone (also called process gravel or road base) because its angular shape allows it to lock together when compacted. Each layer should be no more than 3 inches thick and thoroughly compacted before adding the next.
- Check grades and slopes frequently during base installation. Patios should slope away from buildings at a minimum of 1/4 inch per foot to ensure proper drainage.
- Install edge restraints around the perimeter to prevent lateral movement of your hardscape materials. Options include plastic edging, metal edging, or concrete curbing, depending on your design and budget.
- Spread and screed the bedding layer, typically 1 inch of coarse sand. This provides a smooth, level surface for setting pavers or stone. For natural stone installations, a wet mortar bed may be used instead.
- Begin laying your chosen hardscape material according to your design pattern. Start from a fixed edge or corner and work outward. Use string lines to ensure straight courses and check for level frequently.
- Cut pieces as needed to fit around obstacles or at edges. Always wear appropriate safety gear when cutting stone or concrete.
- Install joint material between pavers or stones. This might be fine sand, polymeric sand, or mortar, depending on your materials and design.
- Compact the surface (for pavers) to settle them into the bedding layer. Skip this step for natural stone or porcelain to avoid damage.
- Apply sealant if desired to improve color and protect against staining. Not all hardscape materials require sealing, so consult with a professional about the best approach for your specific installation.
- Clean up the site thoroughly, removing all debris and excess materials.
Site Prep for Hardscape Installation
Proper site preparation is the foundation of successful hardscape installation. Industry statistics show that improper site preparation is the most common cause of hardscape failure, with issues like poor drainage and insufficient base material leading to problems within 5 years of installation.
Start by establishing accurate string lines to guide your excavation. These lines should represent the finished height and perimeter of your hardscape. Remember to account for the thickness of your chosen material plus the base layers when determining excavation depth.
Excavation depths vary based on your climate and the intended use of the hardscape:
– For walkways in mild climates: 6-7 inches
– For patios in mild climates: 7-8 inches
– For driveways or cold climates: 9-12 inches
During excavation, be mindful of tree roots and existing utilities. If you encounter large roots, consult with an arborist before cutting them, as this could damage or kill valuable trees. Similarly, if you find unmarked utilities, stop work immediately and contact the appropriate service provider.
Compaction is critical throughout the base installation process. Use a plate compactor to achieve 95% compaction of the subsoil and each subsequent layer of base material. Proper compaction prevents future settling and extends the life of your hardscape.
In areas with poor soil conditions, consider installing geogrid or geotextile fabric to stabilize the base. These materials distribute weight more evenly and prevent base materials from mixing with the subsoil.
Laying & Setting Materials
When it comes time to lay your chosen hardscape materials, attention to detail makes all the difference. Start by establishing a clear pattern alignment using string lines or chalk marks. For complex patterns, dry-lay a section first to ensure the design works as planned before setting materials in place.
Maintain consistent bond lines (the joints between pieces) for a professional appearance. Staggered joints create stronger installations by preventing long, continuous seams that could crack or shift.
For paver installations, use plastic spacers to maintain uniform joint widths. This ensures proper spacing for sand or polymeric sand and prevents pavers from touching and potentially chipping. Typical spacers range from 1/16″ to 3/16″ depending on your design and material.
When cutting is necessary, use the appropriate tools for your material:
– Concrete pavers: masonry saw or paver splitter
– Natural stone: wet saw with diamond blade
– Porcelain: wet saw with porcelain-specific blade
Always cut in a well-ventilated area and wear proper safety equipment including eye protection, hearing protection, and a dust mask.
For joint filling, polymeric sand offers advantages over regular sand for many applications. This special sand contains polymers that harden when activated with water, creating more stable joints that resist weed growth and insect activity. Apply according to manufacturer instructions, typically by sweeping into joints, compacting, and then misting with water to activate.
Finishing Touches in Hardscape Installation
The final phase of hardscape installation involves those details that lift your project from good to exceptional. Consider these finishing touches:
Apply an appropriate sealer to improve colors and protect your hardscape from stains and weathering. Different materials require different sealers, so consult product specifications or professional advice. Some materials, like porcelain pavers, may not need sealing at all.
If your design includes lighting, install conduits during the base preparation phase to avoid disturbing the finished hardscape later. Low-voltage landscape lighting can highlight design features, improve safety, and extend the usability of your outdoor space into the evening hours.
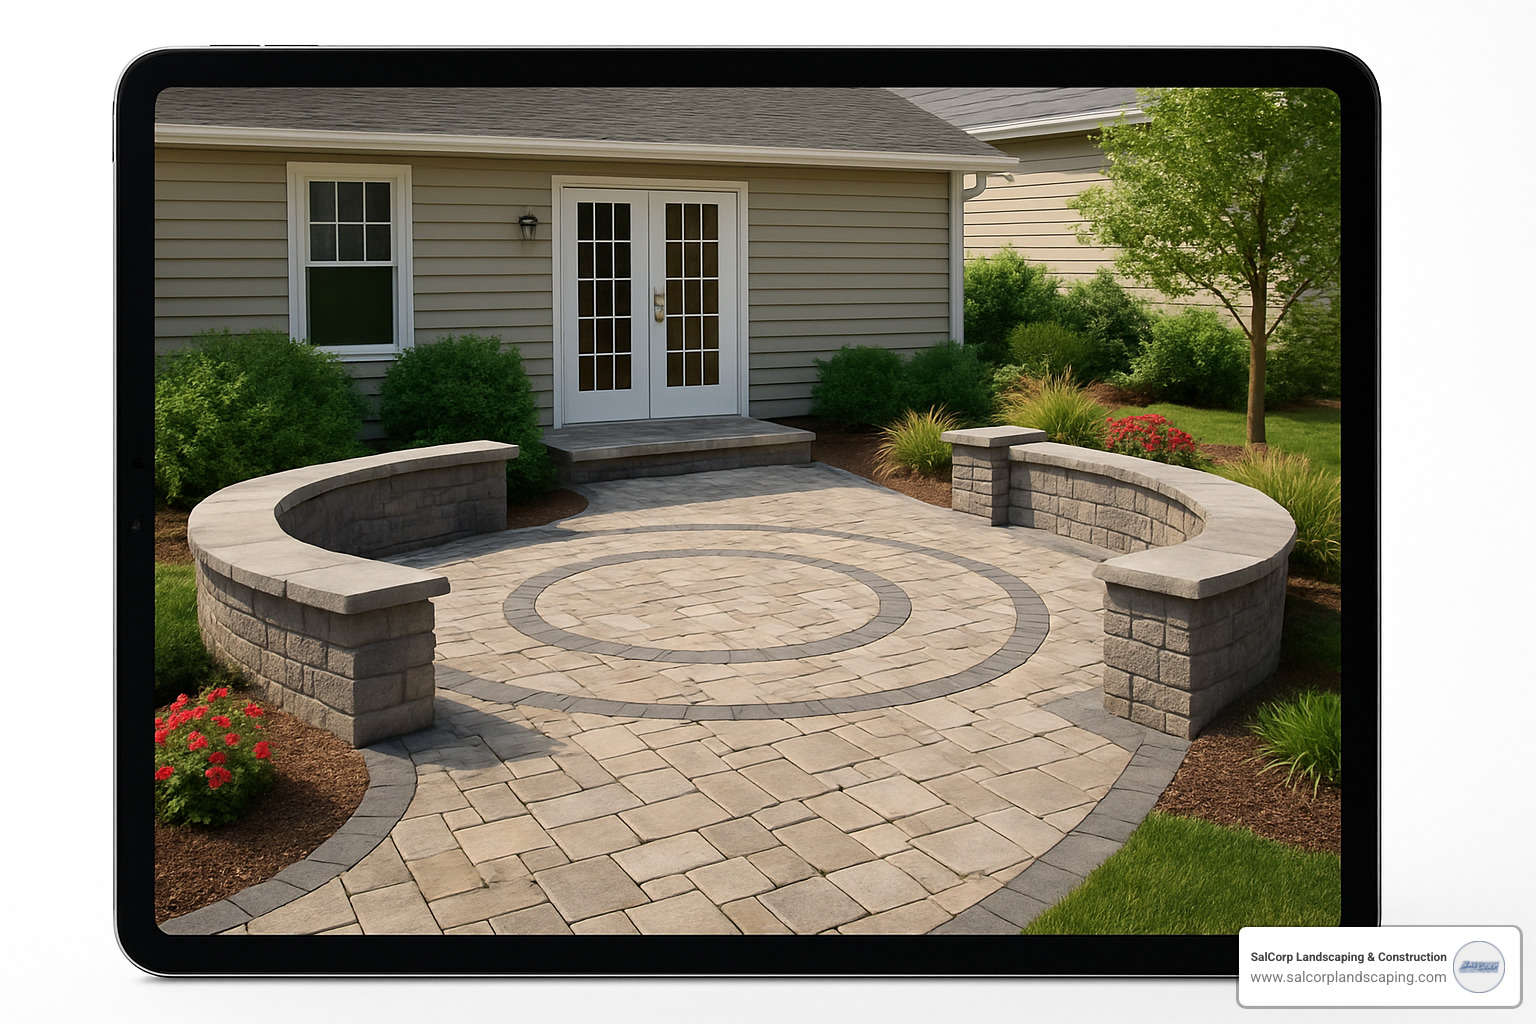
Incorporate seating walls where appropriate. These multi-functional elements provide casual seating without taking up floor space and can help define different areas within your hardscape. At SalCorp Landscaping & Construction, we often include seating walls in our patio designs to maximize functionality.
For outdoor kitchens or fire features, install utility stubs (gas, water, electric) during the base preparation. Proper planning for these elements ensures they integrate seamlessly with your hardscape rather than appearing as afterthoughts.
Consider adding built-in planters to soften hardscape edges and bring greenery into your design. These can be constructed from the same materials as your patio or walls for a cohesive look.
Drainage, Maintenance & Common Mistakes
Ask any hardscape professional about the most critical element of a successful installation, and they’ll likely give you the same answer: drainage. Without proper water management, even the most stunning patio or walkway will fail before its time. The industry gold standard for hardscape installation slope is 1/4 inch per foot (about 2%) away from buildings and structures. This gentle grade is nearly imperceptible to the eye but makes all the difference in preventing water pooling and the damage it causes.
Here in Massachusetts, we face unique challenges with our freeze-thaw cycles. When water seeps into joints and freezes, it expands, potentially causing pavers to heave or crack. That’s why we recommend deeper base preparation in our climate and often suggest polymeric sand for joints, which creates a more water-resistant barrier while still allowing necessary drainage.
Many of our environmentally-conscious clients are turning to permeable paving systems as a sustainable drainage solution. These innovative systems allow rainwater to pass through the surface into a specially engineered base that temporarily stores water before allowing it to gradually infiltrate the surrounding soil. Beyond preventing runoff and erosion, these systems can help homeowners meet local stormwater regulations and contribute to healthier local watersheds.
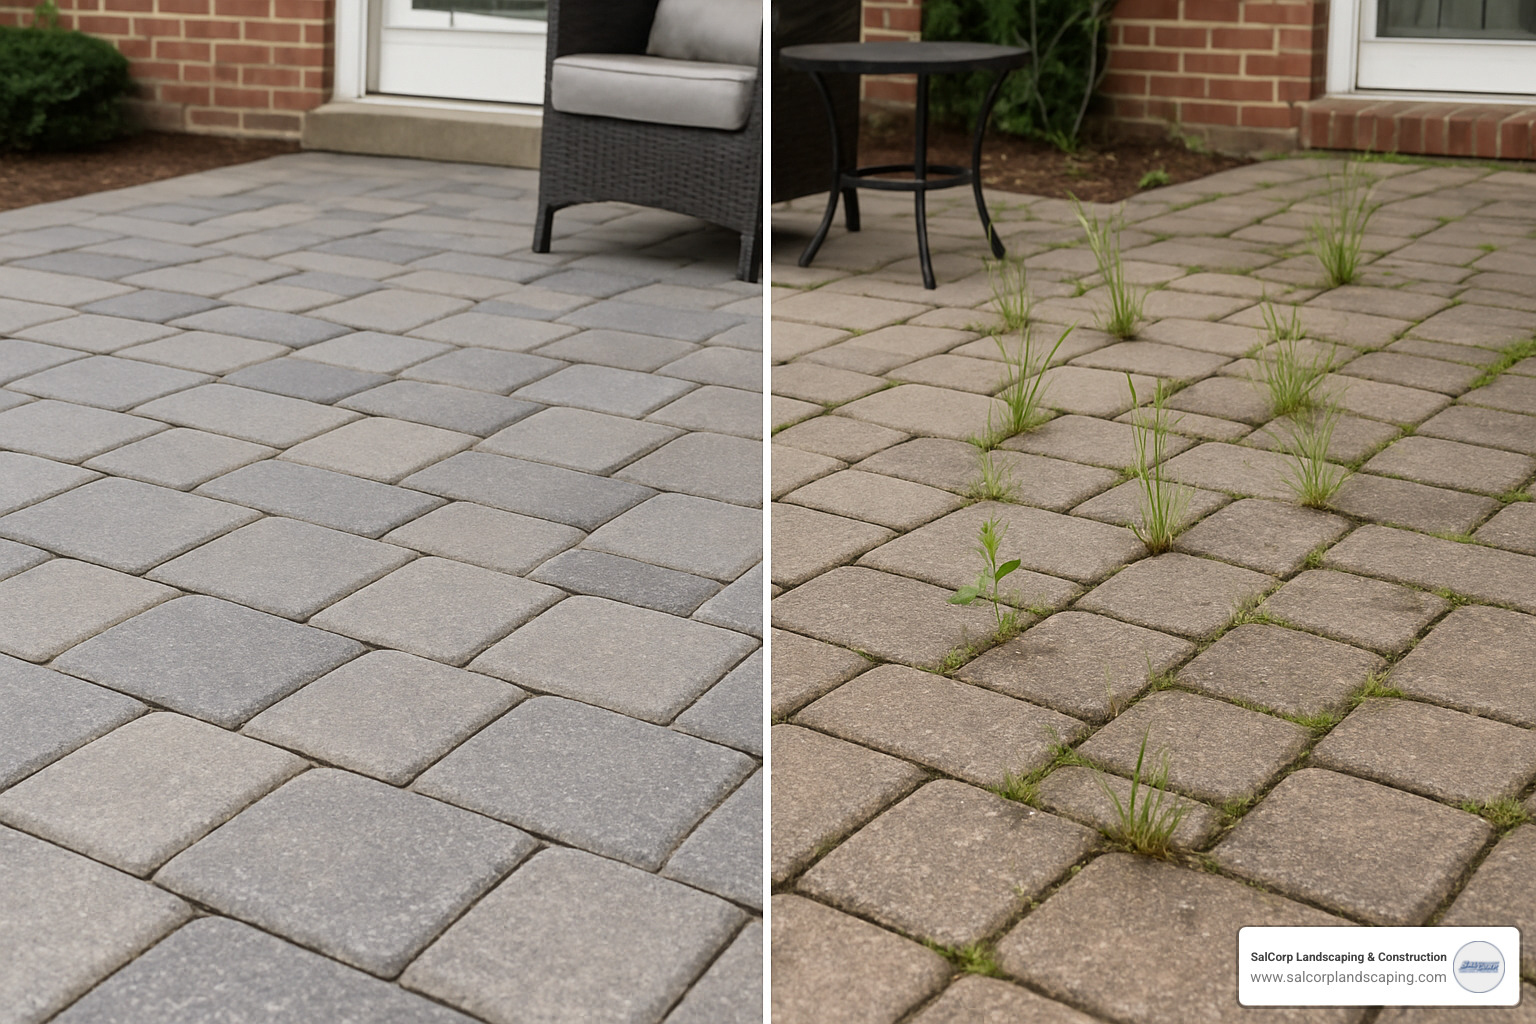
Your hardscape is an investment worth protecting with regular maintenance. Most installations need simple but consistent care:
Sweep surfaces regularly to remove leaves and debris that can stain or encourage moss growth. A quick rinse with a garden hose every few weeks keeps dirt from building up in the first place. Once a year, consider a more thorough cleaning with a pressure washer—but be careful to use appropriate pressure settings for your specific material to avoid damage.
Keep an eye on joint sand levels, especially after heavy rains or pressure washing, and top up as needed. Tackle any weeds promptly before their roots can cause disruption, and follow manufacturer recommendations for resealing (typically every 3-5 years depending on your material and exposure).
In our 20+ years at SalCorp Landscaping & Construction, we’ve been called in to repair countless hardscape installation failures. The same mistakes appear time and again:
Inadequate base preparation tops the list of hardscape sins. Skimping on base depth or proper compaction might save money initially, but it leads to settling, uneven surfaces, and premature failure. We always follow or exceed industry guidelines for base preparation based on your specific application and our New England climate.
Poor drainage planning is next on the list. Water will always find a way, and if you haven’t planned for where it should go, it will create its own path—often with destructive results. Proper grading, drainage features, and water management should never be afterthoughts.
Material mismatches occur when homeowners select products unsuited to our climate or specific application. For instance, some beautiful natural stones can’t withstand our freeze-thaw cycles and will spall (flake) within a few seasons.
Joint issues arise from improper spacing or filling. Joints that are too tight can cause pavers to chip at the edges as they expand and contract, while poorly filled joints invite weeds and allow pavers to shift.
Forgotten edge restraints might seem minor, but without proper edging, the perimeter of your hardscape will gradually spread outward, causing the entire installation to loosen and fail over time.
Long-Term Care Checklist
Caring for your hardscape doesn’t require complicated procedures, but it does benefit from seasonal attention. Here’s how we recommend maintaining your investment throughout the year:
Spring is the perfect time for a thorough inspection after winter’s challenges. Look for any pavers that have heaved or settled and address these issues promptly. Give surfaces a good cleaning with appropriate pressure washing to remove winter grime. Check joint sand levels and replenish where needed. Don’t forget to inspect drainage systems and clear any debris that might block water flow.
Summer maintenance focuses on prompt stain removal. Those barbecue drips and popsicle spills are much easier to clean when fresh! Keep an eye out for weeds trying to establish in or around your hardscape and address them before their roots cause damage. An occasional rinse with clean water removes dust and pollen that can dull your hardscape’s appearance.
Come Fall, regular leaf removal prevents staining and keeps drainage paths clear. If your hardscape is due for sealing (typically every 3-5 years), fall’s moderate temperatures make it an ideal time. Before winter arrives, check that all drainage is functioning properly to prevent ice damage during freeze-thaw cycles.
During Winter, protect your investment by using plastic snow shovels rather than metal ones that can scratch surfaces. Apply ice melt products sparingly and choose options compatible with your specific hardscape material. For newly installed hardscapes, avoid deicers entirely during the first winter to prevent potential damage while the installation is still settling.
Repair & Refresh Options
Even with perfect installation and maintenance, your hardscape may eventually need some attention. The good news? Most issues can be addressed without starting from scratch.
Lift and relay is one of the biggest advantages of segmental paving systems over poured concrete. If an area has settled or heaved, we can lift the affected pavers, fix the base issue, and reinstall them—good as new and perfectly level.
Paver replacement allows us to swap out damaged pieces without disturbing the surrounding area. This is why we always recommend purchasing 5-10% extra material during initial installation and storing it for future repairs.
Joint re-sanding provides a quick refresh when joint material has eroded or become compromised. Fresh polymeric sand can restore stability and give your patio or walkway a crisp, well-maintained appearance.
As your needs evolve, patio extension lets you expand your outdoor living space. While matching existing materials can sometimes be challenging, our experienced team can often create seamless transitions between original and new sections.
For hardscapes showing their age through staining or dulling, professional cleaning and sealing can restore the original vibrancy without major reconstruction. This relatively simple service can make a dramatic difference in your hardscape’s appearance.
Budgeting, Timelines & When to DIY vs Hire
Money matters when it comes to hardscape installation, and setting realistic expectations from the start helps ensure your outdoor dreams don’t turn into financial nightmares. Let’s talk about what drives costs and how to plan for a successful project.
The biggest factor affecting your budget? Material selection. Natural stone creates a stunning, timeless look but typically costs significantly more than manufactured pavers. Gravel represents your most budget-friendly option, though it offers a different aesthetic and functionality. Some materials require more specialized installation techniques, which affects labor costs too.
“The most beautiful materials in the world won’t look good if they’re installed incorrectly,” notes Sal Musto, owner of SalCorp Landscaping. “The installation process is where quality really shows.”
Site access plays a surprisingly large role in your project costs. When trucks and equipment can drive right up to your installation area, work proceeds efficiently. But if materials need to be wheelbarrowed through narrow gates or around obstacles, labor time (and costs) increase dramatically. Similarly, sloped sites require more extensive grading and preparation than flat areas, adding to the bottom line.
Those gorgeous curves, intricate patterns, and multi-level designs you’ve pinned? They’re absolutely achievable—but they add complexity that impacts both material and labor requirements. Built-in features like lighting, fire pits, or water elements lift your space but require additional expertise and materials.
When considering the DIY route versus hiring professionals, look beyond the hourly labor rate. DIY projects often end up costing more than expected when you factor in equipment rental, materials purchased at retail prices (versus contractor discounts), and the potential for costly mistakes. Plus, there’s the time factor—professionals can typically complete in days what might take a homeowner weeks of weekends.
For professional hardscape installation, you can generally expect these timeframes:
– Small walkway or patio (under 200 square feet): 2-4 days
– Medium patio with simple features (200-500 square feet): 1-2 weeks
– Large comprehensive project with multiple features: 3-4 weeks or more
Smart homeowners build in a contingency of 10-20% for both budget and timeline. This buffer accommodates unexpected challenges like hidden rocks, poor drainage areas, or those “while we’re at it” design improvements that often emerge during installation.
The good news? Quality hardscaping delivers impressive returns. Industry statistics show that well-designed outdoor living spaces can increase home values by 8-20%. Even more valuable is the everyday enjoyment these spaces bring to your family life—the morning coffee on your new patio or the memories made around your fire pit can’t be measured in dollars and cents.
At SalCorp Landscaping & Construction, we believe in transparent pricing and realistic timelines. As a Massachusetts-based, owner-operated business with over two decades of experience, we take pride in delivering exceptional value without surprises.
Estimating Your Hardscape Installation Budget
Creating a ballpark budget starts with basic math: measure the areas you plan to hardscape and multiply by the approximate cost per square foot for your chosen materials. Group different areas by function (patio, walkway, wall) since materials and installation requirements vary.
Material costs fluctuate based on several factors. Natural stone typically costs more than manufactured pavers, and within each category, there are standard and premium options. Local materials generally cost less than imported varieties, and specialty finishes like tumbled edges or textured surfaces add to the price.
The beautiful stones or pavers you see are just the tip of the iceberg. Your budget must include:
Base materials form the foundation of your installation—typically crushed stone and sand. Edge restraints keep everything in place over time. Joint filling materials like polymeric sand prevent weed growth and insect nesting. Drainage components ensure water moves away from your home and hardscape.
Don’t forget to account for those special touches that transform a basic patio into an outdoor living room:
Lighting adds safety and ambiance, typically costing between $10-30 per linear foot installed. Steps connect different levels of your landscape, ranging from $100-300 per step depending on materials and width. Seating walls provide casual seating without taking up floor space, generally running $150-450 per linear foot. Fire features create a natural gathering spot, with costs ranging from $1,500-7,500 depending on complexity.
For larger projects, consider financing options like home improvement loans, home equity lines of credit, or manufacturer financing programs. Many of our clients find that phasing projects over several seasons helps manage costs while still working toward their complete vision.
Selecting the Right Pro
The contractor you choose will ultimately determine whether your hardscape installation is a source of pride or problems for years to come. Here’s how to make this crucial decision:
First, verify credentials and experience. Any contractor worth considering should have proper licensing and insurance—this protects both you and them. Look for industry certifications or evidence of continuing education, which demonstrates commitment to best practices. Specific experience with your desired materials and features matters tremendously, as different hardscape elements require different expertise. And longevity counts—companies with at least five years in business have proven they can weather economic ups and downs.
Next, examine their portfolio carefully. Request to see projects similar to what you’re planning, including before and after photos that show the change. If possible, ask to see examples of work completed several years ago—this reveals how their installations hold up over time. Quality hardscaping should last decades with proper maintenance.
Finally, check client testimonials and references. Read online reviews across multiple platforms like Google, Houzz, and Facebook. Don’t hesitate to ask for references from past clients, particularly those whose projects were completed a few years ago. If possible, visit completed projects in person—this gives you the best sense of craftsmanship and attention to detail.
At SalCorp Landscaping & Construction, we welcome this kind of thorough vetting. As an owner-operated business serving Massachusetts communities for over 20 years, we maintain direct oversight of every project from design through installation. This hands-on approach ensures consistent quality and responsive communication throughout your project.
Ready to explore designs for your outdoor space? Visit our Hardscaping Services page or check out our specialized Walkway Installation services to see how we can transform your property.
Frequently Asked Questions about Hardscape Installation
How deep should my patio base be?
When it comes to hardscape installation, base depth isn’t a one-size-fits-all answer. Here in Massachusetts and similar cold-climate regions, we need to account for those freeze-thaw cycles that can wreak havoc on improperly installed hardscapes.
For walkways, we typically recommend 6-8 inches of base material. This provides enough stability for foot traffic while protecting against frost heave. Patios generally need a bit more—about 8-10 inches of base material—since they’re larger surfaces that need to stay perfectly level for furniture and gatherings.
Driveways require the deepest base at 10-12 inches because they bear the weight of vehicles day after day. These measurements include both the crushed stone layer (usually 4-6 inches) and the bedding sand layer (about 1 inch) that sits directly under your pavers or stones.
If your property has clay-heavy soil or particularly poor drainage, we might suggest adding geotextile fabric beneath the base. This simple addition prevents your crushed stone from slowly sinking into the soil below—a small step that can add years to your hardscape’s life.
Can permeable pavers handle New England winters?
I get this question all the time, and the answer is a resounding yes! Permeable pavers actually perform exceptionally well in our tough New England winters when properly installed.
The secret lies in their ability to manage water. Traditional hardscapes can trap water that freezes, expands, and causes damage. Permeable systems allow that water to filter through into a specially designed base of clean, open-graded stone with plenty of void spaces. This means less standing water to freeze and less chance of frost heave damaging your beautiful patio or driveway.
The installation process differs significantly from conventional pavers. We use larger, clean stone without fine particles to create those essential void spaces for water storage. Getting the right depth and compaction level is crucial—this isn’t a place to cut corners if you want your permeable system to perform through our Massachusetts winters.
During snow season, it’s best to keep metal plow blades slightly above the surface to avoid scraping out the special joint material. And while it might be tempting to throw down lots of salt when things get icy, try to use it sparingly as it can affect the system’s infiltration rate over time.
We’ve installed dozens of permeable paver systems throughout Massachusetts that have weathered multiple harsh winters without issue. They’re an excellent investment for both environmental benefits and long-term durability.
What maintenance is needed the first year?
The first year after hardscape installation is a bit like bringing home a new baby—it needs some extra attention while it settles in. For paver installations, patience is key with sealing. Wait at least 30 days before applying any sealant to allow efflorescence (that whitish powder that sometimes appears on concrete products) to emerge naturally so it can be cleaned off first.
Around the 3-6 month mark, don’t be alarmed if you notice some joint sand has disappeared—this is normal settling. Simply sweep in some additional sand to keep those joints full and stable. Keep an eye out for any pavers that might settle unevenly and address these promptly before they become more significant issues.
For natural stone installations, tackle any mortar haze within the first week while it’s still easy to remove. After about a month, apply an appropriate sealer if recommended for your specific stone type. Different stones have different porosity levels and sealing needs—we always provide specific guidance for the materials in your project.
For all hardscapes, the first heavy rainstorm is actually an important test. Watch how water flows across and away from your new installation. Are there any puddles forming? Is water draining away from your home’s foundation? Addressing any drainage issues early prevents bigger problems down the road.
Be gentle with your new hardscape during its first winter. Avoid harsh deicing chemicals if possible, and when removing snow, use a plastic shovel or set your snowblower blade slightly higher to prevent scratching or chipping.
The care you take during this first year sets the foundation for decades of enjoyment. At SalCorp Landscaping & Construction, we don’t disappear after installation—we provide all our clients with customized maintenance guidelines and remain available to answer questions as your hardscape matures through its first year and beyond.
Conclusion
A thoughtfully designed and expertly executed hardscape installation does more than just beautify your property – it transforms your outdoor living experience. From those first planning sketches to the final touches of your finished patio or walkway, each step builds toward creating a space where memories will be made for years to come.
The value of quality hardscaping extends far beyond curb appeal. Well-constructed patios, walkways, and retaining walls significantly boost your property’s market value – industry data shows increases of up to 20% in home selling prices with professional outdoor improvements. But the real payoff comes in daily life: reduced lawn maintenance, better drainage, erosion control, and expanded living space that connects you with the outdoors in all seasons.
Today’s homeowners are increasingly mindful of environmental impact, and modern hardscaping addresses these concerns beautifully. Permeable paving systems manage rainwater naturally, reducing runoff while replenishing groundwater. Strategically placed hardscapes can create microclimates for drought-resistant plantings, lowering water usage and maintenance needs. Your outdoor space can be both beautiful and environmentally responsible.
At SalCorp Landscaping & Construction, we’ve spent over two decades perfecting our approach to hardscape installation throughout Massachusetts. Being owner-operated means we take personal pride in every walkway, patio, and retaining wall we build. Our clients appreciate working with one dedicated team from initial concept through final installation – no handoffs, no communication gaps, just seamless service and exceptional results.
Whether you’re dreaming of a simple garden path that winds through your yard or envisioning a complete outdoor living space with a kitchen, fire feature, and multi-level entertaining areas, we bring the expertise and equipment to make it happen. Our commitment to quality materials, proper installation techniques, and meticulous attention to detail ensures your investment will stand strong through New England’s challenging seasons.
Ready to transform your outdoor space? We invite you to explore our Backyard Patio Design options and request your free consultation. Let our experienced team guide you through creating a hardscape that perfectly balances beauty, function, and durability – a space that improves both your property and lifestyle for many years to come.

