Installing Underground Irrigation Systems: Top 5 Easy Steps

Installing underground irrigation systems can make a significant difference in maintaining a lush, healthy lawn or garden with minimal manual effort. It offers the following benefits:
- Conserves water through targeted delivery
- Reduces soil erosion and nutrient runoff
- Improves lawn health and aesthetic appeal
- Saves time compared to manual watering
For property managers and homeowners in Massachusetts, investing in such systems ensures a safe, visually appealing environment with minimal downtime.
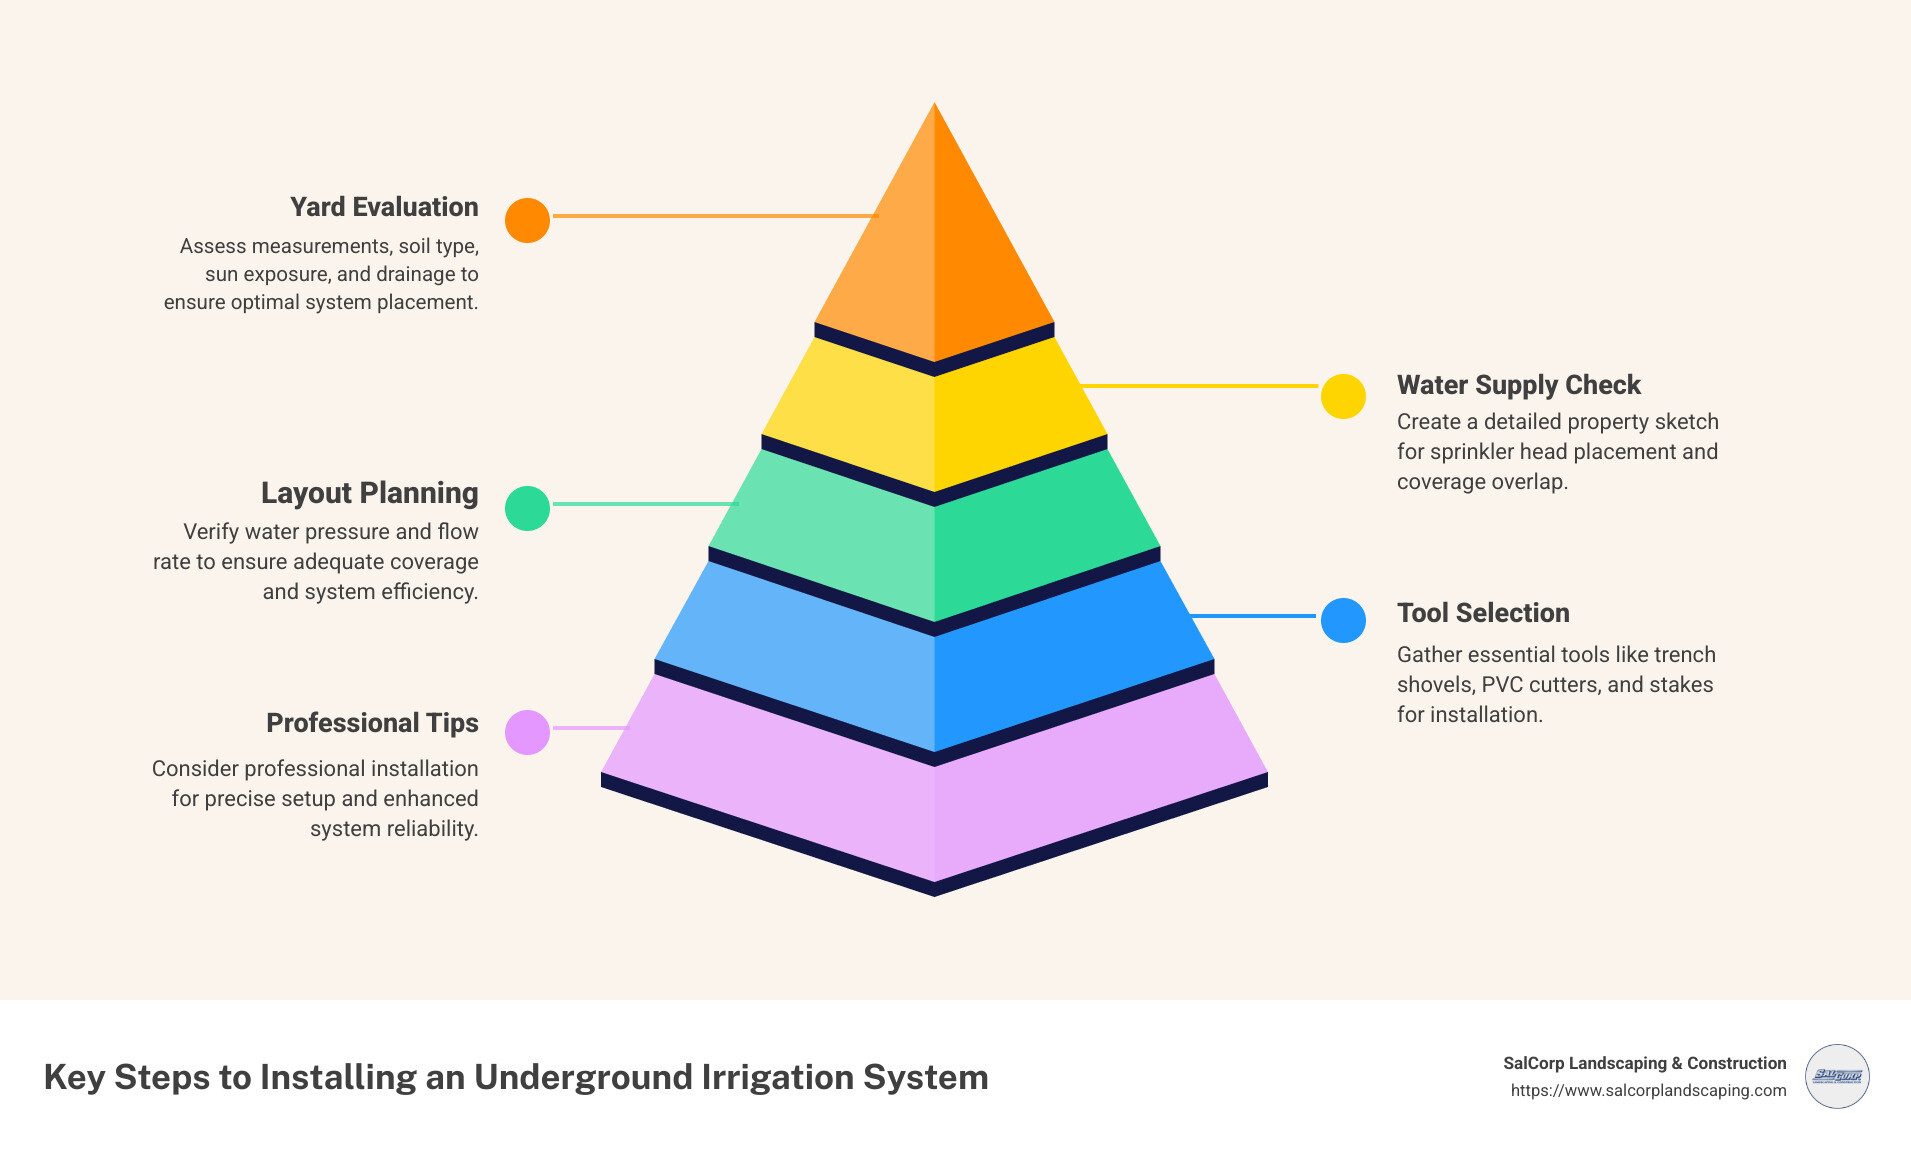
If you’re considering installing underground irrigation systems on your own, it requires careful planning, from evaluating your yard to choosing the right tools. While DIY installations are possible with time and effort, enlisting professional help can guarantee precise installation, maximizing efficiency and reliability.
I’m Sal Musto. With over two decades of experience in landscaping and hardscaping, I’ve guided countless installations of underground irrigation systems in the Massachusetts area. This experience ensures every system is designed for optimal performance and durability.
Planning Your Underground Irrigation System
Evaluating Your Yard
Before diving into installing underground irrigation systems, it’s crucial to evaluate your yard. Start by measuring the area where you plan to install the system. This helps in determining the length of pipes and the number of sprinkler heads needed.
Soil Type:
Different soils absorb and retain water differently. Sandy soils drain quickly, requiring more frequent watering, while clay soils retain water longer, meaning less frequent watering is needed. Knowing your soil type helps in planning the watering schedule and choosing the right sprinkler heads.
Sun Exposure and Drainage:
Identify areas that get a lot of sun—they’ll need more water. Also, check for spots with poor drainage. These areas might require special attention to prevent water pooling and plant damage. Evaluating these elements ensures your irrigation system is effective and efficient.
Checking Water Supply and Pressure
Understanding your water supply is vital for a successful installation.
Water Pressure and Flow Rate:
Use a pressure gauge to measure water pressure at an outdoor faucet. This tells you how far and how efficiently your sprinklers can spray. Most homes have a pressure between 40 and 70 PSI. Also, measure the flow rate in gallons per minute (GPM) to ensure your system can handle the water demand.
Permits and Utility Lines:
Before digging, check if you need a permit. Always call 811 to mark underground utility lines to avoid costly and dangerous mistakes.
Creating a Layout
With your measurements and assessments in hand, it’s time to sketch your property.
Property Sketch and Sprinkler Head Placement:
Draw a to-scale map of your yard, including the house, trees, and gardens. Mark where you plan to place sprinkler heads. Overlap the spray patterns to ensure 100% coverage and avoid dry spots.
Overlap Coverage:
Head-to-head coverage is key. Each sprinkler should reach the next, ensuring no area is left dry. This is crucial for maintaining a healthy lawn.
Planning is the backbone of installing underground irrigation systems. A well-thought-out plan saves time, money, and effort, ensuring your system works efficiently from day one. Now, let’s move on to the tools and materials you’ll need for a successful installation.
Tools and Materials Needed
When it comes to installing underground irrigation systems, having the right tools and materials is half the battle. Let’s break down what’s essential for a smooth installation process.
Essential Tools
- Trench Shovel:
A trench shovel is your go-to tool for digging narrow trenches where pipes will be laid. Its long, narrow blade makes it perfect for cutting through soil with precision. - Hacksaw and PVC Cutter:
You’ll need a hacksaw or a PVC cutter to trim pipes to the desired length. A PVC cutter is particularly useful for making clean, straight cuts quickly. - String Line and Stakes:
Use string lines and stakes to map out the path for your pipes and sprinkler heads. This helps maintain straight lines and ensures accurate placement.
Key Components
- PVC Pipe and Poly Pipe:
PVC pipe is the most common choice for irrigation systems due to its strength and durability. It’s ideal for areas with stable temperatures. Polyethylene (poly) pipe, on the other hand, is flexible and better suited for regions with colder climates, as it can withstand freeze cycles. - Connectors, Fittings, T-Joints, and Elbows:
These are vital for connecting and directing the pipes. T-joints and elbows help in creating the necessary angles and branches in your system, ensuring water reaches all parts of your lawn. - Control Valves and Risers:
Control valves regulate water flow to different zones in your irrigation system. Risers connect the pipes to the sprinkler heads, elevating them to the proper height for maximum coverage. - Sprinkler Heads:
Choose sprinkler heads based on the water requirements of your plants and the spray pattern needed. Options vary from fixed spray to rotating heads, each serving different coverage needs. - Backflow Preventer:
This device is crucial for preventing contaminated water from flowing back into your clean water supply. It’s a must-have in most regions to comply with local codes. - Timer:
A programmable timer automates your irrigation schedule, ensuring your lawn gets watered even when you’re not around. It connects to the control valves and allows you to set specific watering times for each zone.
Having these tools and materials on hand will make the installation process smoother and more efficient. With everything ready, you can now move on to the next step: digging trenches and laying your irrigation system.
Step-by-Step Installation Guide
Digging Trenches
Before you start digging, it’s crucial to mark the locations for your trenches and sprinkler heads. Use string lines and stakes to outline where the trenches will go. This ensures precision and helps you avoid zigzagging paths that waste materials.
Trench Depth:
Trenches should be 4 to 12 inches deep, depending on your local climate and frost line. The depth ensures that pipes are safe from lawn equipment and temperature changes.
Using a Trenching Machine:
For efficiency, consider renting a gas-powered trenching machine. Most rental companies offer delivery and pick-up services, making this step even more convenient. This machine will save you time and effort, especially for larger yards.
Connecting to the Water Source
To connect your irrigation system to the main water line, you’ll need to turn off the water supply at the meter. Cut into the main water line and splice in a tee fitting using PVC cement if the line is PVC, or solder a copper tee if it’s a copper line.
Tip: If you’re not confident in handling this step, hiring a professional plumber is advisable to ensure a secure connection.
Installing Zone Valves
Zone valves control water flow to different parts of your yard. Dig a trench from the main water line to your designated valve box location. This trench should end in a hole about 18 inches deep and 2 to 3 feet long, lined with gravel for drainage.
Valve Box Setup:
Place the valve box flush with the grass surface. Assemble the manifold and attach the zone valves according to the manufacturer’s instructions. Connect the manifold to a backflow-prevention device, then run 1-inch PVC pipe from the main line to the manifold.
Lay 24-volt underground wire from the valve box to your timer location. This wire will connect to each valve, allowing them to be controlled remotely.
Laying Pipes and Installing Sprinklers
Lay out PVC pipes in the trenches, connecting them with couplings and PVC cement. Use tee fittings to branch off pipes to sprinkler heads, attaching them with flexible piping for easy adjustment.
Installing Pop-Up Sprinklers:
Attach pop-up sprinklers to the ends of the flexible piping. Ensure that the sprinklers are at ground level or slightly above for optimal coverage. Install the appropriate spray nozzle for each sprinkler as per your layout plan.
Flushing and Testing the System
Before finalizing your installation, it’s important to flush the system to remove any debris. Turn on the water supply and let it run through the pipes until all dirt is cleared out.
Testing Zones:
With the system flushed, test each zone individually using your timer. This helps identify any leaks or misaligned nozzles. Adjust the nozzles to ensure they are spraying in the correct direction and covering the intended area.
Once you’re satisfied with the setup and functionality, cover the trenches and complete any final adjustments to your system. Your underground irrigation system is now ready to keep your yard lush and healthy!
Setting Up the Timer and Maintenance Tips
Installing and Programming the Timer
The timer is the brain of your irrigation system. It controls when and how long each zone waters, ensuring your lawn gets the right amount of water without waste.
Mounting the Timer:
Choose a convenient spot on an exterior wall of your house, close to a power source. It’s best to mount it at eye level for easy access. If you’re unsure about the electrical work, hiring a licensed electrician can ensure a safe setup.
Wiring Instructions:
Connect the 24-volt wires from your zone valves to the timer. Strip the insulation from the wire ends and attach them to the timer terminals, following the manufacturer’s instructions. This step is crucial for the timer to control each zone accurately.
Setting the Schedule:
Program the timer according to your lawn’s needs. Consider factors like soil type, sun exposure, and local water restrictions. Most timers allow you to set different schedules for each zone, so tailor the watering to suit different areas of your yard. Run a test cycle to ensure everything operates smoothly and adjust any sprinkler heads that are off course.
Regular Maintenance Tips
Proper maintenance extends the life of your irrigation system and ensures efficient operation.
Inspecting Heads:
Regularly check each sprinkler head for clogs or damage. A clogged head can lead to uneven watering, while a damaged one might cause leaks. Cleaning or replacing faulty heads as needed can prevent bigger issues down the line.
Checking for Leaks:
Leaks not only waste water but can also increase your water bill significantly. Look for signs like water pooling in your yard or areas that are consistently wetter than others. Fix leaks promptly to avoid further damage.
Winterizing the System:
In colder climates, winterize your system to prevent freezing damage. If your system has auto-drain valves, turn off the water supply and open the valves to let excess water drain. For systems with manual drains, use an air compressor to blow out the water from each zone. Make sure the timer is turned off to prevent accidental watering during the winter months.
By following these maintenance tips, you can ensure your underground irrigation system operates at peak performance all year round. This will keep your landscape lush and vibrant, making your outdoor spaces a source of pride and enjoyment.
Frequently Asked Questions about Installing Underground Irrigation Systems
Can I install my own underground sprinkler system?
Yes, you can! Installing an underground sprinkler system is a do-it-yourself project that many homeowners tackle. However, it’s important to note that it requires a fair amount of time and effort. The complexity of the project depends on the size of your yard and your experience with similar home improvement tasks.
- Time and Effort: Expect to spend more than a day on this project, especially if you’re new to it. Planning, trenching, and installing all take time.
- Yard Size: Larger yards will require more sprinkler heads and longer pipe runs, increasing both the time and effort needed.
If you enjoy hands-on projects and have the patience to follow detailed instructions, this could be a rewarding challenge. However, if you’re short on time or prefer to avoid manual labor, hiring a professional might be a better option.
How deep should irrigation lines be buried?
The depth of your irrigation lines is crucial for both safety and functionality.
- Trench Depth: Typically, trenches should be dug 6 to 12 inches deep. This depth protects the pipes from lawn equipment and ensures that the sprinkler heads can retract properly.
- Safety Considerations: Before digging, always call 811 to have utility lines marked. This prevents accidental damage to underground utilities.
Using a rototiller can help loosen the soil, making it easier to dig your trenches by hand or with a trenching machine. Ensure that the trenches are level to avoid water pooling in lower areas, which can reduce the system’s efficiency.
What is the best pipe for underground irrigation systems?
Choosing the right pipe is vital for the longevity and efficiency of your system.
- Polyethylene Pipe: Known for its flexibility, polyethylene is often preferred in colder climates. Its ability to bend around obstacles and withstand freeze-thaw cycles makes it a popular choice for many homeowners.
- Special Situations: In regions with rocky soil or frequent freeze cycles, polyethylene’s flexibility offers a clear advantage over rigid PVC pipes. It can adapt to natural terrain variations with fewer fittings, reducing potential leak points.
Before making a decision, consider your local climate and soil conditions. Consulting with a local expert or a landscape contractor can provide insights specific to your area.

By considering these factors, you can confidently choose the right materials and techniques for your underground irrigation system, ensuring it serves you well for years to come.
Conclusion
Installing underground irrigation systems can transform your landscape, making it lush and vibrant while saving time and water. Whether you decide to start on this as a do-it-yourself project or hire a professional, the benefits are clear. A well-planned and executed irrigation system ensures your yard receives the optimal amount of water, reducing waste and promoting healthy plant growth.
SalCorp Landscaping & Construction is here to make the process seamless. With over 20 years of experience in Massachusetts, we specialize in designing and installing customized irrigation systems that cater to your property’s unique needs. Our owner-operated approach ensures that every project meets our high standards, providing you with a reliable and efficient system.
If you’re considering professional help, our team at SalCorp can handle everything from initial planning to final installation with expertise and care. We use top-of-the-line products and own our machinery, allowing us to complete projects efficiently and pass savings on to you.
Ready to improve your landscape with an underground irrigation system? Contact SalCorp Landscaping & Construction today to discuss your needs and let us help bring your vision to life.
