Re Sodding Lawn: Top Guide to a Perfect Yard 2025

For many homeowners and property managers, achieving a lush green lawn is a dream that often seems out of reach. Whether due to harsh weather or simple wear and tear, lawns can become patchy and lifeless. Re sodding lawn is an effective solution to restore that brilliant green expanse. Here’s a quick look at why re-sodding might be the best approach for you:
- Instant Change: Immediate improvements in curb appeal.
- Fewer Weeds: High-quality sod competes well with weeds.
- Quick Set-Up: Ready for use in just 2 to 3 weeks with proper care.
At SalCorp Landscaping & Construction, we understand both the aesthetic and functional importance of a vibrant lawn. I’m Sal Musto, and with over two decades of experience, I ensure that our team provides precise and efficient re sodding lawn solutions custom to Massachusetts’ unique climate. Whether you want a peaceful retreat or a lively area for gatherings, we can help create the lawn of your dreams.
Related content about re sodding lawn:
– average cost of sodding a yard
– sod installation cost per square foot
– lawn service sod installation
Evaluating Your Lawn Condition
Before diving into the re sodding lawn process, it’s crucial to evaluate your current lawn condition. This ensures that your efforts lead to a lush, healthy lawn. Here’s how to start:
Current Lawn Condition
Take a walk around your yard. Look for signs of wear, like bare patches, excessive weeds, or discolored grass. If over 50% of your lawn is weeds, it’s a sign that re-sodding might be the best option. Less than that, and you might consider overseeding instead.
Soil Test

Testing your soil is a key step. Use a soil test kit to check the pH and nutrient levels. This will help you understand what your soil might be lacking. Ideally, do this at least a month before re-sodding. This allows time to amend the soil based on the results.
Nutrient Availability
Once you have your soil test results, assess the nutrient availability. If your soil lacks essential nutrients, consider adding compost, fertilizer, or other amendments. A nutrient-rich base is vital for sod to establish roots and thrive.
Weed Assessment
Weeds compete with grass for nutrients, sunlight, and water. Identify and assess the extent of weed invasion in your lawn. This will help you decide whether to remove them manually or use an herbicide. Be careful with alternative weed killers like vinegar, as they can harm your yard if not used properly.
By thoroughly evaluating these aspects, you’ll set the foundation for successful re-sodding. This step ensures that your new sod has the best chance to grow into a dense, healthy turf.
Next, we’ll guide you through the advantages and disadvantages of re-sodding to help you make an informed decision.
Advantages and Disadvantages of Re-Sodding
Re-sodding your lawn can transform your outdoor space quickly and effectively. However, like any landscaping project, it comes with its pros and cons. Let’s break them down.
Advantages of Re-Sodding
Instant Results
One of the biggest perks of re-sodding is the immediate change. Unlike overseeding, which can take weeks or even months to show results, sod provides an instant lush, green lawn. This can significantly boost your home’s curb appeal overnight.
Few Weeds
High-quality sod is grown under controlled conditions, which means it typically has very few weeds. This gives your new lawn a head start in outcompeting any weeds that try to sprout up, leading to a healthier and more uniform turf.
Quick Establishment
With consistent watering, sod establishes roots in just 2 to 3 weeks. This means your lawn will be ready for foot traffic, pets, and outdoor activities in no time. It’s a great option if you’re looking to host gatherings or simply enjoy your yard sooner rather than later.
Disadvantages of Re-Sodding
Costly
Re-sodding is generally more expensive than overseeding. The cost of purchasing sod can add up, especially if you have a large area to cover. Additionally, hiring professionals for installation can further increase expenses.
Labor Intensive
Installing sod is labor-intensive. It requires careful preparation, including removing old grass, tilling the soil, and laying each sod piece precisely. If you’re not experienced with this process, it might be worth considering professional help to ensure a flawless finish.
While re-sodding offers quick and impressive results, it’s important to weigh these benefits against the costs and effort involved. Making the right choice depends on your budget, timeline, and the current state of your lawn.
In the next section, we’ll provide a step-by-step guide to re-sodding your yard, ensuring you have all the information needed to achieve a successful installation.
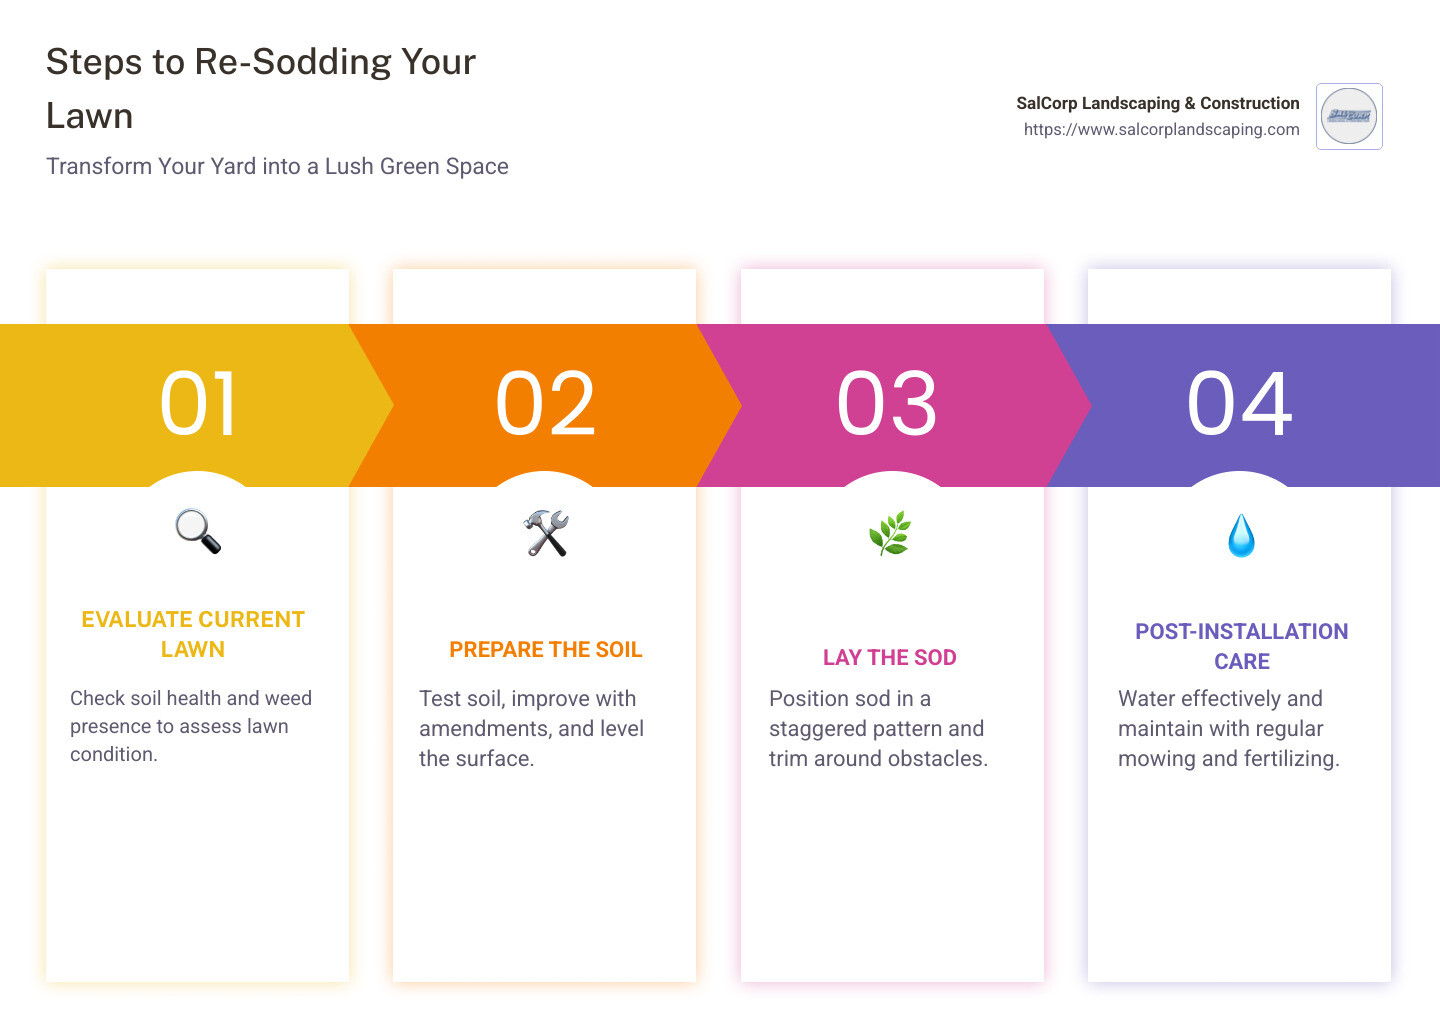
Step-by-Step Guide to Re-Sodding Your Yard
Changing your yard with new sod involves several critical steps. Follow this guide to ensure a successful re-sodding lawn project.
Soil Preparation
Start by assessing your soil’s health. Conduct a soil test to check pH and nutrient levels. This will guide you in choosing the right soil amendments, like compost or fertilizers, to create an ideal growing environment.
Next, till the area using a rotary tiller. This breaks up compacted soil, allowing roots to penetrate deeply. Aim for a loose and level surface. Remove any debris, rocks, or old roots that could hinder sod growth.
Removing Old Grass
To achieve a clean slate, it’s crucial to remove existing grass. Use a sod cutter for efficient removal, ensuring you strip away the entire root system. This prevents the old grass from interfering with the new sod.
If a sod cutter isn’t available, a rotary tiller can also help in loosening the turf. Just be sure to rake away any remaining debris to avoid poisoning the new sod’s roots.
Laying the Sod
Begin by laying the first row of sod along the longest straight edge of your yard, like a driveway or fence. This ensures a straight starting line.
Stagger subsequent rows, cutting the first piece of each new row in half. This brick-like pattern minimizes visible seams and helps the sod knit together more effectively.
Use a sharp sod-cutting knife to trim sod around obstacles, like planting beds or sprinkler heads, for a neat finish.
Watering Techniques
Water the sod immediately after installation to help settle the soil and establish root contact. For the first week, water daily in the morning to avoid evaporation and fungal growth.
In the second week, reduce watering to every other day. By the third week, aim for twice weekly, adjusting for weather conditions. Use a soil probe to check moisture levels and avoid overwatering.
Post-Installation Care
Once your sod is established, regular maintenance is key. Mow the new grass when it reaches 3 inches, using a walk-behind mower set to 2 inches. Bag the clippings for the first mow to prevent clumping.
Apply a starter fertilizer about three weeks after installation to replenish nutrients. Follow up with regular fertilization to maintain a lush, healthy lawn.
If you encounter issues like dry patches, adjust your watering schedule and ensure proper soil contact. For yellowing grass, check for overwatering or nutrient deficiencies and adjust accordingly.
By following these steps, you’ll be on your way to a vibrant, healthy lawn that improves your home’s curb appeal. Next, we’ll discuss how to choose the right sod for your climate, ensuring long-term success for your re-sodded yard.
Choosing the Right Sod for Your Climate
Selecting the right sod is crucial for a successful re-sodding lawn project. The type of grass you choose should thrive in your local climate and match your yard’s conditions.
Cool-Season Grasses
If you live in a region with cold winters and mild summers, cool-season grasses are your best bet. These grasses, such as Kentucky bluegrass, fescue, and ryegrass, grow actively during the cooler months of spring and fall. They are ideal for areas in the Northeast, where they can help avoid weed problems common with spring seeding. Cool-season sod establishes quickly and offers a lush, green appearance even in chilly conditions.
Warm-Season Grasses
For those in warmer climates, like the Southern states, warm-season grasses are more suitable. Options like Bermuda grass, zoysia grass, and centipede grass thrive in hot temperatures and are drought-resistant. These grasses grow best during the warm months and turn brown during winter dormancy. They cannot be grown from seed, making sod a popular choice for a quick and effective lawn change.
Consulting Local Experts
When deciding on the right sod, it’s wise to consult with a local garden center or sod farm. They have the expertise to recommend a blend of two or three turf grasses that suit your area’s specific conditions. These experts can help you choose sod with the ideal color, texture, and hardiness for your region. Make sure to mention any shaded areas in your yard, as this will impact the sod selection process.
Choosing the right sod ensures that your new lawn will thrive, providing a beautiful and robust outdoor space. Next, we’ll address some frequently asked questions about re-sodding to help you steer any uncertainties.
Frequently Asked Questions about Re-Sodding Lawn
Can you put new sod over old grass?
It’s tempting to lay new sod over existing grass to save time. However, this approach is not recommended. For sod to thrive, it needs a proper grade and a healthy root system. Laying sod over old grass can lead to uneven surfaces and poor root establishment, causing your lawn to suffer in the long run.
How do you remove old sod and lay new sod?
Removing old sod is a crucial first step in the re-sodding lawn process. Use a sod cutter or a rotary tiller to remove the existing grass, creating a clean slate for your new lawn. Once the old sod is gone, it’s important to add new soil to improve the base layer, ensuring better root penetration and drainage.
When laying the new sod, start by placing the first row along a straight edge, like a driveway or walkway. Use a staggered pattern, similar to laying bricks, to prevent seams from aligning. This helps the sod knit together more effectively. Trim around obstacles, such as trees or garden beds, using a utility knife for a neat finish. Make sure to determine the direction of each row to maintain a consistent pattern.
Is it better to reseed or resod?
Deciding between reseeding and resodding depends on the current condition of your lawn. If your lawn is over 50% weeds, it might be better to start fresh with sod. This approach provides instant results and a thick, weed-free lawn. However, if your lawn has less than 50% weeds, reseeding can be a cost-effective way to restore it. Reseeding requires more patience and effort, as it takes longer to establish compared to sod.
Both methods have their advantages. Resodding offers immediate improvement in appearance, while reseeding is less labor-intensive and less costly. Your choice should be based on the condition of your lawn and your desired timeline for achieving a lush, green yard.
Conclusion
Changing your lawn into a lush, green paradise is a rewarding journey, and SalCorp Landscaping & Construction is here to guide you every step of the way. With over 20 years of experience, we understand that a beautiful lawn isn’t just about aesthetics—it’s about creating a space for memories, relaxation, and enjoyment.
Long-term Lawn Care
Achieving a perfect lawn doesn’t happen overnight. It requires consistent care and attention. Once your sod is laid, regular maintenance becomes crucial. This includes proper watering, mowing, and fertilizing to ensure your lawn remains healthy and vibrant. By adhering to a consistent care routine, you give your new sod the best chance to thrive.
Regular Maintenance
Regular maintenance is the backbone of a stunning lawn. Just like any other part of your home, your yard needs ongoing care to stay in top shape. This means scheduling regular mowing, checking for pests or diseases, and adjusting your care routine as the seasons change. At SalCorp, we offer customized maintenance plans to suit your lawn’s specific needs, ensuring it stays beautiful year-round.
By choosing SalCorp Landscaping & Construction, you’re not just investing in a lawn; you’re investing in a long-term partnership dedicated to the health and beauty of your outdoor space. Our comprehensive services and commitment to customer satisfaction make us the trusted choice for lawn installation and care in Massachusetts.
Ready to transform your yard? Visit our Lawn Installation Services page to learn more about how we can help you achieve the lawn of your dreams. Together, let’s create an outdoor space that you and your family will cherish for years to come.
