Grass Seed Installation: 10 Powerful Steps for Amazing Results 2025
Why Grass Seed Installation Is Your Path to a Perfect Lawn
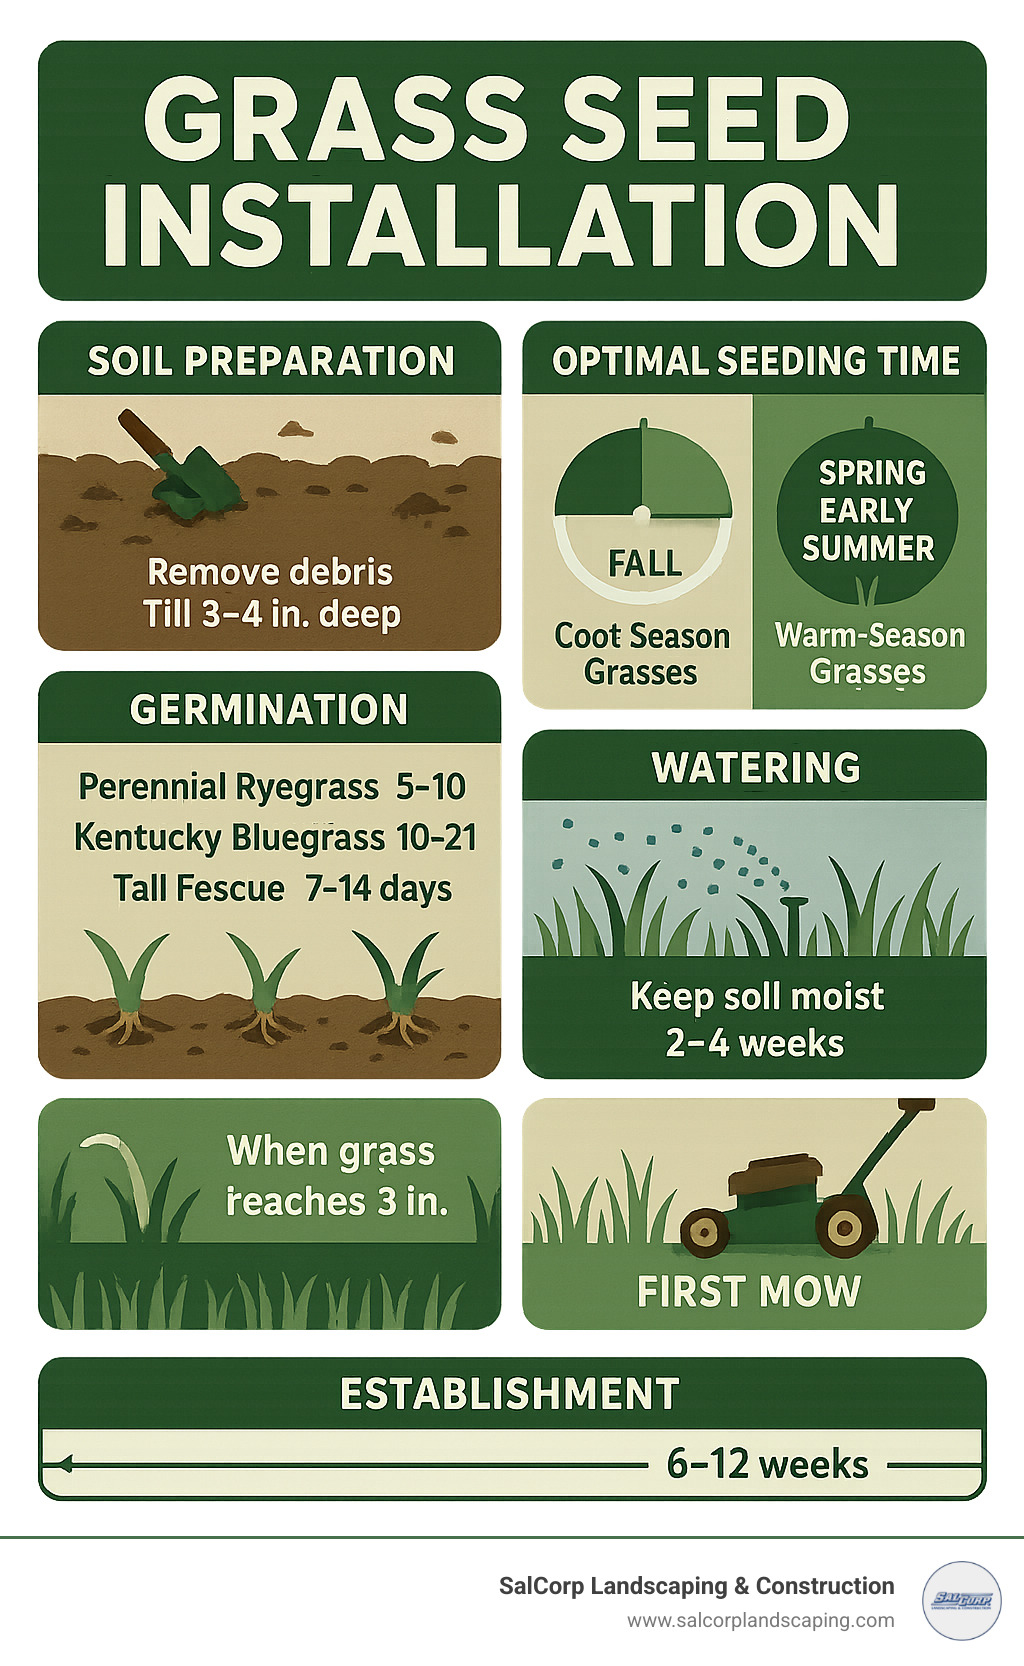
Grass seed installation is the foundation of creating a lush, healthy lawn that improves your property’s curb appeal and value. Whether you’re starting from bare soil or revitalizing an existing lawn, proper installation involves choosing the right seed, timing your planting, preparing the soil, and following proven care practices.
Here’s what successful grass seed installation requires:
- Choose the right seed type – Cool-season grasses (Kentucky bluegrass, tall fescue) for northern climates; warm-season grasses (Bermuda, zoysia) for southern regions
- Time it perfectly – Fall planting for cool-season grasses; spring/early summer for warm-season varieties
- Prepare soil properly – Test pH (target 6.0-7.0), remove debris, till 3-4 inches deep, create firm seedbed
- Apply seed correctly – Use recommended rates (2-6 lbs per 1,000 sq ft), ensure seed-to-soil contact, cover lightly
- Water consistently – Keep soil moist for 2-4 weeks until germination, then transition to deep, less frequent watering
- Protect during establishment – Use straw mulch, avoid foot traffic, delay first mow until grass reaches 3 inches
The process typically takes 6-12 weeks from seeding to full establishment, with germination occurring in 3-30 days depending on grass type and conditions.
Starting a new lawn from seed can save significant money compared to sod installation while giving you more variety options. Research shows that grass seed germination rates typically range from 70% to 90% for high-quality seed.
I’m Sal Musto, owner of SalCorp Landscaping & Construction, and over the past two decades I’ve overseen countless grass seed installation projects throughout Massachusetts, from small residential patches to large commercial properties.
Simple guide to grass seed installation:
Choosing the Perfect Seed Mix
Picking the right grass seed is one of the most important decisions for your lawn’s future. The biggest decision you’ll face is cool-season versus warm-season grasses. Here in Massachusetts, we use cool-season varieties that love temperatures around 60-75°F, including Kentucky bluegrass, tall fescue, and perennial ryegrass.
Warm-season grasses like Bermuda and zoysia thrive above 80°F but go dormant and brown in winter. For New England, stick with cool-season varieties.
When choosing seed, look for the Pure Live Seed (PLS) percentage first. High-quality seed should have a germination rate of at least 85% and minimal weed seed content. You’ll see “blend” (multiple varieties of same species) and “mix” (different species) on packaging – mixes often work better for most homeowners.
Your site conditions should drive your choice. Consider sun exposure, foot traffic, drainage, and pet use when selecting seed.
Which grass seed is best for your yard – this resource guides you toward varieties for your climate zone.
Understanding Grass Species
Kentucky bluegrass creates dense, dark green lawns with underground rhizomes that help repair damage. It needs consistent water and struggles in deep shade or dry conditions. Germination takes 2-3 weeks.
Tall fescue is drought-tolerant with deep roots and handles heavy foot traffic well. Newer varieties have improved texture while maintaining durability.
Perennial ryegrass germinates quickly (3-5 days) and establishes fast, making it perfect for overseeding. It handles moderate traffic but isn’t as cold-hardy as other cool-season options.
Bermuda grass thrives in hot, sunny conditions and spreads aggressively. It goes dormant in winter and needs warm soil (above 65°F) to germinate.
Zoysia creates thick, carpet-like lawns that resist weeds once established. It’s slower to establish than Bermuda but handles cooler weather better.
Matching Seed to Site Conditions
Soil pH between 6.0-7.0 is ideal for most grasses. A simple soil test prevents struggles later – if pH is off, grass can’t absorb nutrients properly regardless of fertilizer applications.
Drainage matters significantly. Areas with standing water need specific varieties or drainage improvements. Sandy soils that drain too fast might need organic matter.
Shade tolerance varies dramatically. Areas with less than 4 hours of direct sunlight need shade-tolerant varieties like fine fescue.
Pet use requires consideration – perennial ryegrass and tall fescue generally recover better from pet damage than Kentucky bluegrass.
Timing Your Planting Window
Timing can make or break your grass seed installation. Soil temperature matters more than air temperature – seeds need consistent soil temperatures between 55-65°F for cool-season grasses and 65-80°F for warm-season varieties.
Check soil temperature with a thermometer pushed 2-3 inches deep for several days to get accurate readings.
Fall versus spring: Fall gives better success odds with cooler air temperatures reducing water stress and allowing plants to build strong roots before summer heat. Spring works but requires intensive summer watering.
Dormant seeding in late fall or winter lets seeds wait for perfect spring temperatures naturally.
Scientific research on seeding dates provides detailed regional recommendations for timing optimization.
Best Time for Cool-Season Lawns
Late summer through early fall (mid-August through mid-October) is ideal for cool-season grasses. Soil temperatures are warm from summer while air temperatures cool down, providing quick germination and perfect growing conditions.
Seedlings get 6-8 weeks to build root systems before winter, ensuring strong spring recovery and first-summer survival.
Best Time for Warm-Season Lawns
Late spring through early summer works best for warm-season grasses. Early spring planting maximizes establishment time before winter dormancy.
Warm-season grasses like zoysia can take over a month to germinate – patience is crucial as these grasses work on their own timeline.
Preparing Soil & Site for Success
Soil preparation is like building a foundation – skip this step and everything else fails. Soil testing comes first, revealing pH levels, nutrients, and organic matter before you buy seed.
pH adjustment is often most important. Most grasses prefer 6.0-7.0 pH – outside this range, grass can’t absorb nutrients properly. Acidic soils need lime, alkaline soils need sulfur. Lime works slowly, so apply in fall if possible.
Organic matter like compost improves sandy and clay soils while providing slow-release nutrients. Work 2-4 inches into the top 6 inches of soil.
Grading and drainage ensures water flows away from buildings without creating swampy spots. A gentle 1-2% slope usually works.
Debris removal includes old roots, construction materials, and thick thatch layers that can sabotage new grass.
More info about Basic Lawn Care Services – our comprehensive approach covers soil testing to ongoing maintenance.
Testing & Amending Soil
Lime application for acidic soils takes months to adjust pH. Split applications over two seasons if you need more than 200 pounds per 1,000 square feet.
Nutrient amendments should be based on soil test results. Phosphorus is important for root development in seedlings, though some areas restrict phosphorus use.
Organic compost improves soil structure, water retention, drainage, and nutrients – like a multivitamin for soil.
Creating the Ideal Seedbed
Tilling 3-4 inches deep breaks up compaction and mixes amendments evenly. Never work wet soil – it should crumble in your hand, not form muddy balls.
Raking smooth eliminates high spots that scalp when mowed and low spots that collect water.
Lawn roller (one-third filled with water) firms the seedbed without creating compaction. The footprint test should show slight impression like walking on firm beach sand.
Grass Seed Installation: Step-by-Step Guide
Getting seeds in the ground properly separates successful projects from disappointing ones. Seed rates matter – Kentucky bluegrass needs about 2 pounds per 1,000 square feet, while tall fescue and perennial ryegrass require 4-6 pounds.
The two-pass spreading technique eliminates streaks: walk north-south with half your seed, then east-west with the other half.
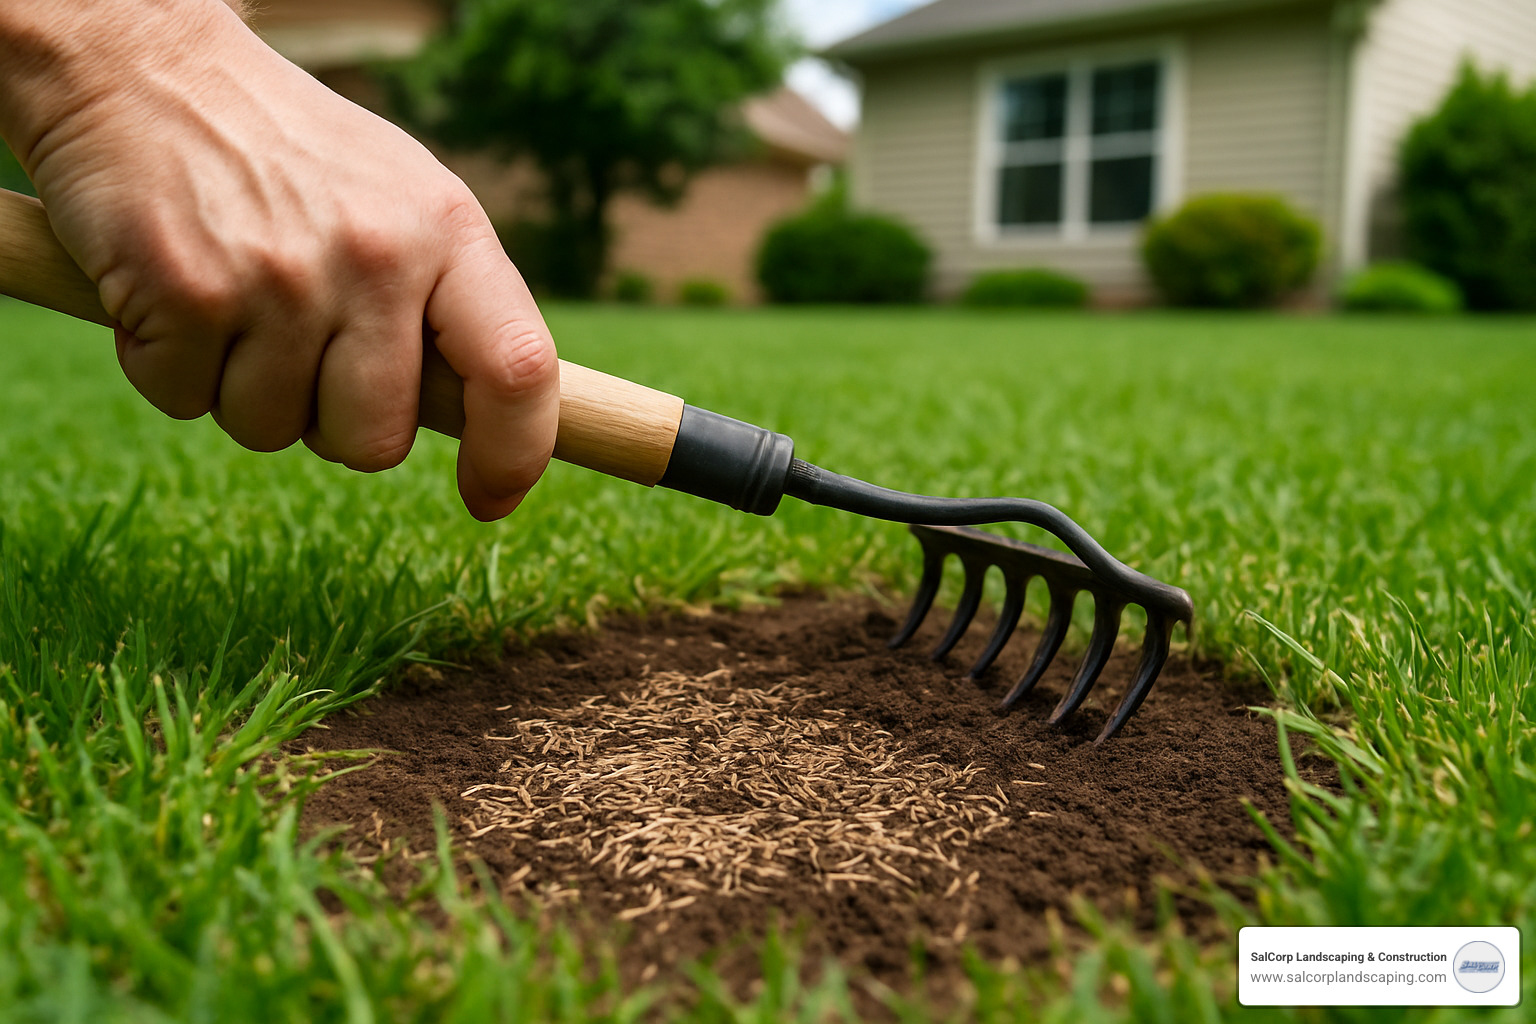
Seed-to-soil contact ensures seeds touch dirt instead of sitting on top. Light raking after spreading settles them properly.
Grass Seed Installation for a Brand-New Lawn
Remove old turf completely using sod cutters for large areas or sharp spades for smaller patches.
Till and amend soil when it feels like a good handshake – not soggy, not bone dry. Mix amendments throughout the tilled area.
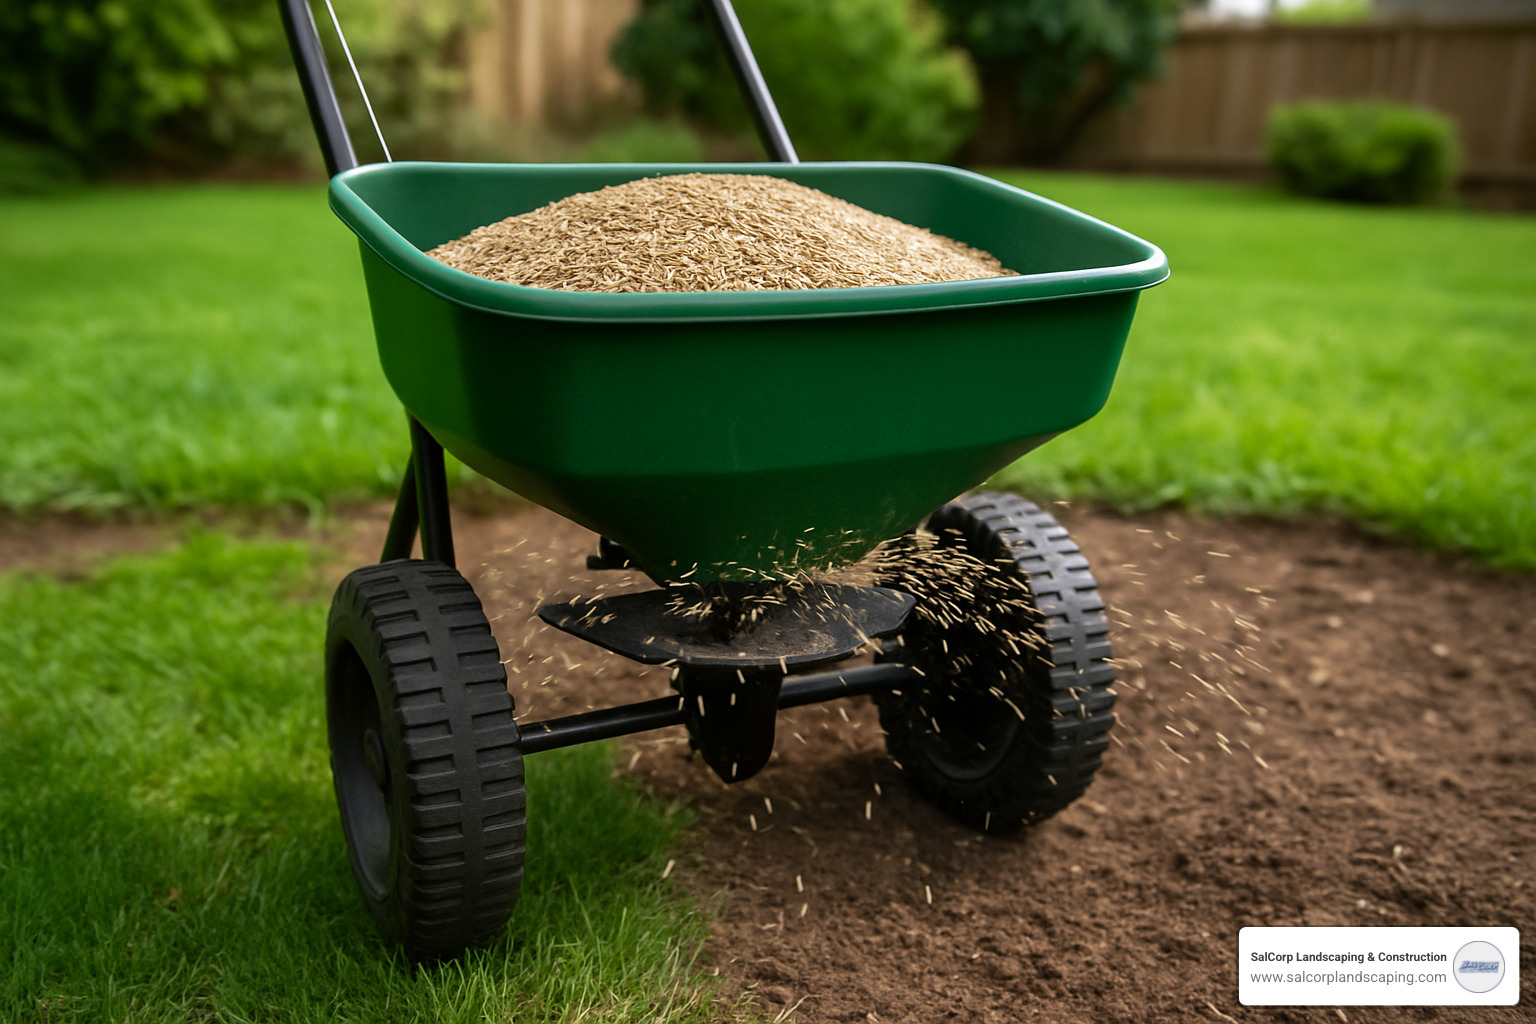
Broadcast seed with a spreader, testing settings on your driveway first. Overlap passes slightly but don’t go over the same spot twice.
Rake to ¼ inch depth covers seeds without burying them. Most grass seeds need some light to germinate.
Final roller pass firms everything and eliminates air pockets that dry out seeds.
Grass Seed Installation When Overseeding an Existing Lawn
Mow low before starting to give new seeds a fighting chance against existing grass.
Dethatch and aerate creates pockets for seeds to settle. Core aeration relieves compaction while creating seed planters.
Slit seeders cut precise grooves and drop seeds directly into soil in one pass – worth renting for larger areas.
Half-rate passes prevent overcrowding since existing grass already occupies space.
Compost topdressing after overseeding protects and feeds seeds as it breaks down.
Covering & Protecting Seed
Weed-free straw remains the gold standard. Apply so you can see 25% of soil surface – seeds need to breathe.
Screened compost provides protection and slow-release fertilizer, breaking down into soil improvement.
Erosion mats work on slopes where straw would wash away.
Watering Schedule During Germination
Light, frequent misting 2-3 times daily keeps the top inch of soil like a wrung-out sponge during the critical 2-4 week germination window.
Transition to deep watering once grass reaches about an inch tall, spacing out waterings while running them longer.
Sprinkler timer systems automate multiple daily waterings during germination.
Sprinkler system tips offers guidance for optimizing irrigation during establishment.
Establishment & Ongoing Care
The weeks following grass seed installation test your patience but determine long-term success. First mow should wait until grass reaches 3 inches tall, even if it takes longer than expected.
Sharp blades are critical for young grass – dull blades tear seedlings instead of cutting cleanly, creating wounds that invite disease.
Fertilizing new grass requires balance. Wait until 4-6 weeks after germination before applying fertilizer, allowing root system development first. Choose slow-release options over quick-release formulas.
Weed control timing tests resolve – resist spraying herbicides until grass has been mowed at least 4 times. Hand-pulling weeds is safest during early establishment.
Once established, aim for 1 inch of water per week through deep, infrequent sessions.
How to Care for Lawn After Hydroseeding – same care principles apply for seeded lawns.
Fertilizing New Grass
Compost topdressing 6-8 weeks after seeding provides gentle nutrition. Spread ¼ to ½ inch of screened compost, working it lightly into the grass canopy.
Slow-release fertilizers prevent feast-or-famine cycles. Look for products where at least 50% of nitrogen comes from slow-release sources.
Weed & Pest Management
Pre-emergent herbicides prevent weed seeds from germinating but also stop grass seed. Wait until grass has been mowed 4-6 times before applying.
Spot-spraying individual weeds provides precision without risking the entire lawn. Use herbicides labeled safe for young grass.
Cultural controls often work better than chemicals – proper mowing height, consistent watering, and adequate nutrition help grass compete effectively.
Mowing Practices for Young Turf
Height of cut should stay higher than normal (3-4 inches) during establishment. Taller grass shades soil and reduces weed germination.
The one-third rule becomes even more critical with young grass – never remove more than one-third of blade height in a single mowing.
Clipping recycling returns nutrients while reducing fertilizer needs. Leave clippings unless they’re thick enough to smother grass.
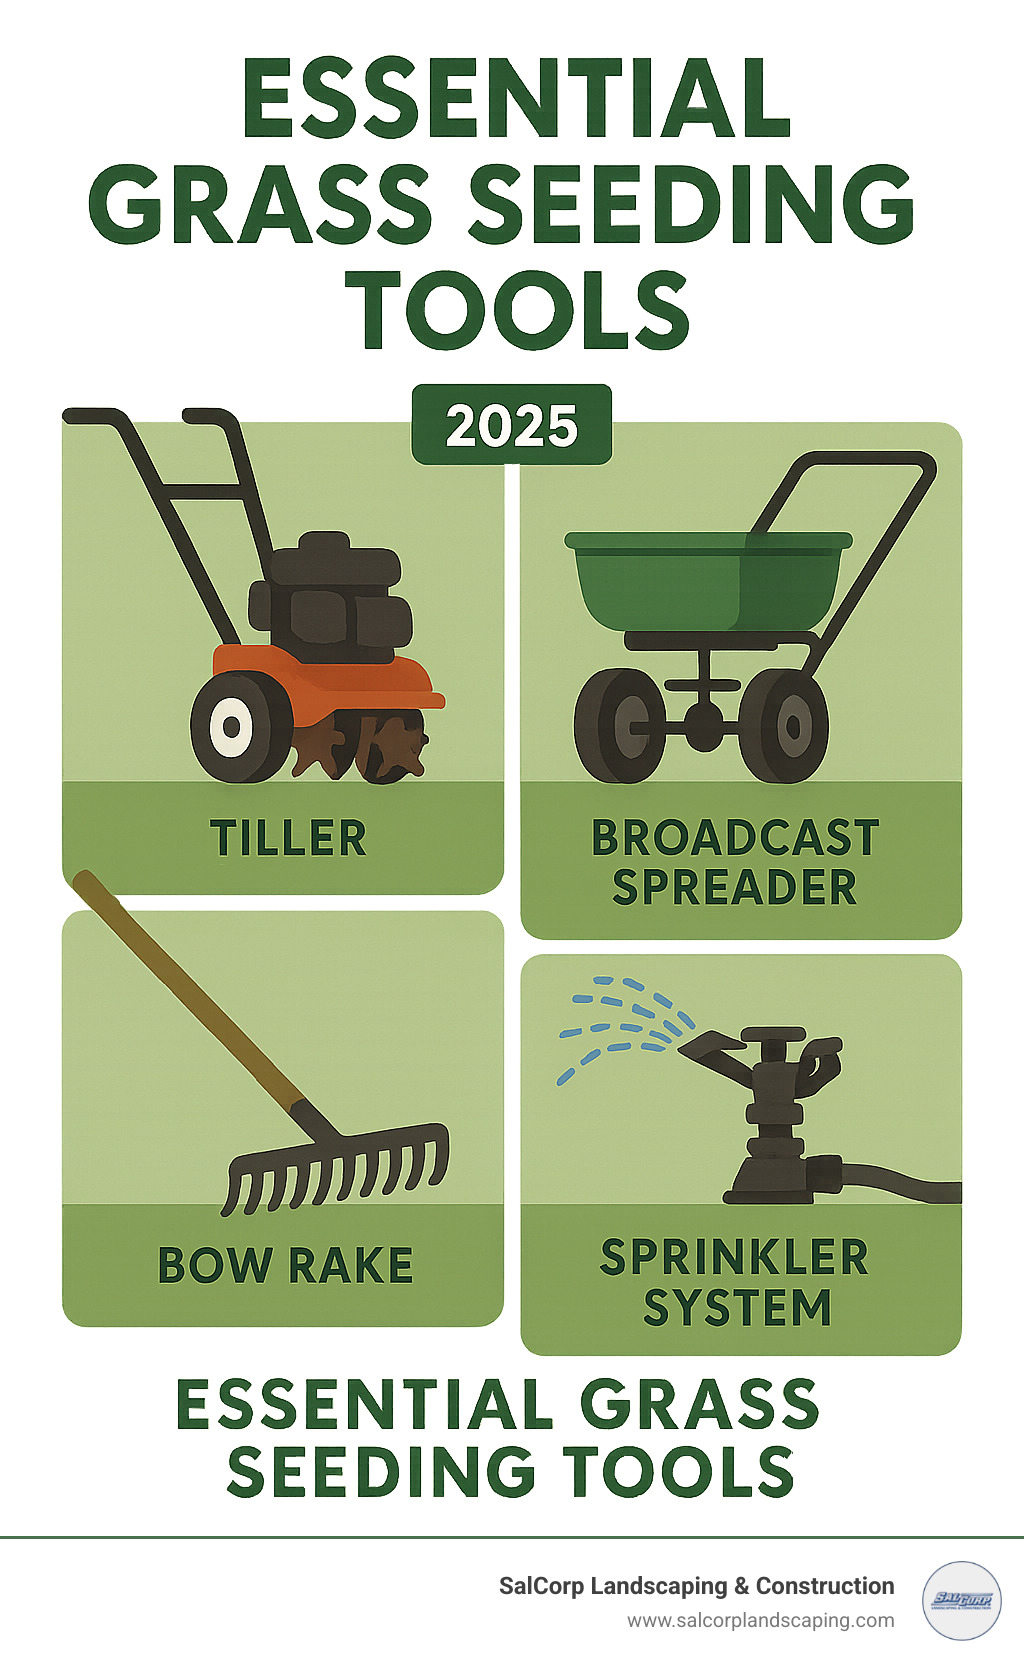
Tools, Materials & Budget Basics
Grass seed installation success depends on having the right tools. Essential items include a hand cultivator for breaking up compacted spots, broadcast spreaders for even seed application, and lawn rollers (rental makes sense for most homeowners).
Your irrigation setup ranges from simple oscillating sprinklers to sophisticated timer systems. Consistent coverage during the first few weeks is crucial.
Straw bales typically cover 1,000-2,000 square feet each. Spring for certified weed-free straw when possible.
Average costs for DIY grass seed installation typically range from $0.10 to $1.50 per square foot based on internet data, with simple projects on the lower end and complex sites requiring more materials pushing costs higher. These are average costs based on internet data and not actual costs for SalCorp Landscaping, as pricing varies significantly based on site conditions, seed selection, and regional factors.
The DIY versus professional decision usually comes down to size and complexity. Small patches work great for weekend warriors, while large areas or tricky slopes benefit from professional experience.
More info about Lawn Installation Services – our comprehensive approach to professional grass installation.
Essential Equipment Checklist
Tillers make soil preparation manageable on larger projects. Rear-tine models handle compacted soil better than front-tine versions.
A quality bow rake creates smooth seedbeds and covers seeds after broadcasting. This tool is worth buying rather than borrowing.
Seed spreaders need calibration before every use – different seed types flow differently.
Your hose and sprinkler system needs capacity to cover the entire seeded area without constant repositioning.
Troubleshooting & Common Mistakes
After two decades of grass seed installation projects, most issues have simple fixes if caught early. Common mistakes include planting seeds too deep (most need light to germinate and only have energy to push through ¼ inch of soil), over-watering (creates fungal conditions), wrong seed selection for site conditions, uneven coverage from poor spreading technique, and bird damage.
Repairing Bare Spots
Scratch the soil surface with a hand cultivator to create seed contact without disturbing surrounding healthy grass.
Your reseeding mix should match existing lawn as closely as possible to avoid patchwork effects.
Light mulching protects new seeds without smothering established grass nearby.
Keep the area moist – small patches dry out faster than large seeded areas.
Slow or Failed Germination
Temperature problems cause most delays. Cool-season grasses won’t germinate below 55°F soil temperature.
Seed freshness matters – germination rates drop significantly over time, especially with poor storage.
Soil compaction creates barriers for water and seedlings. Compacted areas may need cultivation before reseeding.
Frequently Asked Questions about Grass Seed Installation
How long until I can walk on my new lawn?
Light foot traffic becomes okay around 4-6 weeks after seeding, once grass has been mowed 2-3 times. Children and pets should stay off newly seeded areas for at least the first month to avoid disturbing seeds and compacting soil.
Full use typically requires 10-12 weeks from seeding. Cool-season grasses generally establish faster than warm-season varieties.
Can I mix clover with my grass seed?
Microclover works excellently mixed with grass seed, creating low-maintenance lawns that fix nitrogen naturally. Use about 5-10% clover by weight in your seed mix.
Traditional white clover creates more noticeable presence but is extremely drought-tolerant and requires minimal fertilization once established.
What if weeds appear before the first mow?
Hand pulling remains the safest option for weed control in newly seeded lawns. Pull when soil is moist for easier removal.
Herbicide applications should wait until grass has been mowed at least 4 times to avoid damaging young seedlings.
Prevention focus works better than treatment – proper seeding rates, fertilization, and watering favor grass over weeds.
Conclusion
Your journey to a perfect lawn through grass seed installation is absolutely achievable with the right approach. The benefits of a well-established lawn reach beyond curb appeal – providing family recreation space, environmental benefits like air purification and erosion prevention, and increased property values.
Patience truly pays off in grass establishment. Grass that takes 12 weeks to fully establish will outperform rushed jobs for decades. Those extra weeks create root systems that handle droughts and bounce back from winter damage.
Seasonal maintenance protects your investment through proper mowing height, appropriate fertilization timing, and deep watering schedules.
Whether planning a DIY project or considering professional help, good preparation matters more than expensive seed varieties. Properly prepared seedbeds with average-quality seed always outperform premium seed on unprepared ground.
For challenging sites like steep slopes, our Hydroseeding Lawns services offer faster establishment and better soil protection than traditional seeding.
Creating a beautiful lawn requires following proven steps and giving grass time to establish naturally. Your dream lawn is just one growing season away with proper technique, timing, and consistent care.
