Installing an Automatic Sprinkler System: The #1 Ultimate Guide
Why Installing an Automatic Sprinkler System is a Game-Changer for Your Property
Installing an automatic sprinkler system is one of the smartest ways to keep a lawn green while cutting back on water waste—no more dragging hoses around every weekend.
Quick snapshot:
- Time Required: 16-20 hours (a long weekend)
- Skill Level: Intermediate DIY
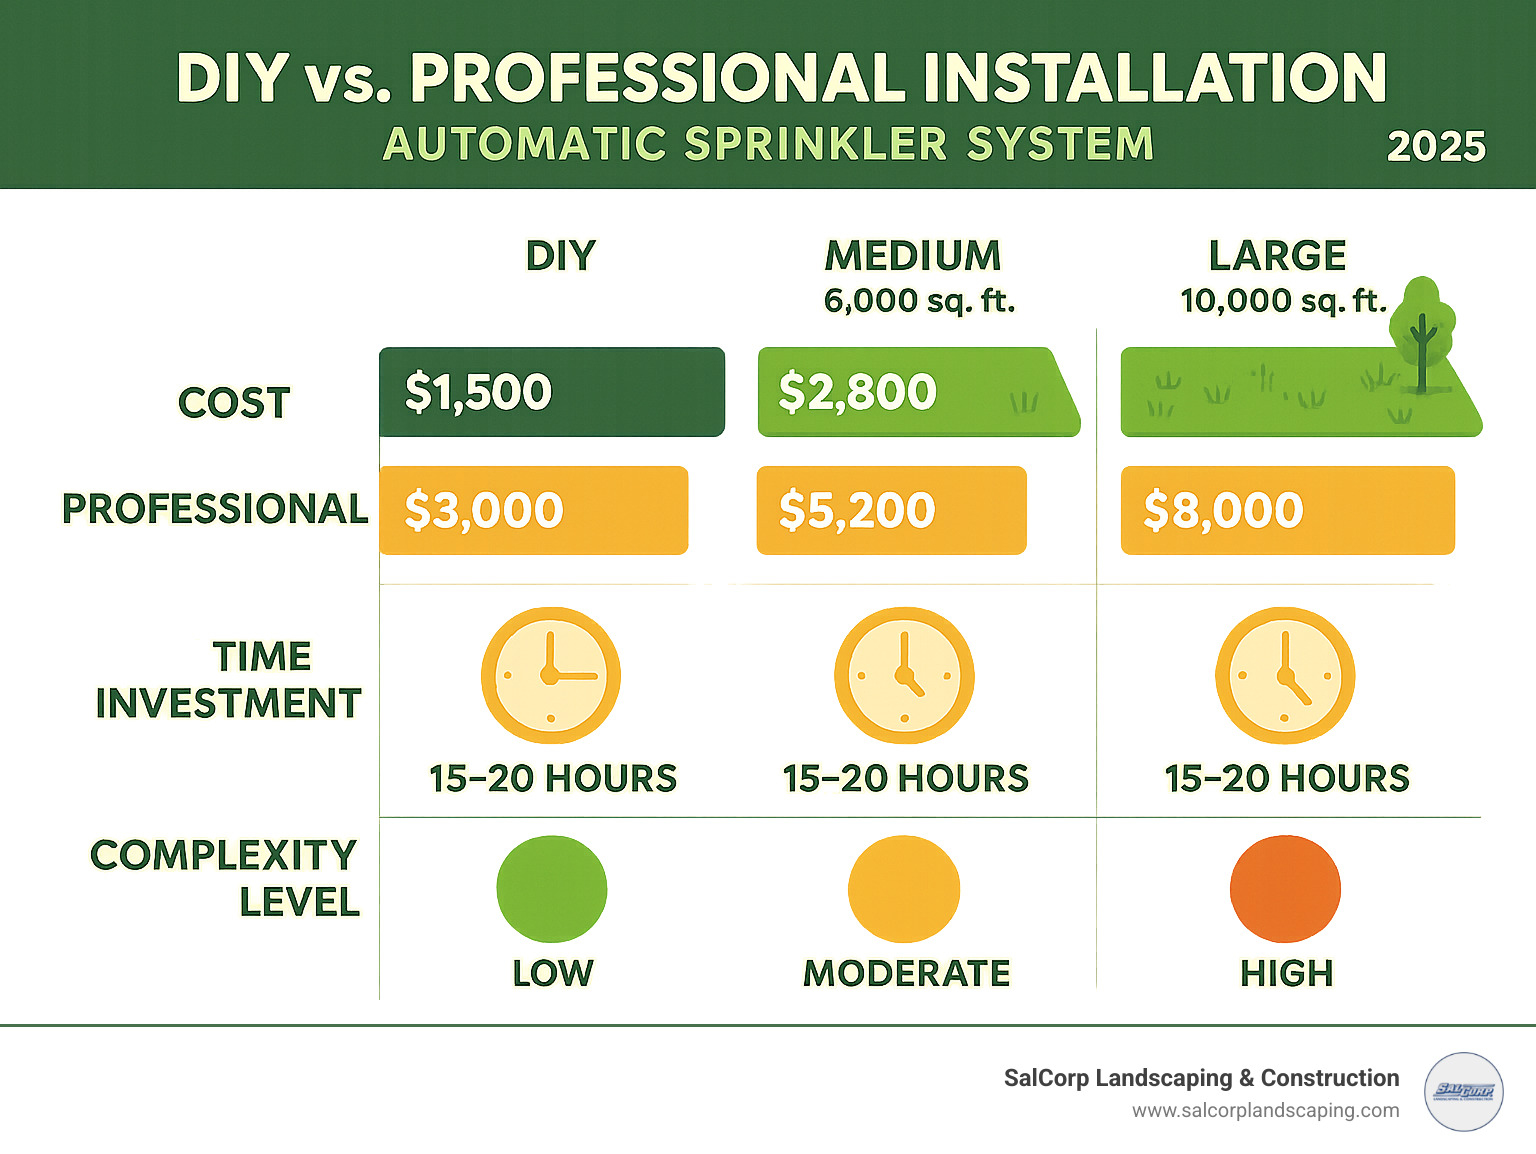
- DIY Cost: $1,000–$4,200 for a typical two-zone setup (average internet estimates, not SalCorp quotes)
- Core Steps: Plan → Trench → Lay Pipe → Test → Program
Essential requirements at a glance:
- Water pressure: 40-65 PSI
- Flow rate: 10-13 GPM
- Trench depth: 6-12 inches
- Check local permits and backflow rules
A properly planned system can trim outdoor water use by up to 30 %, boosts curb appeal, and quickly pays for itself through savings and added property value.
I’m Sal Musto of SalCorp Landscaping & Construction in Walpole, serving communities from Newton and Wellesley to Canton and Foxborough. After 20 years of installing systems across Massachusetts soils and micro-climates, I can tell you the hardest part is getting the details right up front—everything else flows from there.
Know your installing an automatic sprinkler system terms:
- designing underground sprinkler system
- best above ground sprinkler setup
- installing irrigation system for garden
Planning and Preparation: The Blueprint for a Flawless System
Here’s the truth about installing an automatic sprinkler system: the difference between a system that works beautifully for years and one that becomes a constant headache comes down to one thing – planning. I’ve seen too many weekend warriors rush this step, only to end up with dry spots, flooded flower beds, or worse – a call from the gas company.
The good news? With proper planning, you can avoid these costly mistakes and create a system that keeps your lawn green while saving water and time.
Essential Planning for Installing an Automatic Sprinkler System
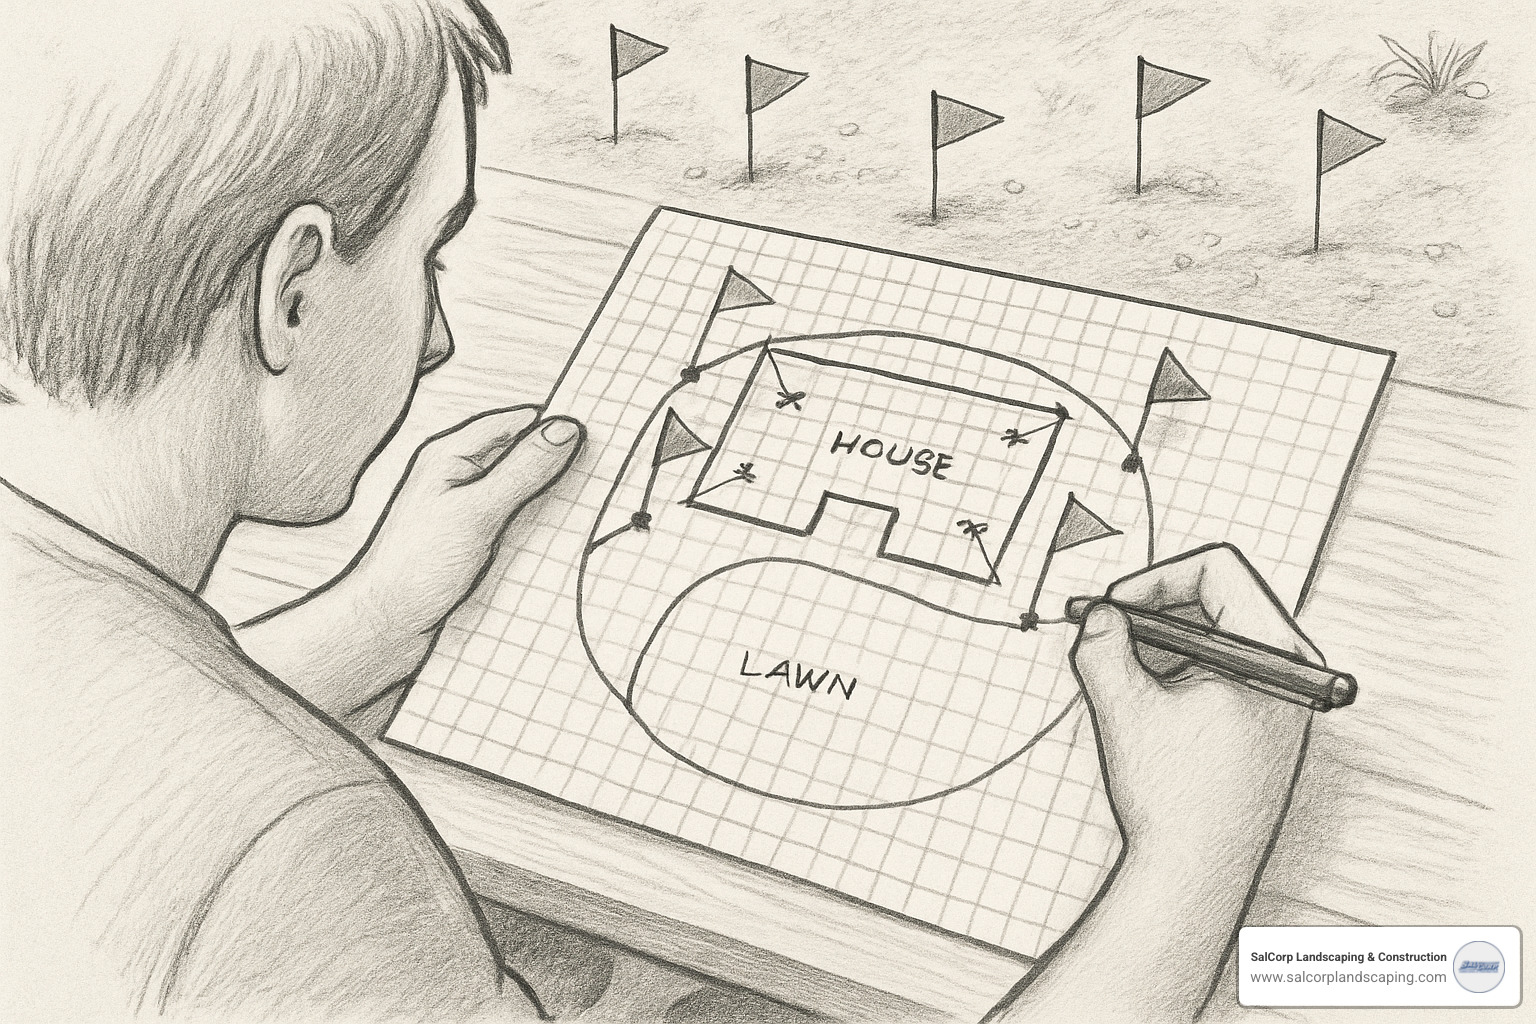
Your first step is creating a detailed yard sketch on graph paper. Use a scale of 1 inch = 10 feet – this gives you the accuracy you need for proper sprinkler placement without making the drawing too complicated. Grab your measuring tape and start mapping out your property, marking trees, flower beds, walkways, and any obstacles.
While you’re sketching, place marking flags where you think sprinkler heads should go. Don’t worry about getting it perfect – this is just your starting point. The key is visualizing how water will flow across your yard.
Know Your Water System
Before you can design zones, you need to understand what you’re working with. Your water meter size and service line size determine how much water you can use at once. Most homes have adequate supply, but it’s worth checking.
Here’s where things get technical, but stick with me – this matters. You need to test your static water pressure using a PSI gauge attached to an outdoor faucet. Most sprinkler systems require 40-65 PSI to work properly. Test at different times of day because pressure can drop during peak usage hours.
Next, calculate your water flow rate by timing how long it takes to fill a 1-gallon container from your outdoor faucet. If it takes 30 seconds, you have 2 GPM. You’ll typically need 10-13 GPM to support a basic sprinkler system, so this number determines how many zones you can run simultaneously.
Smart Zoning Strategy
Not all areas of your yard are created equal. Dividing your yard into zones based on water needs is crucial for both plant health and water conservation. Your sunny front lawn needs different watering than your shaded side yard or vegetable garden.
Create separate zones for areas with different sun exposure – full sun areas need more water, while shaded areas can actually be damaged by overwatering. Consider your soil type too. Clay soil holds water longer but can become waterlogged, while sandy soil drains quickly and needs more frequent watering.
For flower beds and vegetable gardens, drip irrigation is often the better choice than traditional sprinkler heads. It delivers water directly to plant roots with minimal waste.
The Safety Step You Can’t Skip
Before you dig a single inch, call 811. This free service marks underground utilities including gas, electrical, and cable lines. I’ve seen homeowners hit gas lines, and trust me – it’s not just expensive, it’s dangerous. Utility line marking typically takes 2-3 business days, so plan accordingly.
Local Requirements Matter
Check with your local building department about permits and backflow preventer requirements. Many Massachusetts communities require permits for permanent irrigation systems, and most require a backflow preventer to protect the municipal water supply from contamination.
Some areas also require licensed professionals for the main water line connection. It’s better to find out now than after you’ve started digging.
For properties with complex layouts or challenging terrain, professional landscape design services can help integrate your sprinkler system with your overall landscape plan.
Tools and Materials Checklist
Getting the right tools upfront saves time and frustration later. You’ll need a trenching shovel for smaller areas, though I’d recommend renting a power trencher for larger projects – your back will thank you. Pipe cutters are essential because clean cuts prevent burrs that can clog sprinkler heads later.
For the electrical work, you’ll need wire strippers and a multimeter for troubleshooting. Don’t forget large adjustable pliers, screwdrivers (both flathead and Phillips), and a utility knife for various tasks throughout the project.
Material Selection Made Simple
Choose PVC or polyethylene pipe for your main lines – I recommend 1-inch Schedule 40 PVC for durability. You’ll also need PVC primer and cement (remember, cement sets in about 30 seconds, so work quickly), plus various pipe fittings like tees, elbows, and couplings.
Your valve box needs to be dug 18 inches deep and 2-3 feet long with a gravel base for drainage. You’ll need zone valves for each watering area and a valve manifold to connect everything together.
For the sprinkler heads themselves, choose between pop-up spray heads for smaller areas, rotary nozzles for medium coverage, and consider swing joints to make positioning easier. Don’t forget the 24-volt underground wire and waterproof wire connectors for the electrical connections.
Finally, you’ll need a programmable timer/controller to automate everything. This is where your system goes from manual to truly automatic.
For professional installation with guaranteed results and proper permitting, explore our in ground sprinkler installation services.
The Step-by-Step Guide to Installing an Automatic Sprinkler System
Here’s where the rubber meets the road. Installing an automatic sprinkler system transforms from planning to actual construction. This is the most rewarding part of the project – you’ll see your vision come to life, one trench at a time.
The key to success is taking your time with each step. I’ve seen too many weekend warriors rush through the installation, only to spend the following weekend fixing preventable problems. Trust me, doing it right the first time saves you headaches later.
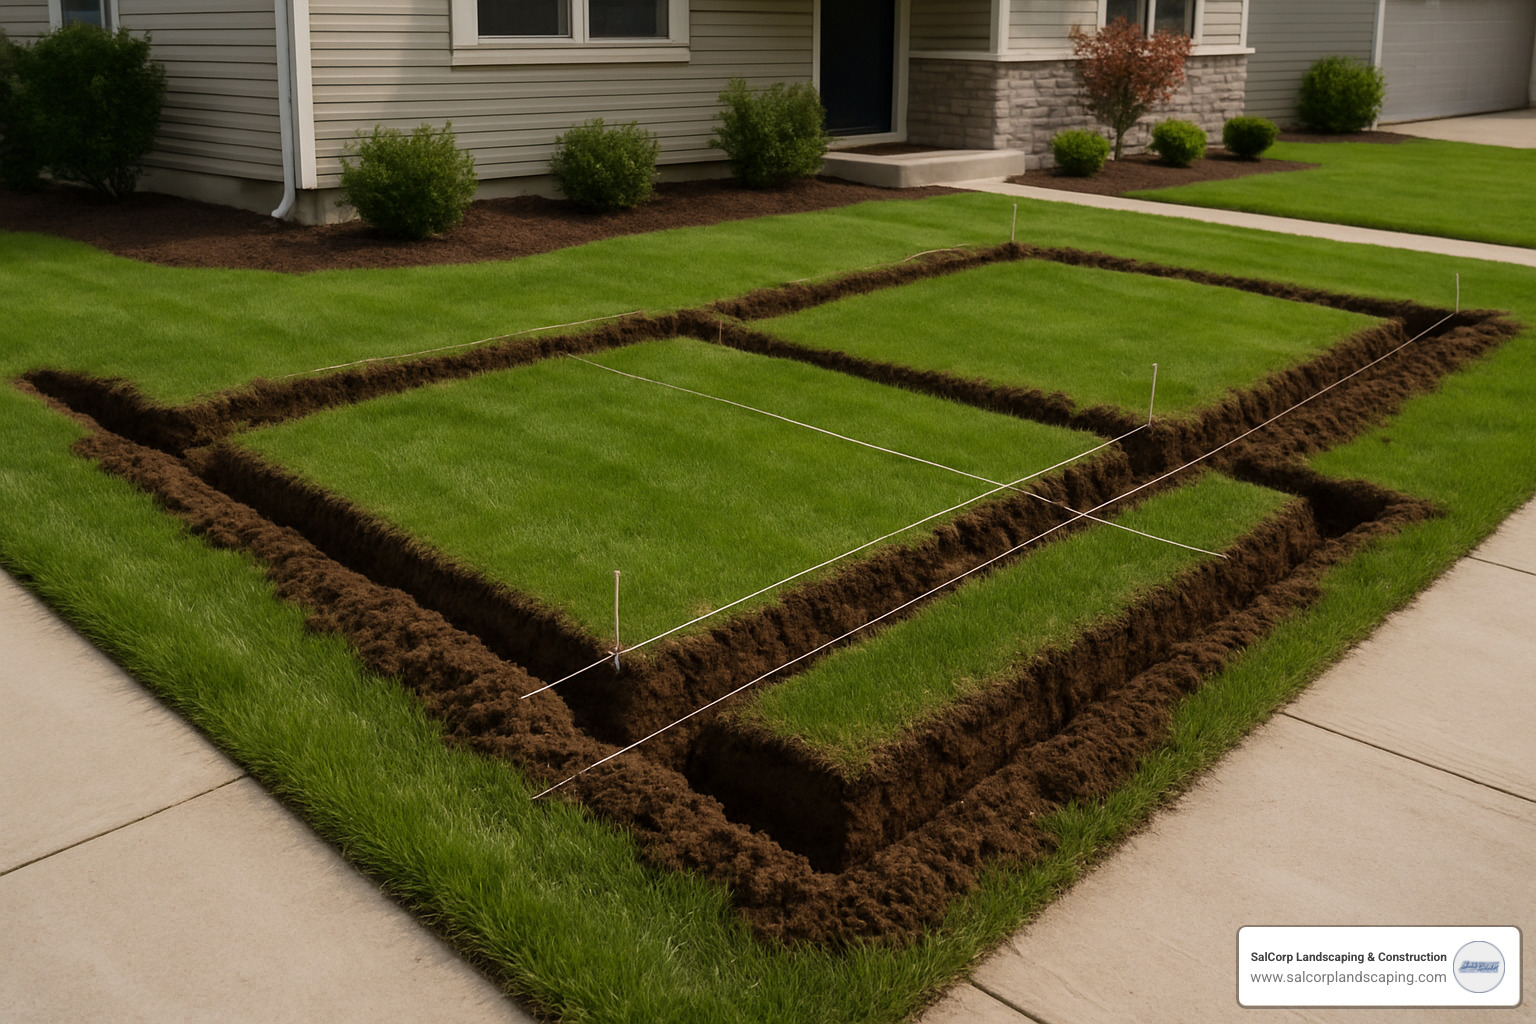
Step 1: Digging Trenches and Preparing the Ground
Let’s be honest – trenching is the part that separates the dreamers from the doers. It’s hard work, but there’s something satisfying about creating those perfectly straight lines that will soon carry water to every corner of your lawn.
Start by laying out string lines following your yard sketch. These act as your roadmap and keep you digging in straight, efficient paths. For trench depth, aim for 6-12 inches deep – deeper in areas that freeze, shallower in warmer climates. The main line typically goes 10-12 inches deep, while lateral lines can be 6-8 inches.
Renting a trenching machine can save your back on larger properties. These machines make quick work of long runs, though you’ll still need to hand-dig near utility lines and delicate areas. Always hand-dig within 24 inches of any marked utilities – no shortcuts here.
Save your sod by cutting it in manageable strips and keeping the roots moist. Cover with damp burlap or old towels. This sod will help restore your lawn after installation, and your spouse will thank you for not destroying the yard completely.
The valve box hole needs special attention. Dig it 18 inches deep and 2-3 feet long, then add a gravel base for drainage. This prevents water from pooling around your valves, which can cause winter freeze damage and corrosion.
Need to get under a sidewalk or driveway? Try the water-pressure drilling method. Attach a hose to one end of your PVC pipe with a jet nozzle, and the water pressure helps you tunnel through the soil. It’s like having a mini boring machine.
Step 2: Connecting to the Water Supply and Assembling the Manifold
This step makes many DIYers nervous, and rightfully so. You’re working with your home’s main water supply, where mistakes can flood your basement or leave you without water for dinner prep.
Shut off your main water supply first – this isn’t optional. Find the best connection point, usually near your water meter or main shutoff valve. Cut into the main line and install a tee fitting to create your branch connection.
The backflow preventer installation is required by most local codes and protects your drinking water from contamination. Think of it as insurance for your family’s health. Don’t skip this step, even if your local inspector doesn’t catch it.
Assembling the valve manifold is like building the control center of your system. Space your zone valves with enough room for future maintenance – cramped valves are a nightmare to service years later. Connect each zone valve using PVC cement and primer, remembering that cement sets in about 30 seconds, so work quickly but precisely.
Use thread tape on all threaded connections for extra security. It’s cheap insurance against leaks that can turn your beautiful lawn into a swamp.
If you’re uncomfortable with the main water line connection, this is the perfect time to call a professional plumber. The rest of the installation can still be your DIY victory. For complete professional installation, our landscaping irrigation sprinkler system services handle everything from design to final testing.
Step 3: Laying Pipe and Installing Sprinkler Heads
Now comes the satisfying part – building your water distribution network. This phase requires attention to detail but feels manageable after the trenching marathon you just completed.
Start with the main line pipe from your water connection to the valve manifold. Use 1-inch Schedule 40 PVC for durability and adequate flow. Then install lateral line pipes from each zone valve to your sprinkler locations.
Connecting pipes with fittings requires precision. Cut pipes with proper pipe cutters to prevent burrs that can clog sprinkler heads later. Lay pipes flat in trenches with no kinks or bends – kinked pipes restrict flow and create weak spots.
PVC cement sets in 30 seconds, so have everything positioned before you start gluing. There’s no “oops, let me try that again” with PVC cement.
Installing risers and swing joints makes sprinkler positioning much easier. Swing joints allow you to adjust sprinkler head placement without digging up pipe connections. It’s a small investment that pays big dividends during adjustment time.
Attaching sprinkler heads requires matching the right head to each area. Pop-up spray heads work great for smaller areas and install about 18 feet apart. Rotary nozzles cover medium areas with 25-30 foot spray patterns. For large open areas, impact sprinklers can reach 15-30 feet.
For garden areas, drip irrigation tubing spaced 12 inches apart provides targeted watering that reduces water waste. Secure the tubing with ground stakes every 18-24 inches to prevent shifting.
The goal is head-to-head coverage – each sprinkler’s spray should reach the adjacent sprinklers. This ensures even water distribution and eliminates those brown spots that scream “amateur installation.”
Finalizing, Testing, and Maintaining Your New System
You’re almost there! The hardest work is behind you, but these final steps will make or break your system’s performance. I’ve seen too many DIYers rush through testing only to spend their first summer chasing dry spots and fixing leaks that could have been caught early.
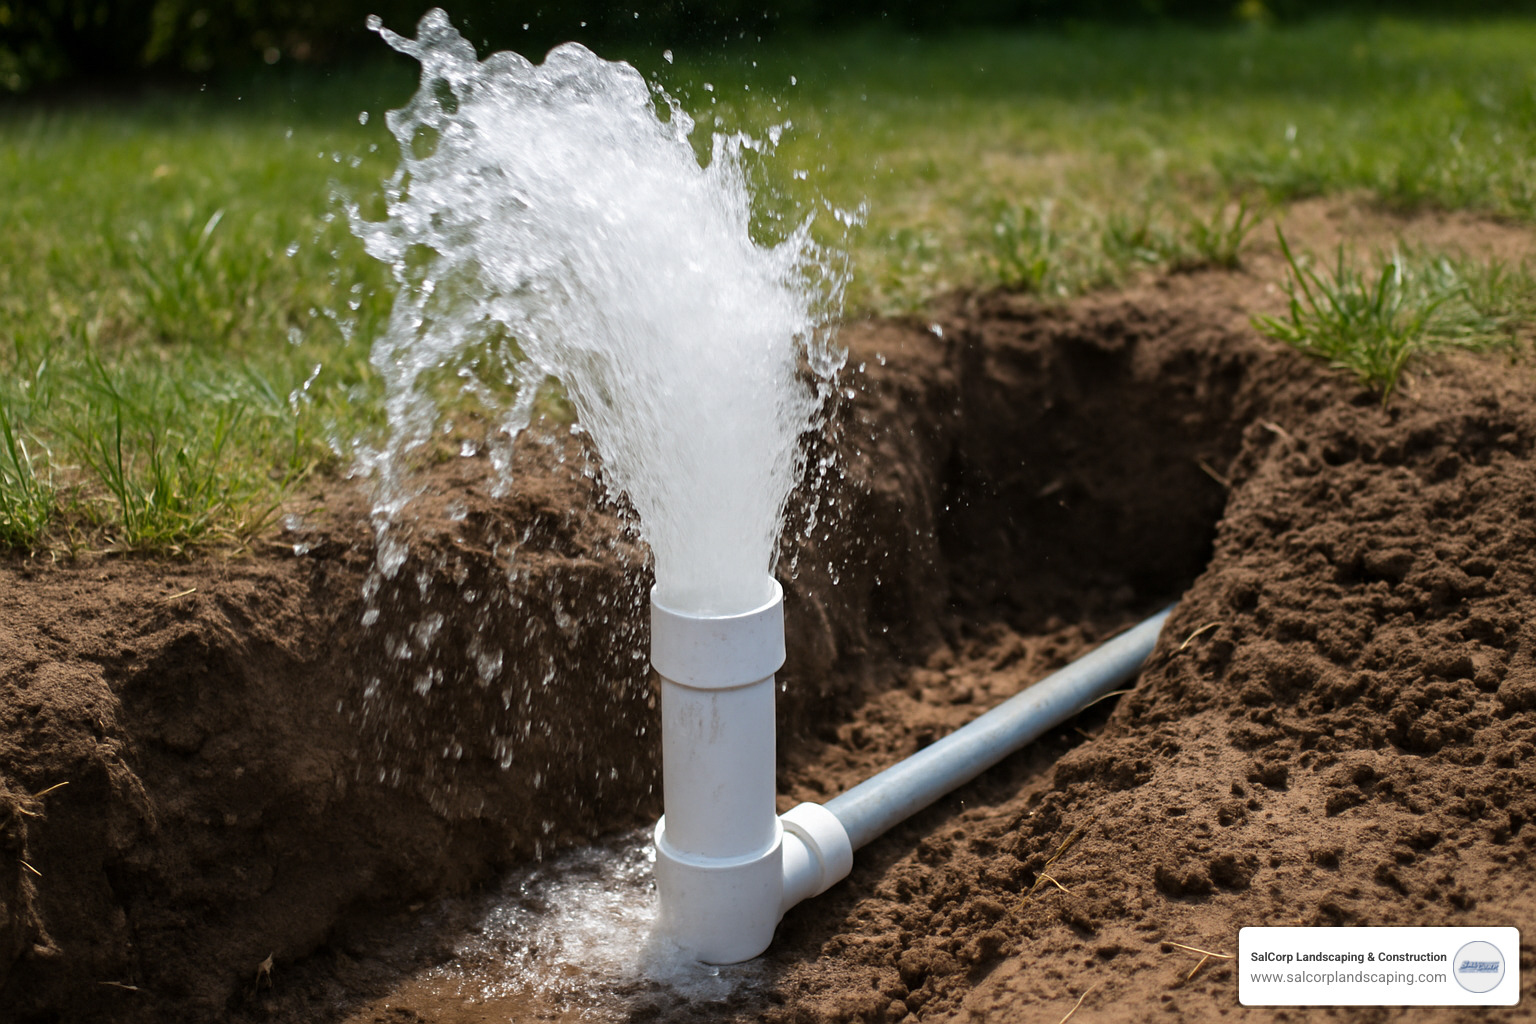
Step 4: Flushing, Testing, and Adjusting for Perfect Coverage
Never skip the system flush – it’s the most important step many homeowners overlook. Before you install a single sprinkler head, turn on each zone and let water blast through the open risers. This clears out dirt, pipe shavings, and debris that would otherwise clog your expensive sprinkler heads.
A helpful tip from a popular lawn care forum really resonates: “I had to remove the sprinkler guts to flush the system zone by zone. It was a bit of work, but it ensured no debris clogged the heads.” This extra effort pays dividends in the long run.
Leak hunting comes next. With water flowing through each zone, walk your entire system looking for trouble spots. Check every joint, every connection, and every fitting. Look for dripping water, wet spots in trenches, or zones with noticeably lower pressure than others. Finding leaks now, while the trenches are still open, saves you from digging up your beautiful lawn later.
Testing coverage patterns is where your system really comes to life. Install your sprinkler heads and run each zone for 10-15 minutes. Place small containers (coffee cans work great) around each zone to see how evenly water is distributed. You want head-to-head coverage – each sprinkler should reach the adjacent ones.
Don’t be discouraged if the coverage isn’t perfect on the first try. Adjusting spray patterns, swapping nozzles, and fine-tuning angles is normal. Some areas might need different nozzle types than you originally planned.
Backfilling trenches should wait until you’re completely satisfied with your system’s performance. When you do backfill, work carefully around pipes and avoid dropping rocks that could damage your installation. Replace your saved sod immediately and water it well – it’s been stressed and needs help reestablishing.
Step 5: Wiring and Programming After Installing an Automatic Sprinkler System
Mounting the controller in the right spot makes daily operation much easier. Choose a location that’s protected from weather but easily accessible – your garage or a covered porch works perfectly. Most residential controllers need to be plugged into a standard electrical outlet.
Running the 24-volt wire from your valve manifold to the controller is straightforward but requires patience. You’ll need one wire for each zone valve plus one common wire that connects to all valves. Color-coding your wires and labeling each connection at both ends saves enormous frustration during troubleshooting.
Use waterproof wire connectors at every connection point. Regular wire nuts will fail underground, causing zones to stop working at the worst possible times. The small extra cost for quality connectors prevents major headaches later.
Programming your watering schedule is where your system transforms from a collection of pipes into a lawn-saving miracle. Set your zones to water in the early morning hours – typically between 4 AM and 8 AM. This timing gives plants time to absorb water before the heat of the day while reducing evaporation losses.
Installing a rain sensor is one of the smartest additions to any sprinkler system. Mount it where it receives direct rainfall – on a roof edge, fence post, or dedicated pole. Avoid areas under trees or within your sprinkler spray patterns. This simple device prevents your system from watering during rainstorms, saving water and preventing overwatering.
Step 6: Long-Term Maintenance and Troubleshooting
Seasonal maintenance keeps your investment running smoothly for years. In spring, check water pressure, inspect for winter damage, and clear any clogged nozzles. Summer maintenance focuses on adjusting misaligned heads and monitoring coverage as plants grow and change your landscape.
Fall preparation involves cleaning debris from sprinkler heads and preparing for winter shutdown. Remove leaves and grass clippings that can block spray patterns or jam pop-up mechanisms.
Winterization is absolutely critical in Massachusetts. Drain your entire system using an air compressor set between 50-100 PSI to blow out residual water. Frozen pipes are expensive to repair and can damage your entire system. If you’re not comfortable with this process, hiring a professional for winterization is money well spent.
Common problems you might encounter include weak spray (usually a clogged nozzle), uneven coverage (needs adjustment or different nozzles), zones that won’t turn on (check electrical connections), and low pressure system-wide (look for leaks or partially closed valves).
Installing an automatic sprinkler system yourself is incredibly rewarding, but don’t hesitate to call for help when you need it. Some homeowners tackle the installation themselves but have professionals handle the main water connection and winterization – there’s no shame in knowing your limits.
For comprehensive irrigation solutions designed and installed by professionals, our landscaping irrigation sprinkler system services ensure optimal performance from day one.
Frequently Asked Questions about Sprinkler Installation
How much does it cost to install an automatic sprinkler system?
The cost of installing an automatic sprinkler system yourself varies dramatically based on your yard size, soil conditions, and material choices. Based on internet data, a basic two-zone system might cost anywhere from $1,000 to over $4,200 for materials alone. Larger properties with multiple zones, premium components, or challenging layouts can push costs significantly higher – sometimes reaching $8,000 or more for complex DIY installations.
These wide price ranges reflect the reality that every property is unique. A small, flat yard with easy access to water lines will cost much less than a large, sloped property with multiple garden zones and obstacles to work around.
Professional installation typically costs more upfront but includes expert design, proper permits, warranty coverage, and the peace of mind that comes with experienced installation. The investment often pays for itself through optimal system performance and avoiding costly mistakes.
These are average estimates based on internet data and not quotes for our services. For a precise quote custom to your specific property needs, consider a professional consultation with our lawn installation services.
How deep do sprinkler lines need to be buried?
Here in Massachusetts, sprinkler lines should typically be buried 6-12 inches deep, with main lines going deeper than lateral lines. We usually recommend 10-12 inches for main lines and 6-8 inches for the smaller lateral lines that feed individual sprinkler heads.
The depth isn’t just about following guidelines – it’s about protecting your investment. Deeper burial helps prevent freeze damage during our harsh New England winters. It also protects pipes from accidental damage during routine yard work like aerating or planting.
Your soil type matters too. Sandy soil drains quickly but doesn’t insulate as well, so you might want to go a bit deeper. Clay soil holds moisture longer and provides better insulation, but it’s also harder to dig through.
Always check your local building codes first. Some Massachusetts communities have specific requirements, especially in areas with deeper frost lines. When in doubt, go deeper rather than shallower – it’s much easier to dig a few extra inches now than to repair frozen pipes later.
Can I really install a sprinkler system myself?
Absolutely! Installing an automatic sprinkler system is definitely within reach for homeowners with intermediate DIY skills and a willingness to put in some serious weekend work. We’ve seen countless homeowners successfully tackle this project over the years.
The project does require some specific abilities though. You’ll need the physical stamina for trenching (or the budget to rent a power trencher), basic plumbing knowledge for connecting pipes, and elementary electrical skills for wiring the controller. Most importantly, you need patience for the planning phase and attention to detail during testing.
Most dedicated DIYers complete the installation over a long weekend, putting in about 16-20 hours total. The key is breaking it down into manageable phases and not rushing any step.
That said, there are times when calling in professionals makes sense. Consider getting help with the main water line connection if you’re not comfortable working with your home’s primary water supply. Complex electrical work, challenging property layouts, or strict local permit requirements might also warrant professional assistance.
The satisfaction of watching your perfectly programmed system water your lawn while you relax with your morning coffee? That’s worth every hour of work you put in.
From DIY Project to a Permanently Lush Lawn
Take a step back and admire your work – you’ve just completed installing an automatic sprinkler system that will transform your property for years to come. This isn’t just another weekend project; it’s an investment that keeps paying dividends every time you look out at your consistently green, healthy lawn.
The change you’ll see is remarkable. Your grass will develop deeper, stronger roots because it’s receiving consistent, optimal watering. No more brown patches from missed watering days or overwatered soggy spots from weekend marathons with the hose. Your system delivers the right amount of water at the right time, every time.
The water savings alone make this project worthwhile. Most homeowners see their water bills drop significantly because automated systems eliminate the guesswork and waste of manual watering. You’re watering smarter, not harder.
Your property value just increased too. Real estate professionals consistently note that homes with professionally installed irrigation systems command higher prices and sell faster. Buyers love seeing a well-maintained landscape that won’t require immediate attention.
But perhaps the best benefit is getting your weekends back. No more dragging hoses around the yard or setting timers to move sprinklers. Your Saturday mornings are now free for actually enjoying your beautiful outdoor space instead of maintaining it.
The learning curve was worth it. While installing an automatic sprinkler system required careful planning and some physical work, you now understand exactly how your system operates. This knowledge makes future maintenance and adjustments much easier.
Of course, not every homeowner wants to tackle this level of project. Complex properties with challenging slopes, difficult soil conditions, or multiple garden areas can make DIY installation overwhelming. Some Massachusetts communities have strict permitting requirements that are easier to steer with professional help.
That’s where our experience makes the difference. At SalCorp Landscaping & Construction, we’ve been helping Massachusetts homeowners create beautiful outdoor spaces for over 20 years. Our owner-operated approach means you work directly with experienced professionals who understand New England’s unique growing conditions and weather challenges.
Whether you’re in Walpole, Newton, Wellesley, or throughout Massachusetts, our comprehensive landscaping irrigation sprinkler system services ensure your system is designed perfectly for your specific property. We handle everything from initial design and permits through installation and seasonal maintenance.
Our own machinery and experienced team mean faster installation with less disruption to your daily routine. We understand that your lawn and landscape are investments worth protecting, and we treat every project with the same care we’d give our own property.
The end result is the same whether you choose DIY or professional installation: a beautiful, healthy landscape that improves your home’s value and your quality of life. Your lawn will be the envy of the neighborhood, and you’ll wonder why you waited so long to make this improvement.
