patio build: 7 Powerful Steps for Stunning Results 2025
Transform Your Outdoor Space with a DIY Patio Build
There’s something magical about stepping out onto your very own custom-built patio on a warm summer evening. A patio build transforms an ordinary backyard into an inviting outdoor living space where memories are made—from morning coffee to evening gatherings with friends and family.
What does it take to create this outdoor oasis? Here’s a quick snapshot of the essentials:
| Patio Build Essentials | Details |
|---|---|
| Time Required | 8-50 hours depending on size and materials |
| Average DIY Cost | $400-$3,000+ based on materials and size |
| Basic Materials | Pavers/stone, gravel base, sand, edging, polymeric sand |
| Key Tools | Shovel, rake, level, tamper/plate compactor, rubber mallet |
| Skill Level | Beginner to intermediate |
The beauty of tackling a patio build yourself is the substantial savings—up to 45% compared to hiring professionals. This makes it an appealing weekend project for homeowners looking to improve their outdoor space without breaking the bank. With proper planning and a friend or two to help, you can complete a standard 12×12 foot patio in a single weekend.
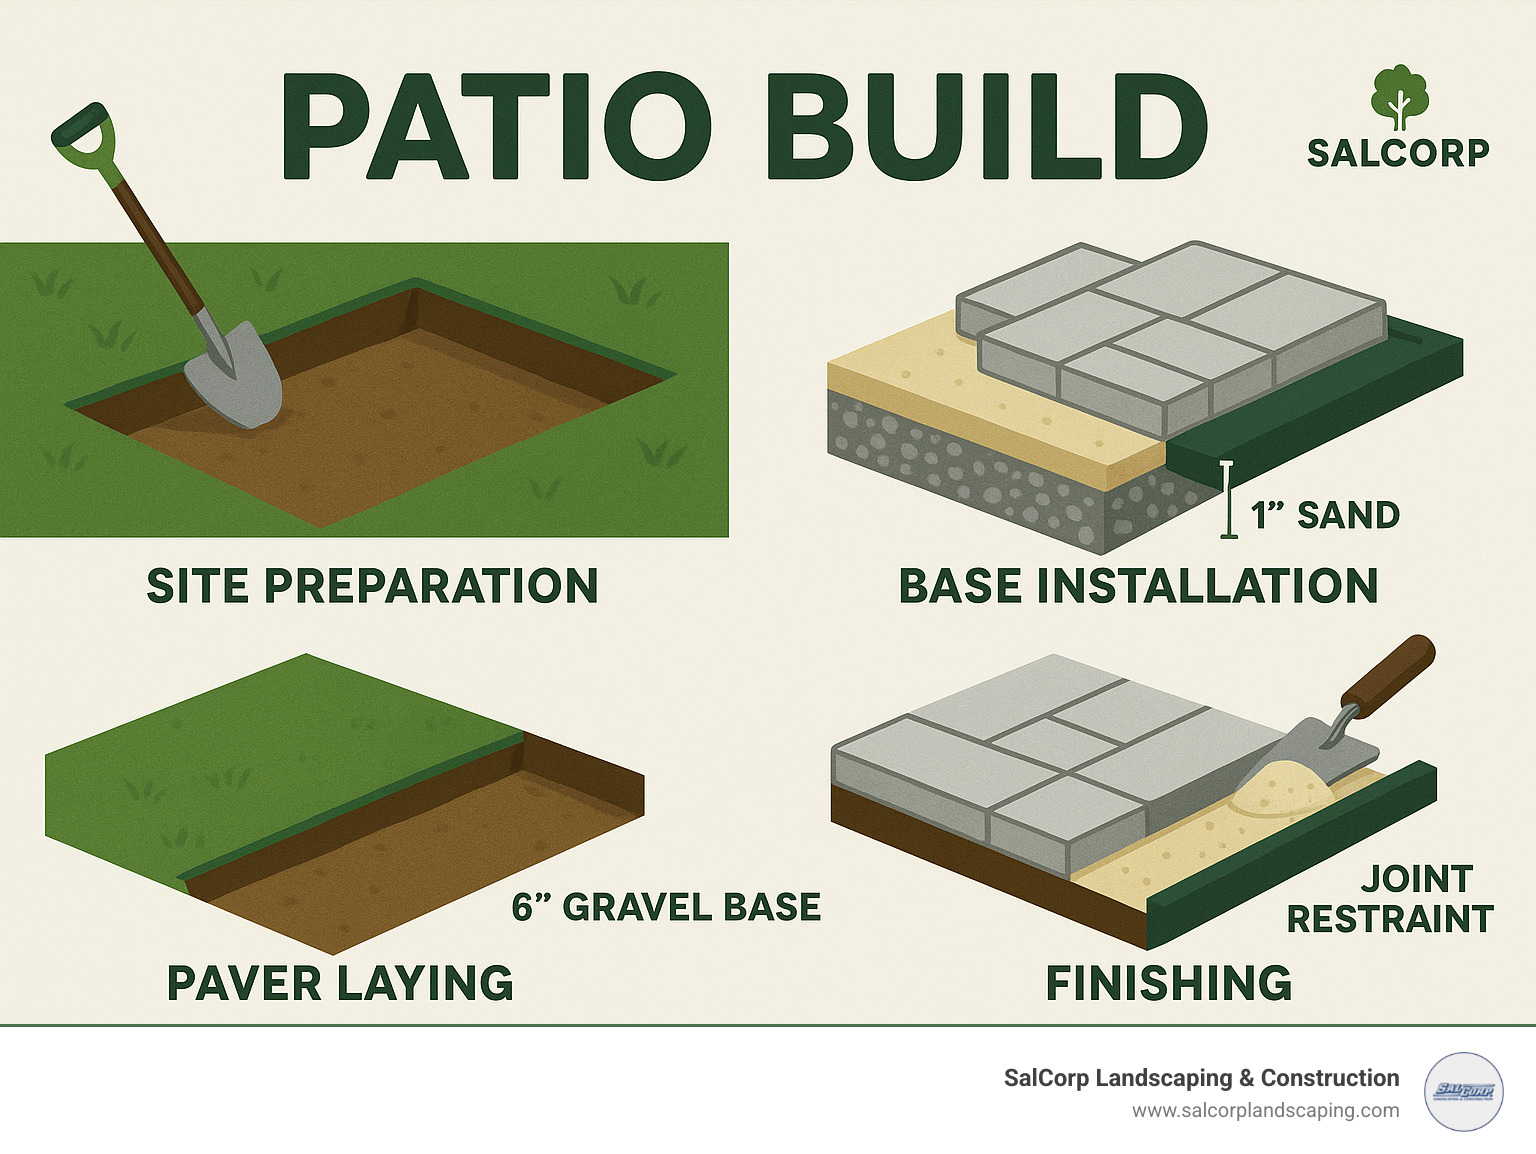
Don’t let the idea of a DIY project intimidate you. While a patio build is certainly labor-intensive (prepare for a good workout!), it requires more muscle than specialized skill. The basic process involves four key phases: preparing the site, creating a solid foundation with about 6 inches of gravel and an inch of sand, carefully placing your pavers, and finishing with edge restraints and joint sand.
What’s the secret to a patio build that stands the test of time? It all comes down to thorough ground preparation and proper drainage. Including a slight slope (about 1 inch drop every 4 feet) away from your house prevents water pooling that can damage your patio and potentially your home’s foundation. This simple but crucial step dramatically extends the lifespan of your outdoor space.
I’m Sal Musto, owner of SalCorp Landscaping & Construction. Over the past two decades, I’ve personally overseen hundreds of professional patio build projects throughout Massachusetts. There’s nothing more satisfying than watching ordinary backyards transform into stunning outdoor living spaces where families create lasting memories year after year.
Choosing Your Patio Type
The first step in your patio build journey is selecting the right material for your outdoor space. This decision affects not only the aesthetic appeal but also the cost, installation difficulty, and long-term maintenance requirements.

Paver Patios—the DIY Favorite
Concrete pavers have become the go-to choice for many DIY enthusiasts, and for good reason. As Pete Pedersen, a landscape architect with decades of experience, likes to say: “Building a patio is much like putting together a puzzle. Rotate the pieces until they fit together, working to create a nearly uniform space between the stones.”
The popularity of pavers for a patio build isn’t just about looks. They offer incredible durability, especially important here in Massachusetts where freeze-thaw cycles can wreak havoc on less sturdy materials. If one paver gets damaged (which rarely happens), you can simply replace that individual piece rather than redoing the entire patio—try doing that with a concrete slab!
The pattern versatility of pavers is another huge selling point. Whether you prefer the simple elegance of a running bond or want to make a statement with a complex herringbone design, pavers deliver. Many of our clients in Walpole and Dedham choose pavers precisely because they can create a look that’s uniquely theirs.
For pattern inspiration, our Patio Designs with Pavers gallery showcases various options from simple to elaborate. The pattern you choose affects not only the look but also how much work you’re signing up for:
| Pattern | Difficulty | Cutting Required | Visual Impact |
|---|---|---|---|
| Running Bond | Beginner | Minimal | Classic, clean |
| Basketweave | Beginner | Moderate | Traditional |
| Herringbone | Intermediate | Extensive | Sophisticated |
| Circular/Fan | Advanced | Extensive | Dramatic focal point |
Natural Stone Elegance
There’s something magical about natural stone that manufactured products simply can’t replicate. Each stone tells its own story through unique coloration and texture, creating a truly one-of-a-kind patio that seems to have been there forever.
Flagstone patios, with their irregular shapes and rich color variations, create a relaxed, organic feel that works beautifully in garden settings. Bluestone, with its distinctive blue-gray hue, offers a more refined look that’s equally at home beside a historic Colonial in Concord or a modern masterpiece in Wellesley. For those seeking lighter tones, limestone provides a smooth, sophisticated surface that brightens any outdoor space.
“When the patio design takes its cues from the architecture, it gives you a more seamless look,” notes Pete Pedersen. This is especially true with natural stone, which seems to have an innate ability to complement a home’s character.
While natural stone typically costs more than concrete pavers, the investment pays off in spades. Many of our natural stone patios in Brookline and Newton have maintained their beauty for decades with just minimal care—like fine wine, they actually improve with age as they develop a natural patina.
Budget-Friendly Gravel Pads
Not every patio build needs to break the bank. For homeowners seeking a quick, economical solution, gravel patios offer considerable charm and practical benefits.
The speed of installation is a major plus—many of our smaller gravel patios can be completed in a single day. Water drains through gravel rather than pooling on the surface, making these patios especially drainage-friendly for low spots in your yard. And the DIY-friendly nature of gravel means you can tackle this project with minimal specialized tools.
Katie-Rose Watson, who built her own gravel patio, shared a money-saving tip with us: “I was pricing out bags of gravel like an idiot until my dad insisted we check out a local stoneyard.” Smart advice! Buying materials in bulk from a stoneyard rather than in bags from retail stores can save you a small fortune.
For a successful gravel patio that stays put, use landscape fabric underneath to prevent weed growth and install sturdy edging to contain the gravel. We recommend choosing angular gravel that compacts better than rounded pea gravel, especially in high-traffic areas.
In coastal communities like Scituate and Cohasset, we’ve installed numerous gravel patios that complement the relaxed, beachy aesthetic while providing practical outdoor living space. There’s something about the casual crunch underfoot that just feels right by the sea.
Whether you choose the DIY-friendly approach of pavers, the timeless elegance of natural stone, or the budget-conscious charm of gravel, your patio will become the heart of your outdoor living space. The material you select sets the stage for countless family gatherings, quiet morning coffees, and starlit evening conversations in the years to come.
Planning & Design Fundamentals
Thoughtful planning is the foundation of any successful patio build. As the saying goes, “Measure twice, cut once”—this philosophy is especially relevant for hardscaping projects.
When planning your patio, consider the size and shape carefully. Most family patios work well at 12×16 feet or larger, providing enough space for both seating and circulation. Think about how you’ll use the space—entertaining requires more room than a simple morning coffee spot.
Proper drainage is critical to prevent water pooling and structural damage. Plan for a 1:4 slope (that’s 1 inch of drop for every 4 feet of patio) away from your home’s foundation. This subtle grade is barely noticeable to the eye but makes all the difference during heavy rainfall.
Sun and shade patterns will determine how comfortable your patio feels throughout the day. Track the sun’s movement across your yard before finalizing your location. That perfect sunny spot at 10 AM might be unbearably hot by 2 PM in July!
For comprehensive planning guidance, our Patio Design resource provides in-depth advice on creating spaces that blend beauty with functionality. Many of our Franklin and Medfield clients have found simple CAD layout tools invaluable for visualizing their patio build before breaking ground.
The Permit & Code Checklist
Before breaking ground on your patio build, understanding local regulations is essential. In Massachusetts, requirements vary by municipality, but some general guidelines apply:
Most ground-level patios require fewer permits than liftd structures, but don’t assume you can skip this step. Many towns have specific stormwater management regulations, especially in environmentally sensitive areas near wetlands or conservation land.
Setback requirements from property lines vary significantly between towns—what’s permitted in Walpole might be prohibited in Westwood. When elevation changes exceed 30 inches, guardrails become a safety requirement, not just a design choice.
“Thoughtful siting will increase the use,” advises landscape architect Pete Pedersen. “Let’s face it, people can be lazy. If you have to go down two flights of stairs to have your coffee, you’re not going to do it.”
One step you should never skip: call 811 before any excavation to have underground utilities marked. This free service prevents dangerous and costly utility strikes during your patio build. We’ve seen too many DIY projects derailed by an accidental cable or pipe strike that could have been easily avoided.
In towns like Sharon and Needham, we’ve helped homeowners steer complex permitting processes for patios that integrate beautifully with existing landscapes while meeting all local regulations.
Small-Space Patio Build Ideas
Limited space doesn’t mean limited possibilities. Even in urban settings like Boston and Brookline, we’ve created stunning small patios that maximize functionality.
A bistro zone needs surprisingly little room—just 7×7 feet is sufficient for a café table and two chairs, perfect for morning coffee or evening wine. For homes with modest yards, this can be an ideal starting point for your patio build.
Think vertically when horizontal space is at a premium. Incorporating trellises, wall planters, or tall containers adds dimension without consuming precious floor space. One Somerville client transformed a tiny 8×10 foot area into a lush garden retreat by using vertical plantings that created the illusion of a much larger space.
Multi-level designs can define different functional areas within a small footprint. Even a slight 6-inch elevation change creates visual separation between dining and lounging zones. Built-in seating around the perimeter frees up floor space while providing ample seating—a trick we’ve used successfully in dozens of Cambridge and Somerville homes.
Material choice becomes even more important in constrained areas. Larger pavers or stones can make a small patio appear more spacious, while intricate patterns might overwhelm limited square footage. Light-colored materials reflect more light, helping small spaces feel more open and airy.
One Quincy homeowner shared: “Our tiny 8×10 foot patio feels twice as large because of the thoughtful design. We have space for grilling, dining, and even a small fire pit—it’s become our favorite ‘room’ in the house.”
Step-by-Step Patio Build Process
Now let’s dive into the actual construction process of your patio build. This methodical approach ensures a stable, long-lasting outdoor space that will provide years of enjoyment.
1. Site Prep & Excavation
The foundation of a successful patio build begins with proper site preparation. As one contractor joke goes, “There are two kinds of concrete—concrete that’s cracked, and concrete that will crack.” The same principle applies to patios—proper prep prevents future problems.
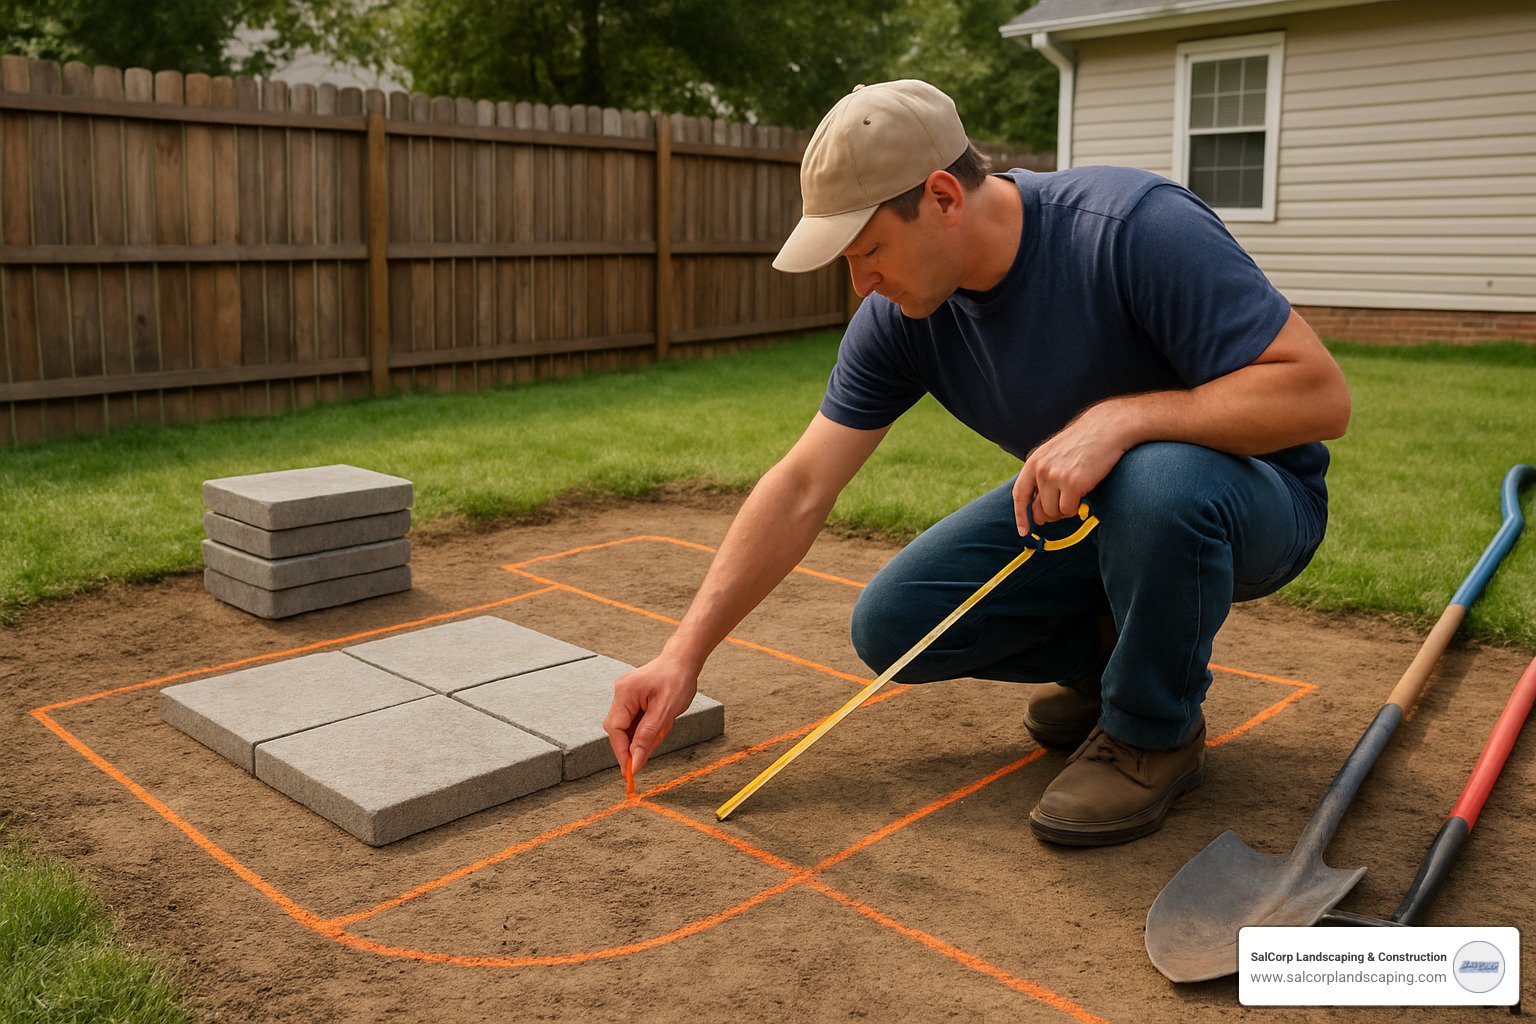
Start by marking your layout with spray paint or a garden hose to outline the patio shape. This visual guide helps you see exactly what you’re working with before digging begins. Next, strip away all grass, plants, and organic material from the area.
Now comes the real work—excavation. You’ll need to dig 6-8 inches plus the thickness of your paving material. Many DIYers don’t dig deep enough, which leads to problems down the road.
“You’ll need to excavate deeper than you might think,” explains Fine Gardening magazine. “At the risk of compromising our job security, we’re willing to let you in on a little secret: You can build your own patio.”
Don’t forget to establish proper slope during excavation. Create a grade that drops 1 inch for every 4 feet away from structures. This seemingly minor detail prevents water from pooling on your patio or flowing toward your home’s foundation.
For larger patio build projects, consider renting a Plate Compactor from your local hardware store. It’s worth every penny to save your back and ensure proper compaction. Here in New England, thorough compaction is your best defense against frost heave and settling.
For a typical 12×12 foot patio, you’ll remove approximately 3-4 cubic yards of soil. Have a plan for this material—perhaps filling in low spots elsewhere in your yard or creating a raised garden bed.
2. Rock-Solid Base Installation
The base is the unsung hero of any patio build—invisible once completed but crucial to long-term success. Think of it as the foundation of your home; cut corners here, and you’ll regret it later.
Start by installing landscape fabric over your excavated area. This simple step prevents weeds while still allowing drainage. Next, add your base material—crusher run (also called ¾-inch minus) is ideal because it contains both stone and fine particles that compact well.
Don’t dump all your base material at once! Add 2-3 inches at a time (called “lifts” in contractor-speak), compacting each layer thoroughly before adding the next. This patience pays dividends in the stability of your finished patio.
As you build up your base, consistently check for that crucial 1-inch drop per 4 feet. A simple level with a string line makes this easy to monitor. For the final sand layer, use 1-inch PVC pipes as guides and a straight 2×4 to level perfectly—a technique called “screeding.”
“Use crusher run (¾″ minus crushed stone with fines) for a stable, draining base,” recommends Fine Gardening. For a 12×12 foot patio, you’ll need approximately 2 cubic yards of base material and 1 cubic yard of sand.
One Framingham client noted: “SalCorp spent more time on the base than on laying the actual pavers. I questioned it at first, but ten years later, my patio is still perfectly level while my neighbor’s DIY project is a wavy mess.”
3. Precise Paver Laying
With proper preparation complete, it’s time for the most satisfying part of your patio build—laying the pavers or stones. This is where your patio begins to take shape before your eyes.
Start at a fixed edge or corner whenever possible. Working from a straight reference point makes alignment much easier throughout the project. Use string lines to guide straight courses and maintain proper alignment—these simple guides prevent the “wandering” effect that screams “amateur job.”
Maintain consistent joints between your pavers. Some materials come with built-in spacers, but for others, you might need to create your own system. A uniform look is worth the extra attention. Once placed, tap each paver gently with a rubber mallet to set it at the proper height.
For those inevitable cuts around curves or obstacles, invest in or rent a masonry saw. The clean edges will lift the entire look of your patio build.
“Rotate the pieces until they fit together, working to create a nearly uniform space between the stones,” advises Better Homes & Gardens. This is especially true for natural stone with irregular shapes, where the process becomes more like assembling a puzzle. Take time to find complementary edges for the most pleasing appearance.
In towns like Wellesley and Dover, we’ve created intricate paver designs that incorporate multiple colors and sizes. These custom outdoor spaces complement the historic architecture while providing modern functionality.
4. Lock-In & Finish
The final steps in your patio build ensure longevity and a polished appearance. Don’t rush this stage—it’s the difference between a patio that lasts three years and one that lasts thirty.
Start by installing edge restraints around the perimeter. These prevent lateral movement and maintain the integrity of your patio edge. Think of them as the picture frame that holds your artwork in place.
Next, sweep polymeric sand into the joints between pavers. This specialized sand contains polymers that harden when exposed to water, creating a firm bond that discourages weeds and ants. After filling the joints, remove all excess sand from the surface.
Give your patio a final pass with the plate compactor. This settles the pavers and begins to set the sand. Then mist the surface with water to activate the polymeric sand, changing it from loose particles to a cement-like bond.
“Sweep polymeric sand into joints, remove excess, then mist to cure,” recommends Lowe’s installation guide. For best results, repeat this process after about a week to ensure joints are completely filled.
While optional, consider sealing your finished patio. A quality sealer can improve color and provide stain resistance—particularly valuable for areas used for dining or entertaining.
One Norwood homeowner shared: “The polymeric sand made all the difference. Five years later, we still don’t have weeds coming through the joints, and the pavers haven’t shifted at all.”
For more detailed guidance on the entire process, our Building a Patio resource provides comprehensive information that walks you through each step with professional insights.
Cost, Time & Skill Snapshot
Understanding the investment required for your patio build helps set realistic expectations and budgeting.

When clients ask me about costs, I always remind them that patio projects are like snowflakes—no two are exactly alike. Based on internet data (not actual SalCorp pricing), the investment range is quite broad depending on your material choices and project complexity.
Gravel patios tend to be the most budget-friendly option, with average costs ranging from $7-$30 per square foot. I’ve seen many Walpole homeowners start with this option, especially for secondary seating areas or transitional spaces.
Moving up the scale, concrete pavers typically fall between $10-$50 per square foot. This wide range reflects the incredible variety of paver styles available—from basic utility pavers to premium designer options with special finishes and edge treatments.
For those seeking the timeless elegance of natural stone, expect internet averages from $15-$70 per square foot. The higher end reflects more exotic stone choices or complex installation patterns that require extensive cutting and fitting.
Stamped concrete offers a middle ground at $12-$50 per square foot, providing the look of natural materials with potentially simpler installation.
These ranges include both materials and professional installation. For DIY warriors tackling their own patio build, materials typically account for about 55% of total project costs, with the remaining 45% representing the labor you’ll be providing yourself—a significant saving!
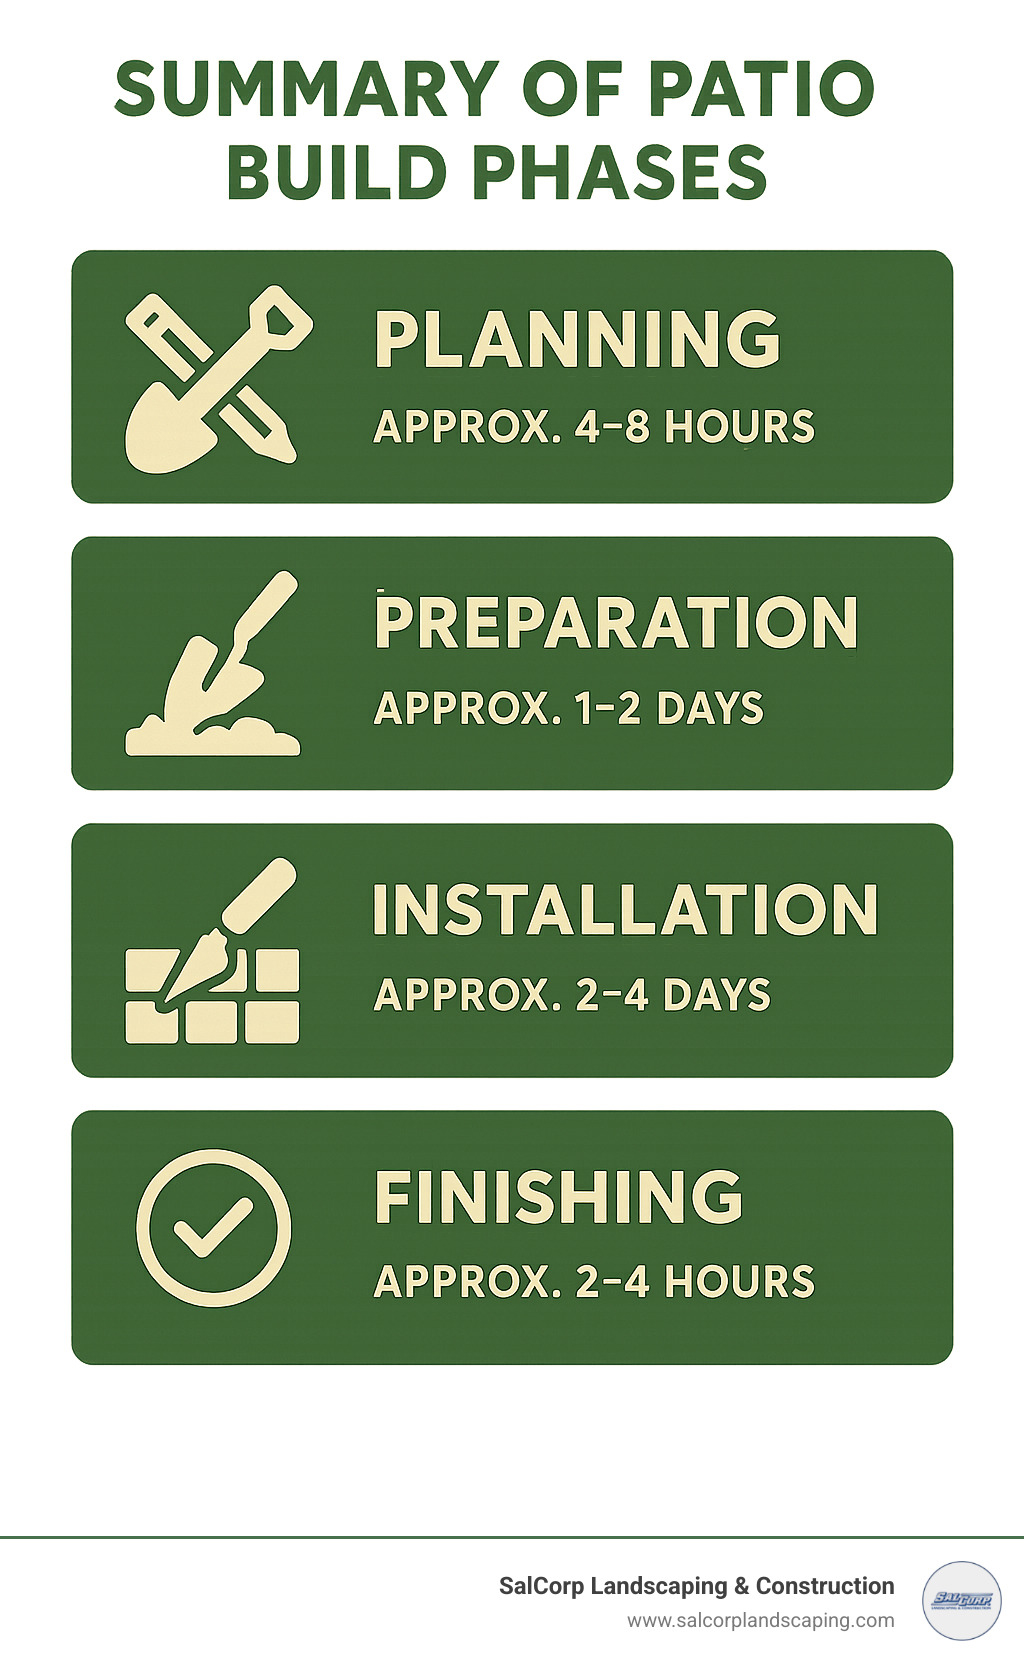
The time commitment for your patio build varies dramatically based on size, materials, and your experience level. A small 10×10 gravel patio might be knocked out in a weekend (8-12 hours), while a medium 12×12 paver patio typically requires 16-24 hours of focused work. Larger natural stone patios, especially those with intricate patterns, can demand 30-50 hours or more.
“A 12-foot-square patio with stone-like pavers can typically be installed by a homeowner and one or two helpers in one weekend,” notes industry research—though this assumes proper planning and having all materials ready on-site. In my experience, first-timers should add a 50% buffer to these time estimates.
Don’t forget to factor tool rentals into your budget. That plate compactor you’ll need typically runs $75-$100 per day, and if you’re cutting pavers or natural stone, a masonry saw rental adds another $50-$90 daily. Having the right tools makes all the difference between a professional-looking finish and a perpetual DIY reminder.
For many of our Massachusetts clients in towns like Dedham and Norwood, the sweet spot has been hiring our team for the critical excavation and base preparation, then taking on the paver installation themselves. This hybrid approach ensures proper drainage and structural integrity while still providing substantial savings.
For more detailed cost information based on material types and project scope, our Average Cost to Install Paver Patio guide provides comprehensive breakdowns that can help you budget more accurately for your specific situation.
Maintenance, Upgrades & Future-Proofing
Your patio build isn’t just a one-and-done project—it’s a living part of your home that needs care and can evolve with your needs. Think of your patio as a good friend: with regular attention and occasional refreshing, it’ll be there for you for decades to come.
Seasonal Maintenance
Living in Massachusetts means our patios face some serious weather challenges throughout the year. A little TLC each season makes all the difference:
When spring arrives, give your patio a thorough sweeping to remove winter’s leftovers. This is also the perfect time to inspect for any frost-heaved pavers or stones that need resetting. In summer, an occasional rinse with a garden hose keeps things looking fresh (though avoid pressure washers on natural stone—they can damage the surface).
Fall maintenance is crucial in New England—those beautiful autumn leaves might look picturesque, but left too long, they’ll stain your pavers. And when winter arrives, remember what one Westwood client learned the hard way: “My metal snow shovel took chips out of three pavers before I realized what was happening. Now I only use plastic shovels on my patio.”
“The joint sand is like the glue holding everything together,” explains Sal Musto of SalCorp. “After a harsh winter, you might need to sweep in some fresh polymeric sand to replace what’s been lost.” This simple maintenance step prevents weeds and keeps pavers firmly in place.
For sealed patios, plan on reapplying sealer every 2-3 years. Think of it like sunscreen for your patio—it protects against stains and weather damage, and keeps colors looking vibrant.
Expanding Your Patio
One of the beautiful things about a properly built paver or stone patio is its expandability. Many of our Dedham and Norwood clients start with a modest dining area, then add on as their budget allows.
“We always tell clients to think ahead when planning their initial patio build,” says Sal. “Even if you’re only building a 10×10 space now, consider where you might want to expand in the future.”
Smart planning means considering:
Future access routes for bringing in materials (that narrow side yard might be fine for wheelbarrows but impossible for equipment)
Matching materials availability (we recommend purchasing a few extra pavers to keep in storage for future matching)
Proper edge installation that allows for seamless expansion
One Dover homeowner shared: “We started with just enough room for our grill and a small table. Three years later, we doubled the size to add a fire pit area. Because SalCorp installed proper edge restraints initially, the expansion blended perfectly—you can’t even tell it was done in phases.”
Upgrading Your Outdoor Space
Your basic patio build can become the foundation for increasingly sophisticated outdoor living. We’ve watched simple patios evolve into complete outdoor rooms that extend our all-too-short Massachusetts outdoor season.
Pergolas and shade structures not only look beautiful but make your patio usable even on the hottest summer days. In Wellesley, we installed a retractable canopy system that provides shade when needed but can be pulled back for stargazing.
Fire features transform how you use your space. As landscape architect Pete Pedersen notes, “Like moths to a flame, people will just come to a fire-pit patio.” We’ve seen this firsthand—a simple fire pit can extend your patio season by months in our New England climate.
Smart lighting has become one of our most requested upgrades. Low-voltage LED systems can be controlled from your phone, creating ambiance while improving safety. One Milton client told us, “The lighting made our patio usable until almost midnight in summer—it’s like we added a whole new room to our house.”
Outdoor kitchens have evolved from simple grills to complete cooking centers. In communities like Brookline and Newton, we’ve installed everything from basic grill stations to elaborate kitchens with refrigerators, pizza ovens, and bar seating.
The beauty of starting with a solid patio build is that these upgrades can happen gradually as your needs and budget evolve. Your patio can grow with you, becoming more personalized and functional over time.
“I tell homeowners to think of their patio as a canvas,” says Sal. “The initial build is just the beginning—over time, you’ll add the elements that make it uniquely yours.” From simple furniture upgrades to complete outdoor room changes, your patio’s potential is limited only by your imagination.
Frequently Asked Questions about Patio Builds
How much base do I really need?
The foundation of your patio build is literally the foundation—and getting it right is crucial, especially here in Massachusetts where frost heave is a genuine concern.
For most patios in our region, we recommend a minimum of 6 inches of compacted base material. This isn’t just our opinion—it’s what the industry standards suggest for our climate. If your property has clay soils or drainage issues (common in areas like Norwood and Medfield), you might need to go deeper with 8-10 inches of base material.
“I thought I could get away with 4 inches of gravel to save on materials,” one Foxboro homeowner told us. “Three years later, my patio looked like a rolling sea of pavers. I had to tear it all up and start over with a proper base.”
Industry research confirms that “a typical DIY paver patio project requires a 6-inch layer of gravel base and a 1-inch layer of sand for proper stability and drainage.” This investment in proper preparation pays dividends in longevity and appearance.
Do I always require a permit for a ground-level patio?
The permit question often causes confusion, and for good reason—requirements vary significantly between Massachusetts communities. Here’s what we’ve learned over two decades of patio build projects:
Ground-level patios typically require fewer permits than liftd structures, but don’t assume you’re completely exempt. In towns like Concord, Newton, and Sudbury, conservation commission approval may be necessary if your property is near wetlands or other protected areas.
Patios attached directly to your house might trigger building permit requirements, while significant excavation could activate stormwater management regulations under laws like the Clean Water Act.
One Westwood client shared: “I assumed I didn’t need permits for my patio since my neighbor didn’t get one. Turns out my property was in a conservation buffer zone—I had to pause construction and apply for permits retroactively. Not a pleasant experience!”
When in doubt, a quick call to your local building department can save significant headaches down the road.
What’s the quickest patio build material for a weekend warrior?
For homeowners looking to transform their outdoor space in a single weekend, gravel patios win the speed contest hands-down. With proper site preparation, a small to medium gravel patio can be completed in a single day, giving you immediate usability.
If you prefer a hard surface, interlocking concrete pavers in simple patterns offer the best combination of speed and durability for a weekend patio build. Stick with straightforward designs like running bond (like a brick wall pattern) or basketweave for the fastest installation.
“Jack-on-jack and running bond patterns are the simplest designs for DIYers,” notes one industry expert, while natural stone typically requires more time for fitting irregular pieces.
A Mansfield homeowner shared their success story: “We completed our 10×12 paver patio in a single weekend. We prepped on Saturday morning, laid pavers Saturday afternoon and Sunday, and were grilling Sunday evening!”
For true weekend warriors, having materials delivered Friday and tools rented in advance makes a significant difference in completing your patio build efficiently. And remember—proper preparation still matters, even for quick projects. A rushed base installation will haunt you for years to come.
Conclusion
A successful patio build transforms your outdoor space into an extension of your home—a place for gathering, relaxing, and creating memories. Whether you choose the DIY route or work with professionals like SalCorp Landscaping & Construction, careful planning and proper execution ensure your patio will provide years of enjoyment.
The journey from bare ground to beautiful outdoor living space might require sweat equity, but the rewards last for decades. As one of our Franklin clients recently told me, “Our patio has become the heart of our summer—where we eat, entertain, and unwind after long days. I can’t believe we waited so long to build it!”
Remember these key takeaways:
– Invest time in proper planning and site preparation
– Don’t skimp on base materials and compaction
– Choose materials that complement your home’s architecture and your lifestyle
– Maintain proper drainage with a 1-inch slope per 4 feet
– Follow a methodical installation process for best results
Beyond the immediate satisfaction of a beautiful new outdoor space, a well-built patio adds lasting value to your property. Real estate professionals consistently rank patios among the top outdoor features that attract buyers, with potential returns on investment between 30-60% depending on design and materials.
As Massachusetts hardscaping experts with over 20 years of experience, we’ve seen how a well-designed patio becomes the center of outdoor living—from summer barbecues in Franklin to autumn gatherings around fire pits in Wellesley. The satisfaction on our clients’ faces when they first see their completed space never gets old.
I’ve personally witnessed how a thoughtfully designed patio can transform not just a backyard, but a family’s entire lifestyle. One Needham couple told me their teenage children started spending more time at home after their patio was built—suddenly their house became the neighborhood gathering spot.
Whether you’re planning a simple DIY project or dreaming of an elaborate outdoor living space, the principles remain the same: solid foundation, quality materials, and attention to detail. With proper care, your patio build will provide a lifetime of outdoor enjoyment through Massachusetts’ beautiful seasons.
For more inspiration and expert guidance on your next outdoor project, explore our Hardscaping / Patios page or contact our team to discuss how we can help bring your vision to life.
