Spray on Grass Seed: Top 10 Tips for a Lush Lawn

Spray on grass seed is revolutionizing the way we think about lawns. If you’re curious about this innovative method, consider these quick highlights:
- What it is: A convenient slurry of grass seed, mulch, and other nutrients applied via spray.
- Key Benefits: Quick germination, erosion control, and a lush, green lawn in less time.
- Who it’s for: Ideal for both homeowners and property managers seeking efficiency and lasting results.
With all its advantages, spray on grass seed is a game-changer in lawn care. This method merges the benefits of traditional seeding with modern efficiency to give you a dense, healthy turf quickly and affordably.
As Sal Musto, founder of SalCorp Landscaping & Construction, I’ve seen how spray on grass seed transforms outdoor spaces. With years of experience in landscaping, we’ve honed our craft to deliver top-notch results in Massachusetts and surrounding areas.
Spray on grass seed terms made easy:
– grass hydroseeding
– hydro grass seed
– hydro seeds for grass
What is Hydroseeding?
Hydroseeding, also known as spray on grass seed, is an innovative method of planting grass that involves spraying a slurry mixture directly onto the soil. This technique is gaining popularity due to its efficiency and cost-effectiveness compared to traditional methods like seeding or sodding.
The Process of Hydroseeding
The process begins by preparing a slurry—a mixture of grass seed, mulch, water, fertilizer, and sometimes a green-tinted dye. This slurry is then sprayed onto the prepared soil using specialized equipment. The mulch acts as a protective layer, helping to retain moisture and shield the seeds from erosion and harsh weather conditions.
Slurry Components
- Grass Seed: The choice of grass seed can be customized based on the climate and specific needs of the lawn. This allows for a custom approach to achieving a lush, green lawn.
- Mulch: This component is crucial for moisture retention and erosion control. The mulch also provides a protective cover for the seeds, ensuring they remain in place until germination.
- Water: Essential for creating the slurry and ensuring the seeds have the moisture they need to begin germination.
- Fertilizer: Added to provide essential nutrients that promote fast and healthy growth.
- Dye: Often included in the mixture to help the applicator see where the slurry has been applied, ensuring even coverage.
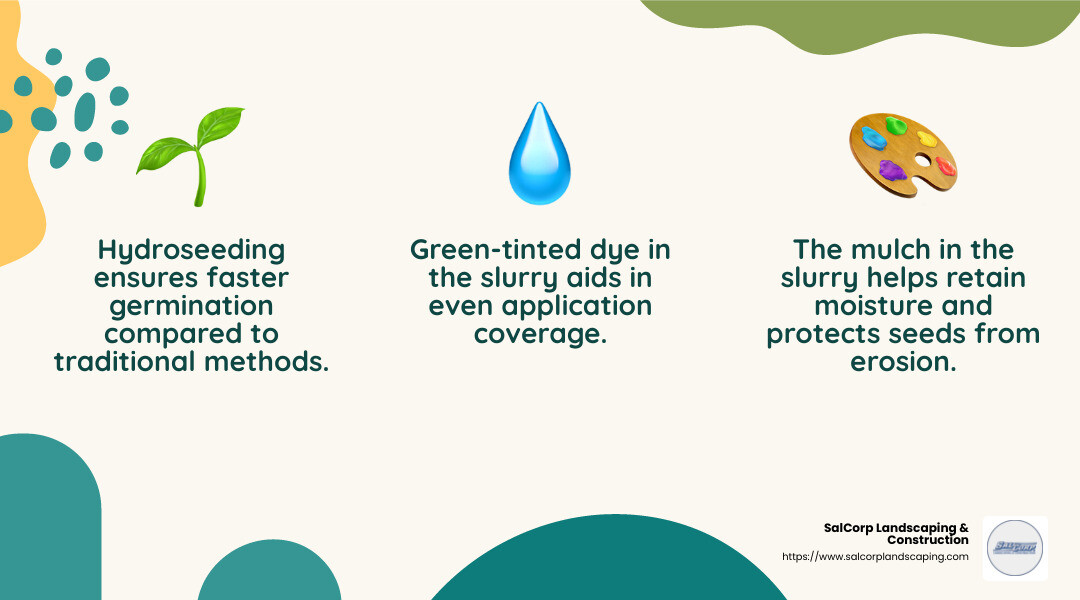
Hydroseeding is ideal for covering large areas quickly and is particularly effective on slopes where soil erosion is a concern. The technique is not only efficient but also promotes faster germination compared to traditional seeding methods, allowing you to enjoy a lush lawn sooner.
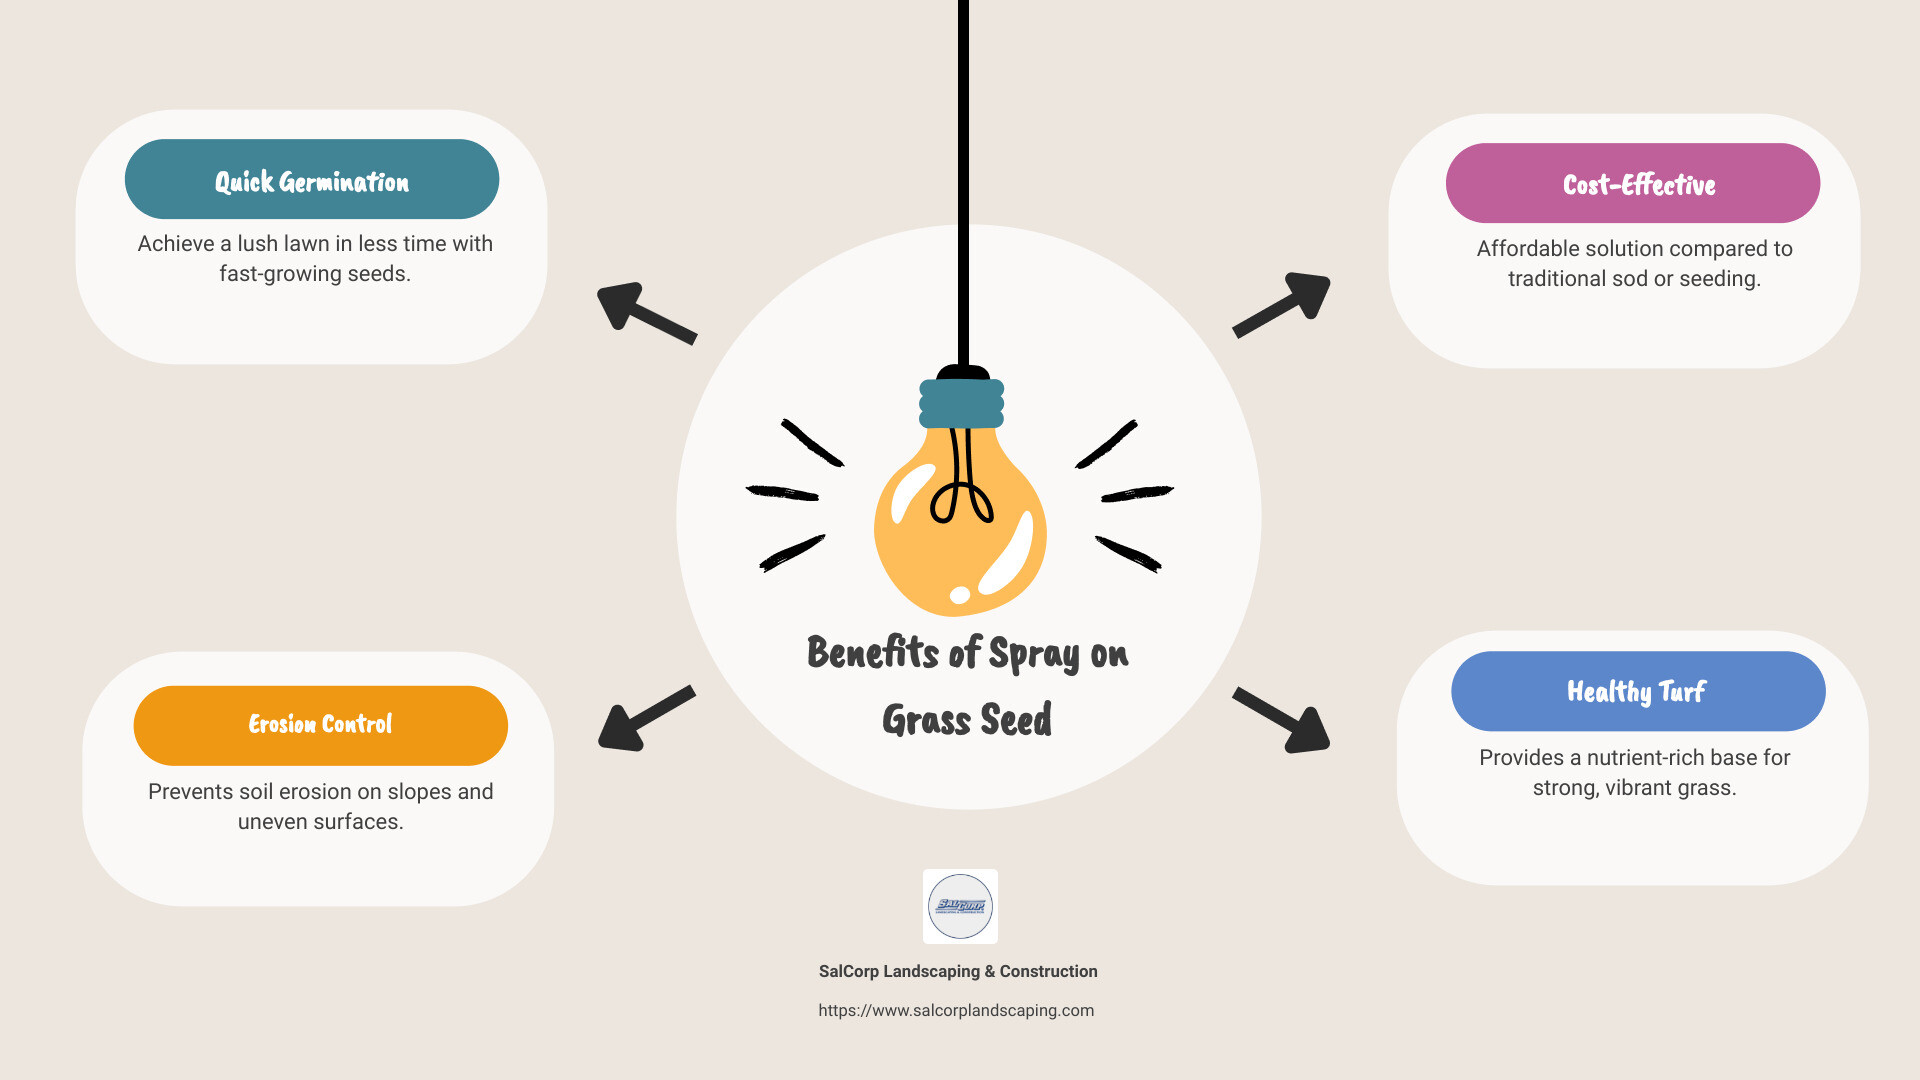
Advantages of Spray on Grass Seed
Spray on grass seed, or hydroseeding, offers several compelling advantages that make it a popular choice for both homeowners and landscapers. Let’s explore why this method stands out:
Cost-Effective
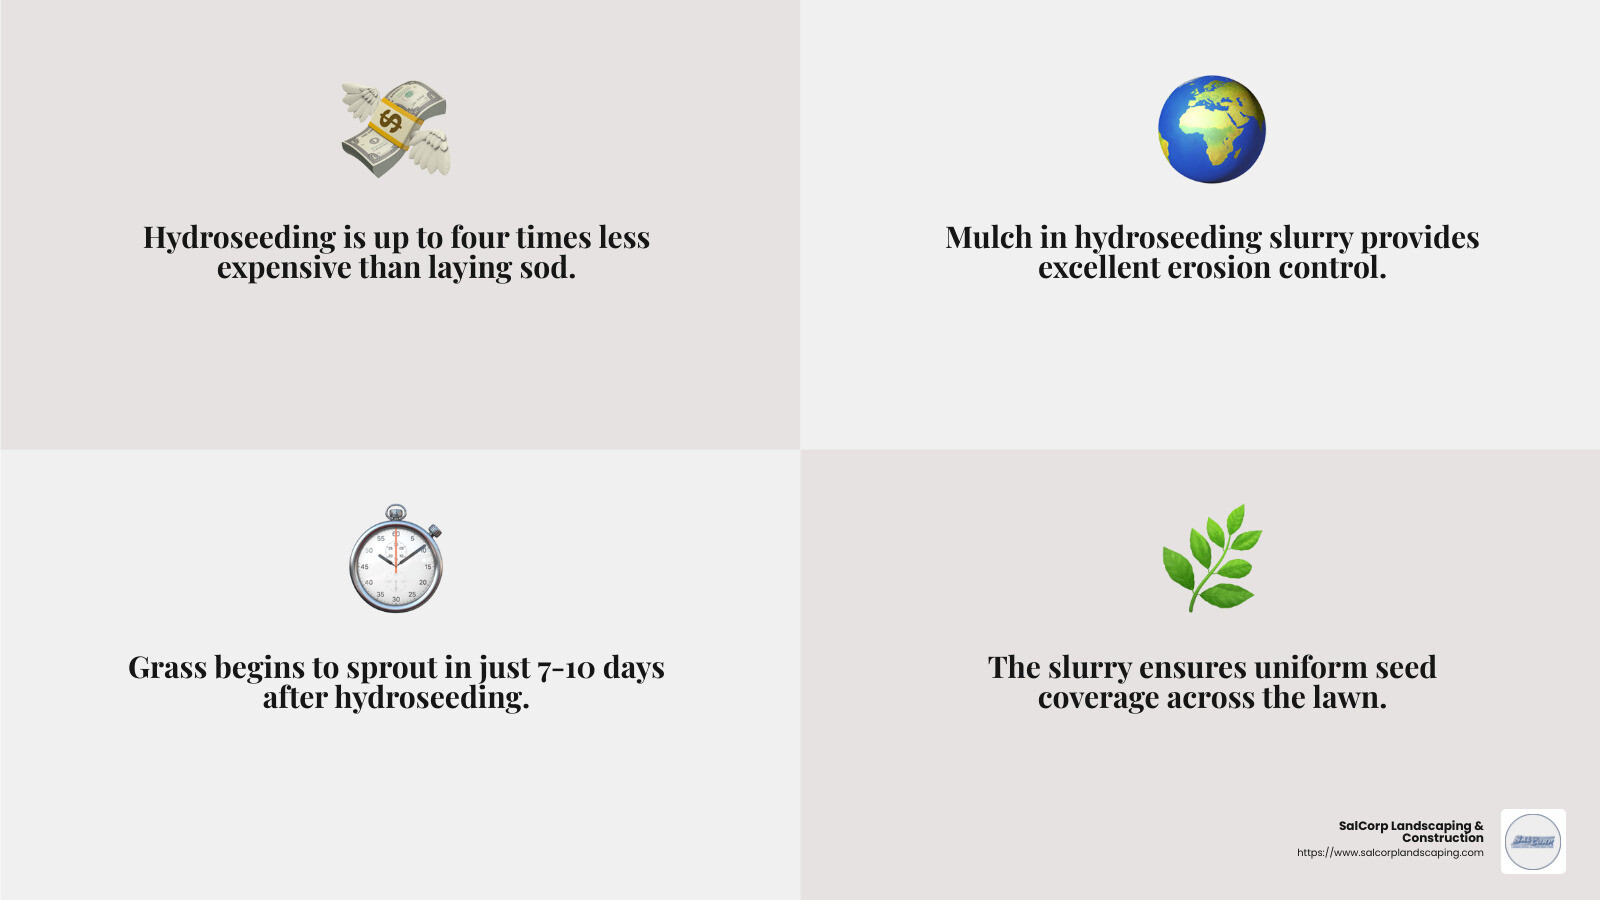
Hydroseeding is more affordable than laying sod and often offers better value than traditional seeding, especially over large areas. While sod provides an instant lawn, it can cost up to four times more than hydroseeding. This makes spray on grass seed an attractive option for budget-conscious individuals looking to transform their lawn without breaking the bank.
Erosion Control
One of the standout benefits of hydroseeding is its ability to control erosion. The mulch in the slurry mixture plays a key role here. It acts like a blanket, holding the seeds in place and protecting them from being washed away by rain or irrigation. This feature is particularly beneficial on steep slopes or areas prone to erosion, where traditional seeding methods might struggle to keep the seeds in place.
Fast Germination
Speed is another area where spray on grass seed excels. The slurry mixture creates an ideal environment for seeds, promoting quick germination. In as little as 7-10 days, you can start to see new grass sprouts emerging. This rapid growth is facilitated by the combination of mulch, moisture, and nutrients in the slurry, which work together to kickstart the germination process.
Uniform Coverage
The application technique ensures even distribution of seeds, resulting in a uniform lawn without the patchiness often seen with hand-seeding. The inclusion of a green dye in the slurry helps applicators achieve consistent coverage by making it easy to see where the mixture has been sprayed. This uniformity not only improves the aesthetic appeal of the lawn but also ensures that every part of the area receives the nutrients and moisture it needs to thrive.
In summary, spray on grass seed is a cost-effective, efficient, and environmentally friendly way to achieve a lush, green lawn. Its benefits in erosion control, fast germination, and uniform coverage make it a superior choice for many landscaping projects. Next, we’ll dive into the practical steps of preparing your lawn for hydroseeding.
How to Prepare Your Lawn for Hydroseeding
Getting your lawn ready for hydroseeding is crucial for ensuring successful growth. Here’s a simple guide to help you prepare:
Soil Test
Before you start, test your soil. This step is important because it tells you about the pH level and nutrient content of your soil. Knowing this helps you decide if any amendments, like lime or gypsum, are needed to create the best environment for your grass seeds. You can get a soil test kit from a garden store or have a professional do it for you.
Clearing the Area
Next, clear the area where you plan to hydroseed. Remove any weeds, rocks, and debris. This gives your seeds a clean slate to grow on. If you have existing grass or plants, you’ll need to remove them too. A sod cutter can make this task easier. Clearing the area helps prevent competition for nutrients and ensures even seed distribution.
Soil Grading
Grade the soil to create a smooth, even surface. This involves leveling the ground and ensuring proper drainage. The soil should slope away from your home to prevent water from collecting near the foundation. A well-graded lawn not only supports healthy grass growth but also prevents erosion and waterlogging.
Material Gathering
Finally, gather all the materials you’ll need for hydroseeding. This includes your custom seed blend, mulch, fertilizer, and any other additives. Renting or purchasing a hydroseeder is also essential if you’re doing it yourself. Having everything ready before you start will make the process smoother and more efficient.
With these preparation steps completed, you’re ready to move on to the actual hydroseeding process. In the next section, we’ll guide you through the step-by-step process of hydroseeding your lawn.
Step-by-Step Guide to Hydroseeding Your Lawn
Measuring and Planning
Before you start spraying, it’s important to measure your lawn. Knowing the exact size helps you mix the right amount of hydroseed. Use a measuring tape or a digital tool to get accurate dimensions.
Once you have your measurements, plan your spraying path. This is crucial to avoid walking over freshly sprayed areas. Start from the farthest point and work your way back to avoid stepping on treated sections.
Creating the Hydroseed Mixture
Next, it’s time to mix your hydroseed ingredients. In your rented auger machine, combine water, seed, mulch, tackifier, lime (if needed), and fertilizer. The consistency of your mix can vary. If you’re working on sloped terrain, aim for a consistency that’s not quite as thick as a milkshake. For flat areas, a thinner mix works better. Consult with your supplier to get the best advice on consistency.
Application Techniques
Now that your mixture is ready, it’s time to spray. Use your hydraulic machine to spray the mixture evenly across your lawn. Move in a steady pattern to ensure uniform coverage. Keep the nozzle close to the ground, but not too close, to avoid uneven application.
Focus on coverage tips. Overlap each pass slightly to ensure there are no missed spots. This will help create a lush, even lawn.
Post-Application Care
After spraying, proper care is essential for successful germination. Water your new grass seed three times a day for short periods, about 15 minutes each time. The goal is to keep the soil moist, not muddy.
Germination times vary by grass type and weather conditions. You might see sprouts in as little as 5 days, but it could take up to 21 days. Be patient and keep the soil consistently moist.
When the grass reaches 3-4 inches tall, it’s time for the first mow. Follow mowing guidelines by ensuring the grass is dry and using sharp blades. Never cut more than one-third of the blade length at a time.
With these steps, you’re on your way to a lush, green lawn. Next, we’ll tackle some common questions about spray on grass seed to help you further master the art of hydroseeding.
Frequently Asked Questions about Spray on Grass Seed
How long does it take for spray on grass seed to grow?
The growth time for spray on grass seed can vary, but it generally germinates faster than traditional seeding. You might see the first sprouts in as little as 5 days. However, it can take anywhere from 5 to 21 days for most grass types to show significant growth. For instance, perennial ryegrass typically germinates within 5-10 days, while Kentucky bluegrass might take between 14-30 days. Weather conditions and the type of grass seed used play a big role in these timelines.
Can I hydroseed my lawn myself?
Yes, you can definitely hydroseed your lawn yourself! Many homeowners choose the DIY route because it’s a cost-effective way to achieve a lush lawn. All you need is the right equipment, like a rented auger machine, and the proper materials. Start by preparing your lawn and mixing the slurry with water, seeds, mulch, and other components. Follow the steps carefully, and you’ll be on your way to a beautiful lawn. That while DIY hydroseeding can save money, hiring professionals can ensure a more uniform application, especially for larger areas.
What are the disadvantages of hydroseeding?
While hydroseeding offers many benefits, there are a few drawbacks to consider. First, it requires a significant amount of water, especially in the first few weeks, to keep the soil moist for germination. This can be a challenge in areas with water restrictions or during dry seasons.
Another potential downside is the initial cost. Although hydroseeding is cheaper than sodding, it is more expensive than traditional seeding. Additionally, the results can be inconsistent if the mixture is not applied evenly or if the preparation steps are not followed properly. Finally, it may take a few months for the lawn to fully establish, requiring patience and ongoing care.
Hydroseeding Costs and Considerations
When considering hydroseeding, understanding the costs and options can help you make the best decision for your lawn.
DIY vs. Professional
DIY hydroseeding can be an appealing option if you’re looking to save on labor costs. Renting a hydroseeder costs between $250-$300 per day, and you’ll need to purchase materials like grass seed, mulch, and fertilizers. While the DIY route can be cost-effective, especially for smaller areas, it requires some familiarity with heavy equipment and lawn care.
On the other hand, hiring professionals can ensure a more uniform application, particularly for larger or more complex landscapes. Professional services typically range from 6 cents to 15 cents per square foot. Hiring experts may be more expensive upfront, but it can save time and ensure quality results.
Cost Range
The cost of hydroseeding varies based on several factors, including the size of your lawn, the type of grass seed used, and your location. Generally, it is more cost-effective than laying sod, yet more expensive than traditional seeding. If you’re working with a large area, hydroseeding is often the most economical choice.
Equipment Rental
Renting a hydroseeder is a practical option for DIY enthusiasts. Daily rental fees range from $250 to $500, depending on the size and type of equipment. That you will also need to budget for additional materials like seed, mulch, and fertilizer, which will increase the overall cost.
Balancing these considerations will help you decide whether to tackle hydroseeding on your own or enlist the help of professionals. Each approach has its merits, and your choice will depend on your budget, lawn size, and personal preference.
Conclusion
As we wrap up our exploration of spray on grass seed and hydroseeding, highlight how these techniques align with sustainable landscaping practices. At SalCorp Landscaping & Construction, we are committed to creating beautiful, resilient landscapes that respect and preserve the environment.
Sustainable landscaping is not just a trend; it’s a responsibility. By using methods like hydroseeding, we not only achieve lush lawns but also contribute to soil stability and reduced water usage. The organic mulch used in hydroseeding helps retain moisture, reducing the need for frequent irrigation. This aligns perfectly with SalCorp’s dedication to environmentally friendly practices, as seen in our use of resource-efficient plants and rainwater catchment systems.
Choosing the right landscaping partner is crucial for a successful project. With over 20 years of experience, SalCorp Landscaping & Construction provides comprehensive outdoor solutions custom to your needs. As an owner-operated business, we bring a personal touch to every project, ensuring that each landscape reflects our high standards for quality and sustainability.
If you’re ready to transform your outdoor space with hydroseeding or explore other sustainable landscaping options, we invite you to learn more about our services. Visit our Hydroseeding Lawns page to find how we can help you achieve a lush, green lawn while protecting the environment.
By choosing SalCorp, you’re not just investing in your property—you’re making a choice for a greener, more sustainable future. Let’s create beautiful landscapes together, one lawn at a time.
