Step by Step Landscaping Ideas: 10 Best Tips for 2024
Step by step landscaping ideas transform your outdoor space from a blank canvas into a beautiful and functional environment. Here are the essential steps:
- Plan your project by assessing the yard’s needs and setting goals.
- Remove existing lawn using techniques like sheet mulching or physical removal.
- Install hardscape elements such as pathways and patios for structure and appeal.
- Build healthy soil to nourish your plants.
- Install an irrigation system to maintain plant vitality.
- Purchase and install plants that suit your landscape’s needs.
- Water efficiently to conserve resources.
These steps will ensure a successful landscaping project, culminating in improved curb appeal and increased property value.
I’m Sal Musto. With over twenty years of experience in turning ordinary gardens into extraordinary landscapes, I’ve honed my expertise in creating comprehensive step by step landscaping ideas. My team and I at SalCorp Landscaping & Construction are committed to offering the very best in landscape design, installation, and maintenance across Massachusetts. Now, let’s dig deeper into turning your vision into reality.
Know your step by step landscaping ideas terms:
– brick step designs
– how to lay a brick step
Step-by-Step Landscaping Ideas
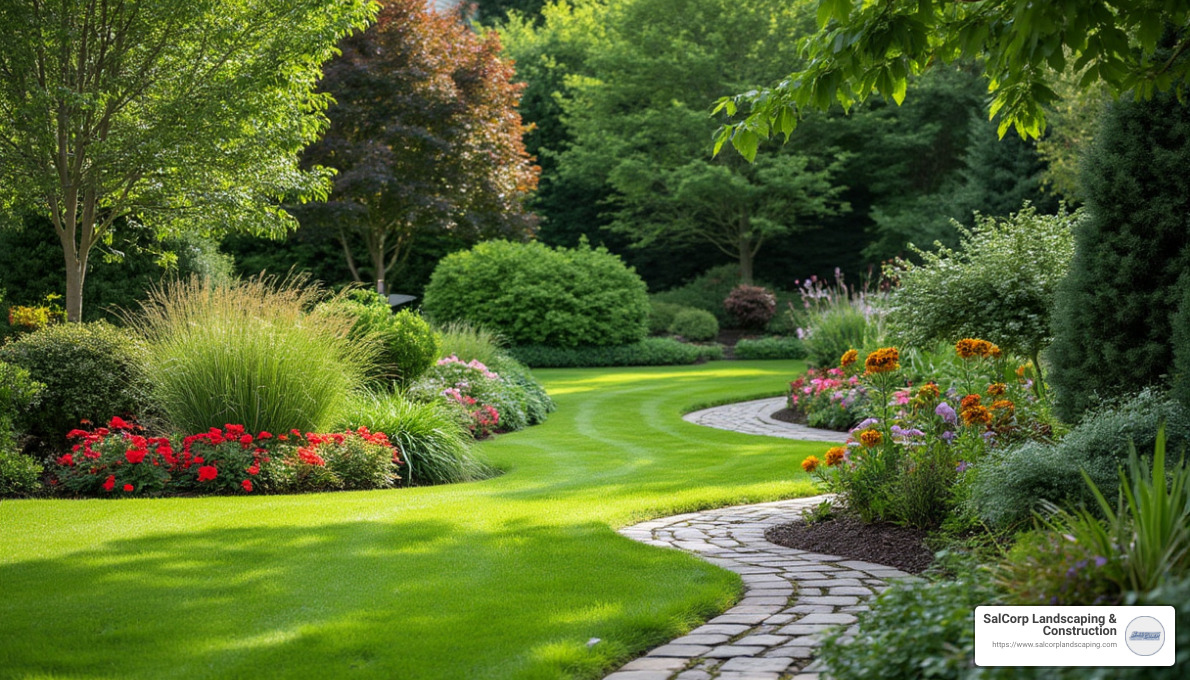
Changing your outdoor space into a dream landscape doesn’t have to be overwhelming. Follow these step-by-step landscaping ideas to create a beautiful and functional environment:
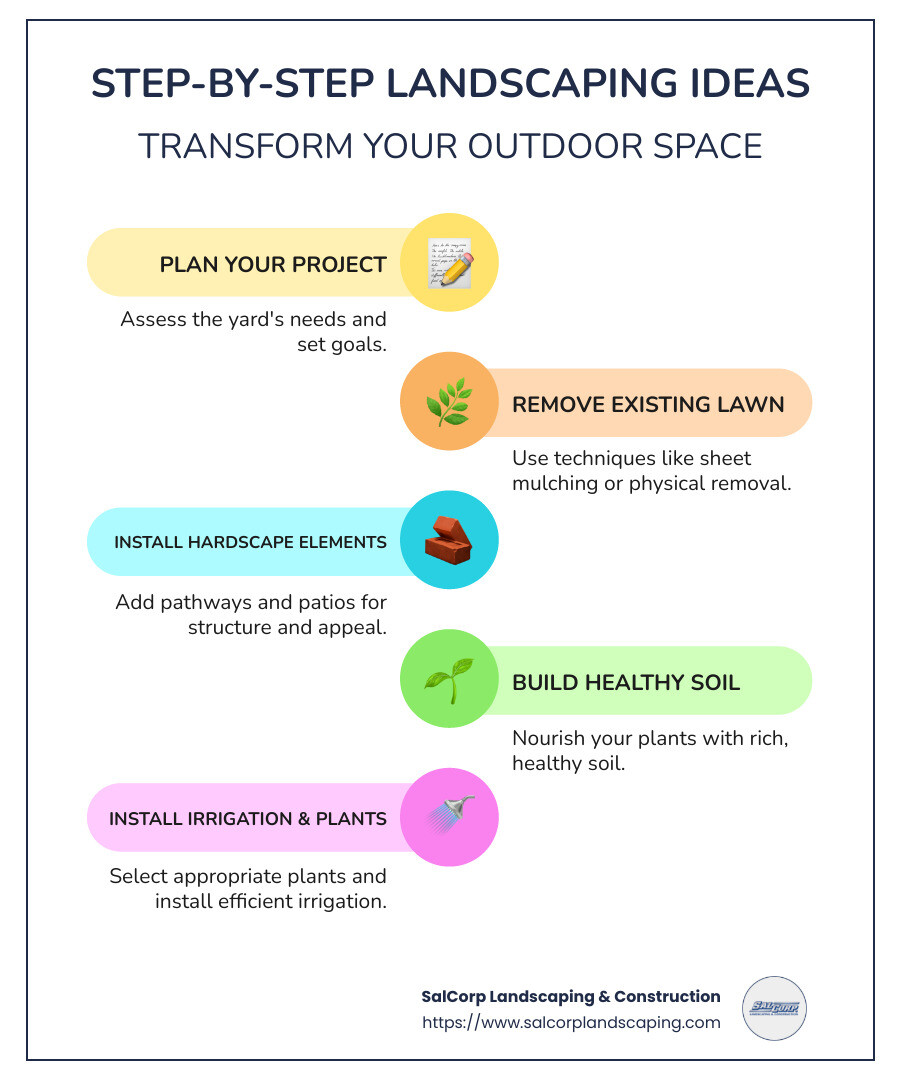
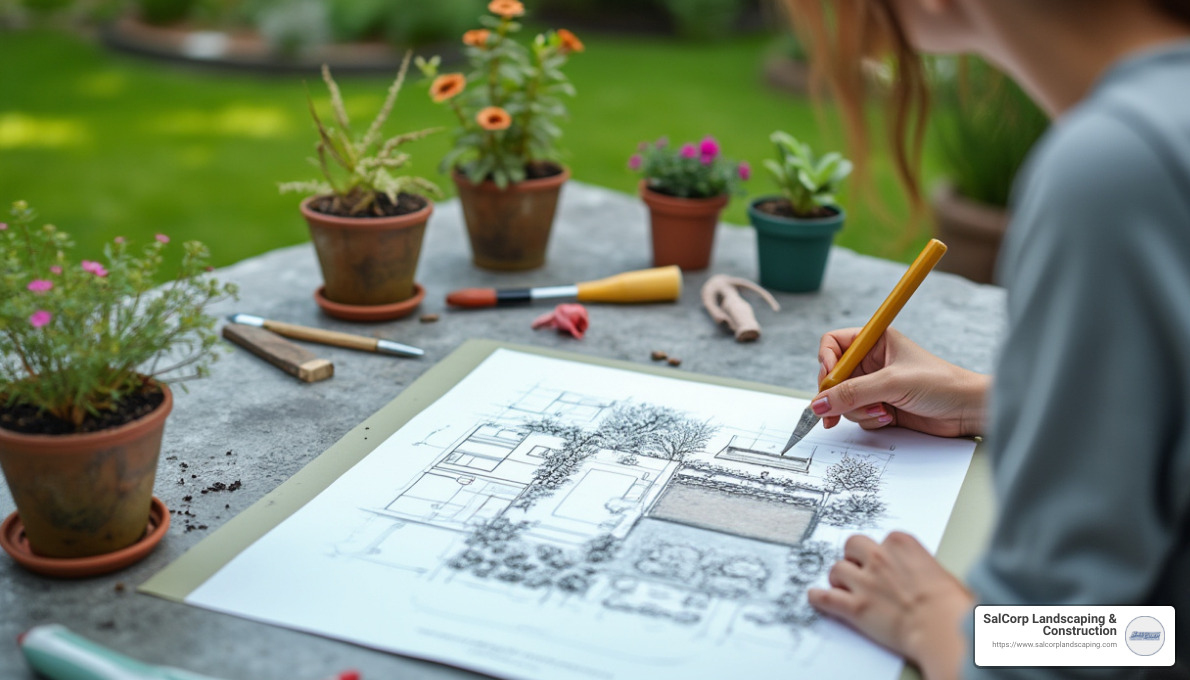
1. Plan Your Project
Start by assessing your yard’s needs and setting clear goals. Do you want a serene garden, an entertainment area, or a play space for kids? This planning stage is crucial. Without a solid plan, it’s easy to get off track.
- Identify Goals: Decide on the main purpose of your landscape.
- Sketch Ideas: Draw a rough layout of your space.
2. Remove the Lawn
If you’re dealing with an existing lawn, you’ll need to remove it to make way for new features. Consider using sheet mulching for an eco-friendly option or physical removal for quicker results.
- Sheet Mulching: A layered method that suppresses weeds and enriches the soil.
- Physical Removal: Use tools like sod cutters for efficiency.
3. Install Hardscape Elements
Hardscape structures like pathways, patios, and walls define the space and add value. These elements should be installed before planting to avoid disturbing plants later.
- Pathways & Patios: Create flow and structure.
- Retaining Walls: Useful for sloped gardens.
4. Build Healthy Soil
Good soil is the backbone of any thriving garden. Before planting, enrich your soil with organic matter to improve its structure and fertility.
- Compost & Organic Matter: Boosts soil health and plant growth.
- Soil Testing: Know what nutrients are needed.
5. Install an Irrigation System
A well-planned irrigation system ensures your plants get the right amount of water. Drip irrigation is particularly efficient, directing water straight to the roots.
- Drip Irrigation: Reduces water waste and is easy to maintain.
- Zone Planning: Tailor watering schedules to different plant needs.
6. Purchase and Install Plants
Choose plants that suit your climate and soil conditions. Opt for native species for easier maintenance and better adaptability.
- Right Plants: Select based on sunlight, soil, and climate.
- Quality Plants: Invest in healthy plants from reputable nurseries.
7. Water Efficiently
Once your plants are in the ground, water them efficiently. This might involve adjusting your irrigation system or hand-watering until they establish.
- Mulch: Helps retain moisture and reduces watering frequency.
- Efficient Techniques: Water early in the morning or late in the evening to minimize evaporation.
By following these step-by-step landscaping ideas, you can ensure your project is successful, enhancing both the beauty and value of your property. Next, let’s explore how to effectively plan your landscape project to bring your vision to life.
Planning Your Landscape Project
Turning your outdoor space into a beautiful landscape begins with careful planning. This phase is where your vision takes shape, setting the stage for everything to follow.
Site Inventory
Start by conducting a site inventory. This involves observing your yard at different times of the day to understand how sunlight, shade, and wind patterns affect it. Note any existing features like trees, slopes, or water drainage areas. Understanding these factors will guide your decisions on plant placement and design.
- Sunlight Patterns: Identify sunny and shady areas.
- Existing Features: Map out trees, structures, and slopes.
- Drainage: Observe how water flows during rain.
Needs Assessment
Next, perform a needs assessment. Determine what you want from your landscape. Are you looking for a relaxing garden, a play area for kids, or a space for entertaining guests? Align your goals with your lifestyle to ensure the space meets your needs.
- Purpose: Define the main functions of your landscape.
- Lifestyle Considerations: Tailor the design to your daily activities.
Functional Diagrams
Create functional diagrams to visualize your space. Use simple shapes like circles and squares to represent different areas, such as patios, gardens, or lawns. This helps you see how each section interacts and fits within the overall design.
- Simple Shapes: Use circles for gardens, squares for patios.
- Interconnections: Plan pathways and transitions between areas.
Conceptual Design
With your functional diagrams in hand, move on to the conceptual design stage. Here, you start to refine your ideas, considering aesthetics and functionality. Think about how to incorporate elements like seating, water features, or privacy screens.
- Aesthetic Elements: Consider colors, textures, and forms.
- Functional Features: Include seating, paths, and focal points.
Final Design Plan
Finally, develop a final design plan. This is a detailed blueprint of your landscape, showing exact measurements and placements of all elements. It’s a crucial step that ensures everything fits together seamlessly.
- Detailed Layout: Include measurements and material specifications.
- Plant Selection: Choose species that thrive in your conditions.
By following these planning steps, you lay a strong foundation for your landscape project. This thoughtful approach ensures that your outdoor space is both beautiful and functional, ready to improve your lifestyle and property value.
Next, we’ll dive into the process of removing the lawn to prepare for new features.
Removing the Lawn
Once you’ve laid out your landscape plan, it’s time to tackle the existing lawn. This is a crucial step in changing your yard into a water-wise and eco-friendly space. Let’s explore some effective methods for removing the lawn: sheet mulching, physical removal, and regrading.
Sheet Mulching
Sheet mulching is an eco-friendly and efficient way to remove your lawn without the need for heavy machinery. This method involves layering organic materials over the grass to smother it, creating a rich bed for new plants.
Here’s how to do it:
- Mow the Lawn: Cut the grass as short as possible.
- Water the Area: Moisten the lawn to help the decomposition process.
- Layer Newspaper or Cardboard: Cover the grass with a thick layer of newspaper or cardboard. This acts as a barrier, blocking sunlight and preventing growth.
- Add Organic Material: Pile on layers of compost, straw, and mulch. These materials will decompose over time, enriching the soil.
Sheet mulching is not only effective but also enriches the soil, making it healthier for future plants.
Physical Removal
For those who prefer a faster approach, physical removal is another option. This method involves cutting and lifting away the lawn using tools or machines.
Here’s a simple guide:
- Rent Equipment: Consider renting a sod cutter for larger areas.
- Cut the Grass: Use the sod cutter or a shovel to slice under the roots.
- Lift and Remove: Roll up the sod and remove it from the area.
Physical removal is labor-intensive but provides immediate results, allowing you to quickly move on to the next steps of your landscaping project.
Regrading
Regrading is essential if your landscape plan involves changing the contour of your yard. This process involves leveling or reshaping the land to improve drainage and prepare for new features.
Steps to regrade:
- Assess the Slope: Determine areas where water pools or flows improperly.
- Plan the Grade: Decide on the new slope that will direct water away from structures.
- Move Soil: Use shovels, rakes, or machinery to adjust the soil level.
Regrading helps prevent water issues and sets the stage for a more functional and visually appealing landscape.
By choosing the right method for removing the lawn, you prepare the ground for a stunning change. Next, we’ll explore how to install hardscape elements to improve your outdoor space.
Installing Hardscape Elements
Once you’ve cleared the lawn, it’s time to focus on installing hardscape elements. These features provide structure and functionality to your landscape, changing it into a truly inviting space. Let’s explore some key hardscape elements: pathways, dry creek beds, boulders, steps, and walls.
Pathways
Pathways guide movement through your garden, adding both utility and charm. They can be crafted from a variety of materials like brick, flagstone, or concrete pavers. Curved paths create a natural flow, while straight lines offer a more formal look.
Key Tips:
– Material Choice: Choose materials that complement your home’s exterior.
– Design: Consider a winding design for a relaxed feel or straight lines for a modern edge.
– Installation: Ensure a stable base to prevent shifting over time.
Dry Creek Beds
Dry creek beds are not only functional but also add a natural aesthetic to your garden. They help manage water runoff and prevent erosion, especially in sloped areas.
Steps to Create a Dry Creek Bed:
1. Plan the Route: Decide where water naturally flows and plan your creek bed along that path.
2. Excavate the Channel: Dig a shallow trench to guide the water.
3. Add Rocks and Gravel: Line the trench with larger rocks and fill with gravel to mimic a natural stream.
Boulders
Boulders bring a sense of permanence and grandeur to your landscape. They can be used as focal points or to create natural borders.
Placement Tips:
– Size Matters: Choose boulders that are proportionate to the space.
– Natural Look: Partially bury boulders to make them appear as though they’ve always been there.
– Groupings: Arrange boulders in clusters for a more organic appearance.
Steps
Steps are essential for navigating changes in elevation within your garden. They can be crafted from materials like stone or wood, blending seamlessly with other landscape elements.
Design Considerations:
– Safety First: Ensure steps are even and stable.
– Material Match: Use the same material as other hardscape features for consistency.
– Lighting: Consider adding lights for safety and ambiance.
Walls
Walls serve multiple purposes, from retaining soil on slopes to creating privacy or defining spaces. They can be built from stone, concrete, or brick, depending on the desired style.
Building Basics:
– Retaining Walls: These must be sturdy and well-drained to prevent collapse.
– Decorative Walls: Focus on aesthetics, using materials that match your landscape theme.
– Height and Length: Ensure walls are proportionate to the rest of your landscape.
By incorporating these hardscape elements, you create a foundation that improves both the beauty and functionality of your outdoor space. This sets the stage for the next step: building healthy soil to support your new plants.
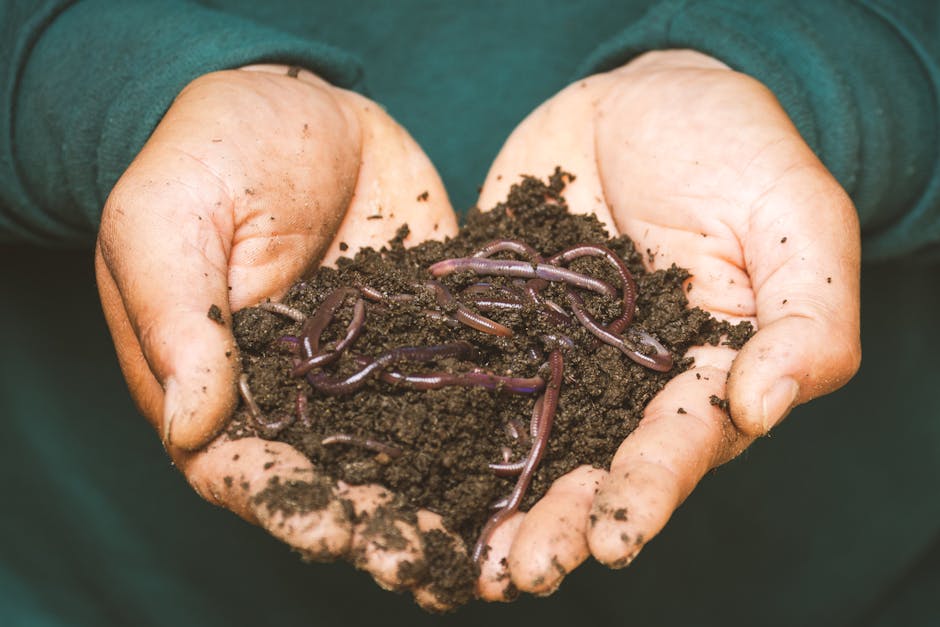
Building Healthy Soil
Healthy soil is the heart of any thriving landscape. It’s more than just dirt—it’s a living ecosystem that supports plant life. Let’s explore how to build healthy soil by focusing on key components like soil composition, minerals, microorganisms, and organic matter.
Soil Composition
The foundation of good soil lies in its composition. Soil is typically made up of sand, silt, and clay. The ideal mix, known as loam, balances these elements to provide adequate aeration, drainage, and nutrient retention.
Key Points:
– Loam is Ideal: Aim for a balanced mix of sand, silt, and clay.
– Test Your Soil: Conduct a soil test to understand its composition and pH level.
Minerals
Minerals are essential for plant growth, providing nutrients like nitrogen, phosphorus, and potassium. These elements support everything from root development to flowering.
Mineral Tips:
– Amend as Needed: Use fertilizers or amendments to address deficiencies.
– Natural Sources: Consider organic options like bone meal or rock phosphate.
Microorganisms
A thriving soil ecosystem is teeming with microorganisms. These tiny life forms, including bacteria and fungi, help break down organic matter and release nutrients for plants.
Microorganism Insights:
– Encourage Diversity: Diverse microorganisms mean healthier soil.
– Compost: Adding compost introduces beneficial microbes.
Organic Matter
Organic matter, such as decomposed plant material, enriches the soil. It improves structure, increases moisture retention, and provides a continuous nutrient supply.
Organic Matter Practices:
– Compost Regularly: Incorporate compost to add organic content.
– Mulch: Use mulch to retain moisture and slowly add organic matter as it breaks down.
By focusing on these elements, you create a robust soil foundation that supports plant health and growth. Healthy soil not only nourishes your plants but also improves the overall ecosystem of your landscape. As you enrich your soil, you’re preparing the ground for the next step: installing an efficient irrigation system.
Installing an Irrigation System
An efficient irrigation system is crucial for keeping your landscape lush and healthy. Let’s explore the essentials of drip irrigation, rootzones, and water efficiency.
Drip Irrigation
Drip irrigation is a game-changer for modern landscapes. Unlike traditional sprinklers that spray water everywhere, drip systems deliver water directly to the base of each plant.
Benefits of Drip Irrigation:
– Precision Watering: Water goes straight to the plants, reducing waste.
– Less Evaporation: Water drips slowly, minimizing loss to evaporation.
– Customizable: Easily adjust to fit the layout of your garden.
Rootzones
Understanding rootzones is key to effective watering. The rootzone is where plants absorb water and nutrients from the soil. Proper irrigation targets this area, ensuring plants get what they need to thrive.
Rootzone Tips:
– Deep Watering: Encourage roots to grow deep by watering thoroughly but infrequently.
– Zone Planning: Group plants with similar water needs together for more efficient irrigation.
Water Efficiency
Water efficiency isn’t just good for the environment—it’s also good for your wallet. By using water wisely, you can maintain a vibrant landscape without the hefty water bill.
Water Efficiency Strategies:
– Timers and Sensors: Automate your system to water at optimal times, like early mornings or late evenings.
– Rain Sensors: Install rain sensors to pause watering when nature provides.
Installing a well-planned irrigation system ensures your plants stay hydrated, healthy, and happy. By focusing on drip irrigation, targeting rootzones, and maximizing water efficiency, you set the stage for a sustainable and thriving landscape. With your irrigation system in place, it’s time to move on to selecting and installing the right plants for your garden.
Selecting and Installing Plants
Choosing the right plants for your landscape is like picking the perfect ingredients for a recipe. It’s essential to select plants that suit your climate and soil conditions. This ensures they will thrive and look beautiful in your garden.
Right Plants
When selecting plants, consider these key factors:
- Climate Suitability: Choose plants that are adapted to your local climate. This increases their chances of survival and reduces maintenance.
- Soil Compatibility: Test your soil to understand its pH and nutrient content. Select plants that will flourish in those specific soil conditions.
- Sun Exposure: Know how much sun each area of your garden receives. Some plants love the sun, while others prefer shade.
Quality Plants
Quality matters when it comes to plants. Here’s how to ensure you’re getting the best:
- Healthy Roots: Check for strong, white roots that are not circling the pot.
- Vibrant Leaves: Look for leaves that are free of spots or discoloration.
- Pest-Free: Inspect plants for any signs of pests or diseases.
Proper Installation
Proper installation is crucial for plant health. Follow these steps to set your plants up for success:
- Dig the Right Hole: Make sure the hole is twice as wide as the root ball but no deeper. This gives roots room to spread.
- Position Correctly: Place the plant in the hole so the top of the root ball is level with the ground. This prevents water from pooling around the stem.
- Backfill with Care: Fill the hole with native soil, gently tamping it down to remove air pockets.
- Water Thoroughly: After planting, water deeply to help settle the soil and start root growth.
By selecting the right plants, ensuring their quality, and focusing on proper installation, you’ll create a landscape that’s not only beautiful but also sustainable and easy to maintain. Now that your plants are in place, let’s explore how to water them efficiently to keep them thriving.
Watering Efficiently
Watering your landscape efficiently is crucial to keeping your garden vibrant while conserving water. Let’s explore how to reduce waste, manage water zones, and use efficient techniques to ensure your landscape stays healthy.
Reduce Waste
Efficient watering starts with reducing waste. Here’s how you can do it:
- Drip Irrigation: This system delivers water directly to the plant roots, minimizing evaporation and runoff. It’s perfect for water-wise landscapes.
- Timers and Sensors: Use timers to water during cooler parts of the day, like early morning or late evening, reducing evaporation. Soil moisture sensors can prevent overwatering by stopping the system when the ground is already moist.
Water Zones
Creating water zones helps tailor watering to your garden’s specific needs. Here’s how:
- Group by Water Needs: Plant species with similar water requirements together. This ensures each zone gets just the right amount of water.
- Adjust for Sun Exposure: Areas that receive more sun may need more frequent watering than shaded areas.
Efficient Techniques
Implementing these techniques can further improve water efficiency:
- Deep Watering: Water deeply but less frequently to encourage deep root growth, making plants more drought-resistant.
- Mulching: A layer of mulch around plants helps retain soil moisture, reducing the need for frequent watering.
- Rainwater Harvesting: Collect rainwater in barrels to use during dry spells. It’s a sustainable way to keep your garden hydrated.
By focusing on reducing waste, establishing water zones, and adopting efficient techniques, you can maintain a lush garden while conserving water. Next, we’ll address some frequently asked questions about landscaping to further improve your gardening knowledge.
Frequently Asked Questions about Landscaping
How to landscape step by step?
Landscaping doesn’t have to be overwhelming. By breaking it down into step by step landscaping ideas, you can transform your outdoor space smoothly and efficiently. Here’s a simple guide:
- Planning: Start with a clear vision. Identify your goals and needs, and sketch a rough layout of your ideas.
- Lawn Removal: Remove existing turf to prepare the soil for new plantings and hardscape elements. Consider sheet mulching or physical removal based on your yard’s needs.
- Install Hardscape: Focus on elements like pathways, dry creek beds, and walls. These structures provide the framework for your landscape.
- Build Soil: Healthy soil is the foundation of a thriving garden. Amend your soil with compost and organic matter to improve its structure and fertility.
- Install Irrigation: Plan and install a system custom to your landscape zones, like drip irrigation for water efficiency.
- Purchase Plants: Choose plants that suit your climate and soil. Opt for smaller plants to save money and allow them to grow into the space.
- Water Efficiently: Use techniques like deep watering and mulching to conserve water while keeping your garden vibrant.
What is the first rule of landscaping?
The first rule of landscaping is to plant big to small. Start with larger elements like trees, which serve as anchors in your design. Then, add shrubs, followed by perennials, and finally, ground cover. This approach ensures a balanced and cohesive look, providing structure and layers to your garden.
What are the 5 basic elements of landscape?
Understanding the five basic elements of landscape design can help create a cohesive and aesthetically pleasing outdoor space:
- Line: Lines guide the eye through the landscape, creating movement and direction. They can be straight for a formal look or curved for a natural feel.
- Form: Forms refer to the shapes of objects in the landscape, such as the rounded form of a tree or the vertical form of a columnar plant.
- Texture: Texture involves the surface quality of plants and hardscape materials. Mixing textures adds depth and interest to the landscape.
- Color: Color adds life to your garden. Consider using a color theme to create harmony and visual appeal.
- Scale: Scale refers to the size of elements in relation to each other and the overall landscape. Balance is key to ensuring that no single element overwhelms the space.
By incorporating these elements, you can create a landscape that is both functional and beautiful. Next, we’ll explore how to plan your landscape project effectively.
Conclusion
At SalCorp Landscaping & Construction, we believe that your outdoor space is an extension of your home and a canvas for your creativity. With over 20 years of experience, we offer comprehensive solutions custom to meet the unique needs of each client. Whether you’re looking to improve curb appeal or create a personal retreat, our team is equipped to transform your vision into reality.
Our expertise spans the full spectrum of landscaping services, from meticulous planning and design to the installation of hardscape and plantings. We pride ourselves on using sustainable practices that not only beautify your space but also benefit the environment. Our commitment to sustainability includes using native plants, efficient irrigation systems, and organic mulches to ensure that your garden thrives with minimal impact on natural resources.
Serving various Massachusetts communities, including Walpole, Canton, and Dedham, we are dedicated to delivering exceptional craftsmanship and personalized service. Our owner-operated business model ensures that every project receives the attention to detail it deserves, making us a trusted partner in creating captivating outdoor spaces.
Ready to transform your landscape? Contact us today to explore how we can bring your outdoor dreams to life with innovative designs and expert craftsmanship. At SalCorp Landscaping & Construction, we don’t just build gardens; we create lasting impressions that improve the beauty and value of your property.
