artificial grass setup: Top 10 Powerful Benefits in 2025
Transform Your Yard with Artificial Grass Setup
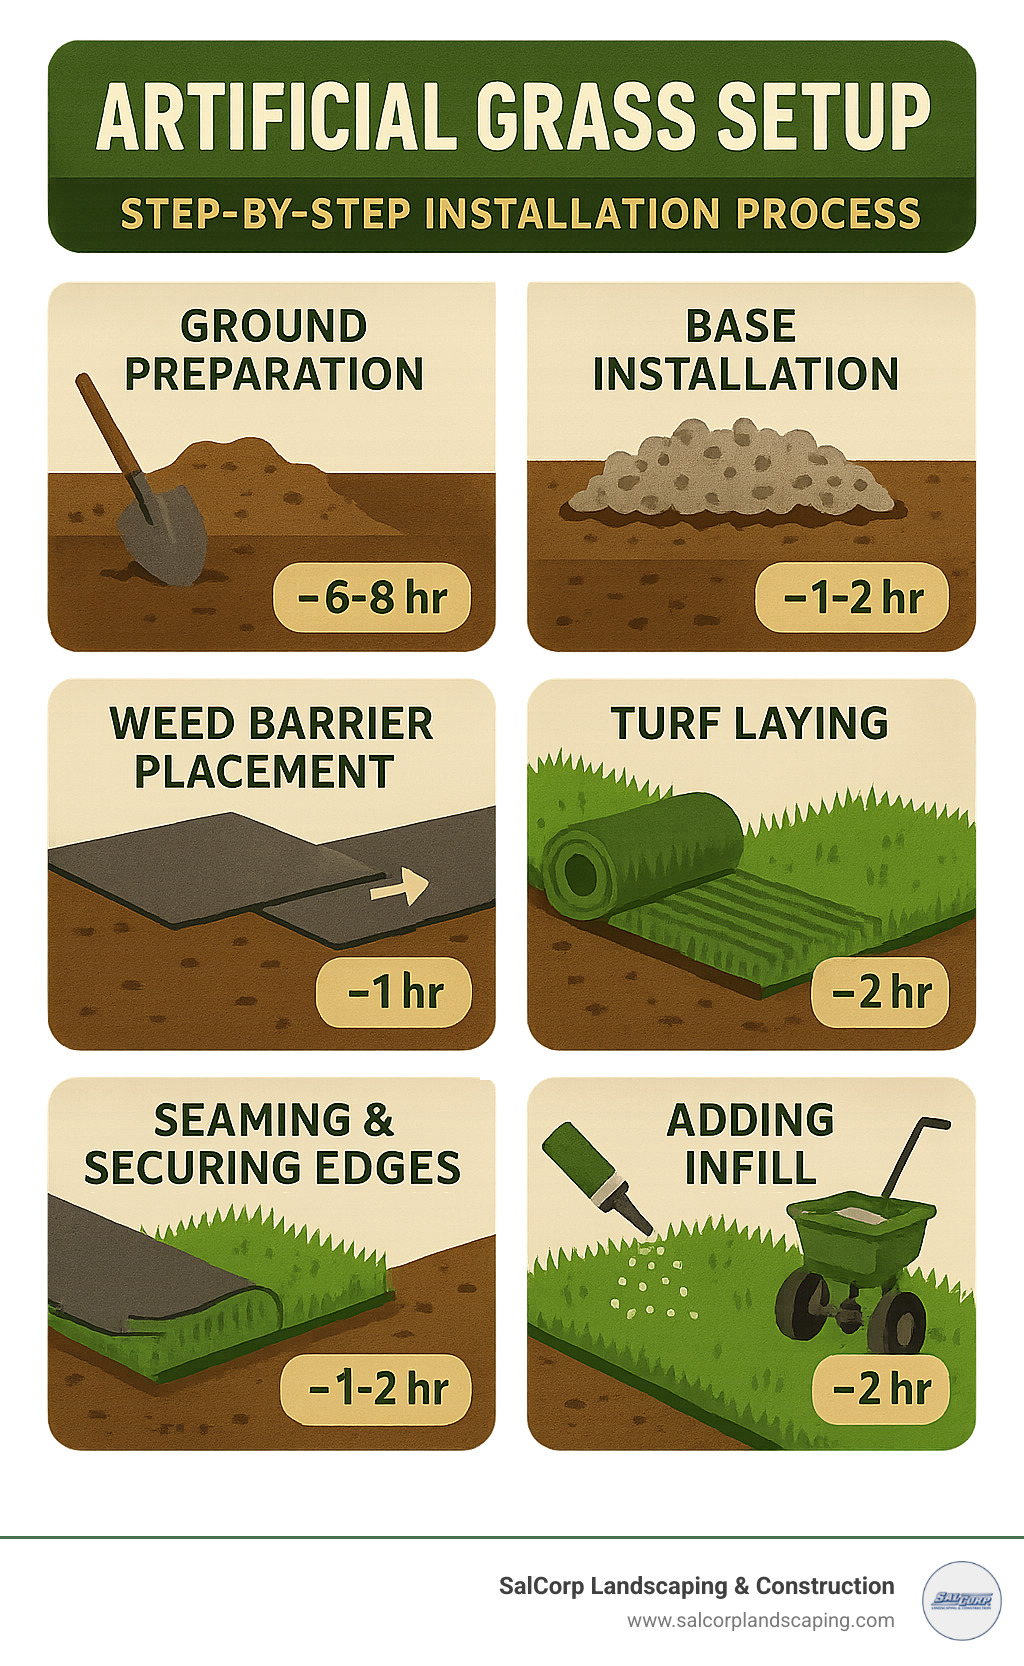
Artificial grass setup involves removing existing sod, preparing a proper base, installing weed barrier, laying the turf, securing it, and adding infill. Here’s a quick overview of the process:
- Remove 3-4 inches of existing soil and grade for drainage
- Install a base layer of 2-3 inches of compacted gravel or crushed stone
- Add weed barrier fabric overlapping seams by 6-12 inches
- Roll out and position turf with consistent blade direction
- Secure edges with nails every 3-4 inches and seam with adhesive
- Add infill material and brush turf fibers upright
Looking for a lush, green lawn without the endless maintenance? Artificial grass setup offers the perfect solution for homeowners seeking a beautiful yard that stays pristine year-round.
Today’s synthetic turf has come a long way from the plastic-looking options of the past. Modern artificial grass provides a realistic look and feel while eliminating the need for mowing, watering, fertilizing, and weed control. With proper installation, your new lawn can last 10-20 years with minimal upkeep.
Whether you’re tired of brown patches, mud tracked indoors, or astronomical water bills, an artificial grass setup can transform your outdoor space into a consistently perfect green oasis that’s ready for everything from backyard barbecues to pet play areas.
I’m Sal Musto, owner of SalCorp Landscaping & Construction, and I’ve personally overseen hundreds of successful artificial grass setup projects throughout Massachusetts, ensuring each installation meets our exacting standards for drainage, appearance, and longevity.
The Faux Revolution at a Glance
Artificial grass (also called synthetic turf or astro turf) consists of synthetic fibers made to look like natural grass. These fibers are typically made from polyethylene, polypropylene, or nylon, and are attached to a backing material that allows for drainage. The result is a surface that mimics the appearance of natural grass but requires significantly less maintenance.
Modern artificial grass maintains its vibrant green appearance year-round, regardless of weather conditions. It’s designed to withstand heavy foot traffic, resist fading from UV exposure, and drain effectively during rainstorms. With advancements in manufacturing technology, today’s artificial turf looks and feels remarkably similar to natural grass, making it increasingly popular among homeowners throughout Massachusetts.
Why Go Synthetic? Benefits, Uses & Eco Impact
When chatting with our clients from Walpole to Boston to Newton, I’ve noticed how quickly the conversation turns to the impressive environmental benefits of artificial grass. The most eye-opening advantage? Water conservation. Switching to artificial turf can slash your lawn’s water consumption by up to 70% compared to natural grass. In these days of increasing water restrictions and climbing utility bills, those savings really add up.
But water is just the beginning of the eco-friendly story. Artificial grass setup eliminates the need for fertilizers, pesticides, and herbicides completely. This means no harmful chemicals seeping into your soil or local water supply, creating a safer environment for everyone. As one of our Needham clients told me with a smile, “I sleep better knowing my grandkids can play freely without worrying about what chemicals might be on the grass.”

The versatility of today’s synthetic options makes them perfect for all sorts of uses. Beyond traditional lawns that stay lush and green year-round, we’ve installed kid-friendly play zones that remain mud-free even after heavy rain, backyard putting greens for golf enthusiasts, and pet-friendly areas that resist damage and clean up easily. For those concerned about water conservation, artificial turf provides the ultimate drought-resistant landscaping solution.
One benefit that often surprises our clients is the impressive drainage capability of quality artificial turf. Premium products allow water to flow through at rates up to 320.9 inches per hour – far exceeding what even the heaviest Massachusetts downpours can deliver. This means saying goodbye to standing water and muddy patches for good.
Environmental Numbers That Matter
The positive environmental impact of artificial grass goes well beyond water savings:
- A typical 1,000 square foot lawn guzzles approximately 56,000 gallons of water annually. Artificial grass setup saves most of this precious resource.
- Your average gas-powered lawn mower creates as much air pollution in a single hour as 11 new cars driving for the same time period.
- Most homeowners apply between 5-10 pounds of pesticides per acre of lawn each year – chemicals that simply aren’t needed with artificial turf.
One of our Wellesley clients did the math and finded their artificial grass setup paid for itself in just over 5 years through water savings alone. And that’s not even counting what they saved by eliminating lawn care services and equipment maintenance!
Perfect Places to Install
While artificial grass setup works beautifully in most outdoor spaces, certain areas benefit particularly from going synthetic:
Front yards become showcases of year-round curb appeal, regardless of weather or season. Dog runs allow pets to play without tracking mud and mess into your home. Shaded areas where natural grass struggles to grow transform into lush green spaces.
Rooftops and balconies gain lightweight, low-maintenance greenery. Areas around pools stay beautiful without suffering damage from chlorine and splashing. And those small, awkward spaces where maneuvering lawn equipment is a nightmare? They become effortlessly maintained green accents.
In coastal communities like Scituate and Hingham, we’ve installed artificial turf in spots where salt spray makes growing natural grass nearly impossible. The durability of synthetic options stands up to these challenging conditions where traditional lawns simply can’t compete.
Want to learn more about the significant water savings of artificial turf? Research confirms what our clients have already finded – the environmental benefits are substantial and measurable.
Preparation & Planning for a Flawless Artificial Grass Setup
The key to a successful artificial grass setup lies in thorough preparation. As we tell our clients across Massachusetts, from Boston to Framingham, “Measure twice, install once.” Start by precisely measuring your installation area, accounting for any curves, trees, or obstacles.
Before breaking ground, always call 811 to have underground utilities marked. This free service can prevent dangerous and costly accidents. We’ve seen DIY projects go sideways quickly when homeowners accidentally cut through irrigation lines or, worse, electrical conduits.
If you live in a neighborhood with a Homeowners Association (HOA), check their rules regarding artificial turf installation. Some associations have specific guidelines about appearance or installation methods. We’ve helped many clients in communities like Wellesley and Newton steer these requirements successfully.
For proper drainage and stability, plan to excavate 3-4 inches of existing soil. This depth allows for adding a base layer of aggregate (typically 2-3 inches) while keeping the finished turf surface at the appropriate height relative to surrounding hardscapes and natural areas.
Essential Tools & Materials Checklist for artificial grass setup
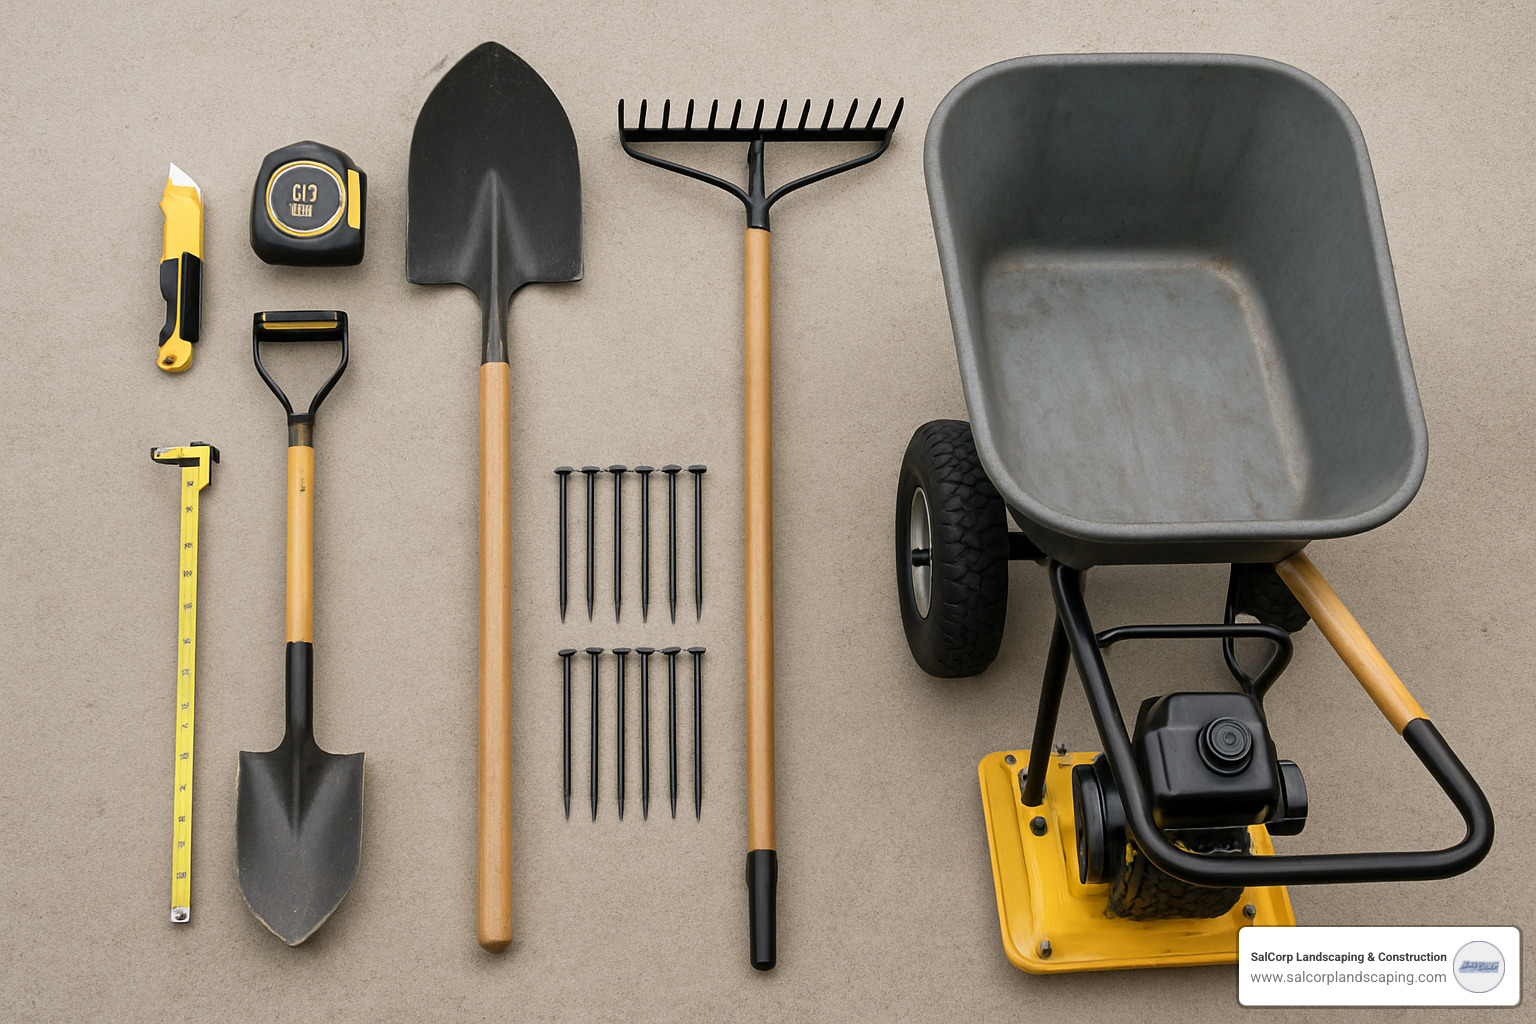
A successful artificial grass setup requires having the right tools and materials at hand before you begin. You’ll need basic tools like shovels (both flat and round), a rake, broom, and wheelbarrow for the heavy work. For precise installation, gather measuring tape, string line, stakes, and a utility knife with plenty of extra blades.
Don’t forget to rent a plate compactor for the base preparation—this isn’t a step you can skip or substitute. A power broom rental will also be invaluable for the final finishing touches. For materials, you’ll need the artificial turf itself (with some extra for waste), Class II road base or decomposed granite, weed barrier fabric, landscape nails, seaming tape with adhesive, and your chosen infill material.
Safety should never be an afterthought—work gloves, knee pads, safety glasses, and a dust mask for compaction work will protect you throughout the project. As one client in Franklin wisely shared, “I underestimated how many knife blades I’d need. Changing them frequently made cutting so much easier and gave cleaner edges.” We recommend changing utility knife blades approximately every 3 meters of cutting for optimal results.
Ground Prep Secrets for Long-Lasting artificial grass setup
The foundation of your artificial grass setup determines its longevity and appearance. Start by completely removing all existing vegetation—grass, weeds, and roots must go to prevent future growth through your turf. Then excavate to the proper depth of 3-4 inches, adjusting for your soil type. The clay-heavy soils common in parts of Massachusetts often require deeper excavation for proper drainage.
Creating a slight slope (about 1-2%) away from structures ensures water flows away from your home’s foundation. Next comes the critical step of adding and compacting your base material. Spread 2-3 inches of Class II road base or decomposed granite, wet it lightly, then compact to 90% density using a plate compactor. As one Dedham homeowner learned, “Making multiple passes with the compactor in different directions made all the difference in preventing future settling.”
For larger lawns, consider creating a slight crown (higher in the middle) for a more natural appearance and better drainage. In areas prone to burrowing pests, installing wire mesh directly on the compacted soil before adding your base material can save countless headaches. One client in Sudbury told us, “After watching gophers turn my neighbor’s lawn into their personal salad bar, the wire mesh was a no-brainer.”
Before moving forward, use a screed board (a straight 2×4) to ensure your base is perfectly level. As we often tell our clients, “Spend the extra time on your base prep, and you’ll save years of headaches down the road.”
Permits, Pets & Kids
Before starting your artificial grass setup, check with your local building department about permit requirements. While many residential installations don’t require permits, larger projects or those affecting drainage patterns sometimes do. At SalCorp, we help clients steer these requirements in all the Massachusetts communities we serve.
Pet owners should consider specialized approaches to keep their artificial lawn fresh and functional. Zeolite infill works wonders as this natural mineral helps neutralize pet urine odors by trapping ammonia molecules—we recommend approximately 0.5 pounds per square foot in pet areas. You might also want to omit the second weed barrier in dedicated pet areas to allow urine to drain more effectively, and consider additional drainage solutions in areas with heavy pet use.
If your artificial lawn will serve as a play area for children, safety should be your priority. Installing a shock pad provides additional cushioning for falls, while choosing rounded infill materials specifically rated for playground use prevents scratches and discomfort. Some families also opt for infills with anti-microbial properties to reduce bacteria in play areas. One Newton family shared, “After installing artificial grass with a shock pad under our swing set, we’ve had zero skinned knees—even when our youngest falls, the landing is soft.”
For more information about how artificial grass complements our comprehensive lawn care services, visit our Lawn Care Maintenance Services page.
Artificial Grass Setup: Installation Step-by-Step
With your ground properly prepared, it’s time for the exciting part – the actual artificial grass setup. This is where your vision starts becoming reality, and attention to detail makes all the difference.
Begin by letting your turf acclimate to its new environment. Simply unroll it and let it bask in the Massachusetts sunshine for 1-2 hours before installation. As I often tell homeowners in Newton and Wellesley, “Think of it like letting a good steak come to room temperature before cooking – it just performs better.” This brief rest period allows the backing to expand and contract naturally, preventing unwanted ripples down the road.
Pay careful attention to blade direction, or what we in the industry call “grain.” All sections should have the grain pointing in the same direction, typically toward your main viewing area. For most front yards, this means orienting toward the street, creating that perfect curb appeal that makes neighbors slow down as they drive by.
When cutting your turf, remember the carpenter’s golden rule: measure twice, cut once. Make cuts from the backing side using a sharp utility knife, ideally between stitch rows for cleaner edges. One of our Quincy clients shared a tip that’s worth its weight in gold: “I changed my blade every few cuts and couldn’t believe how much easier and cleaner my edges turned out.”
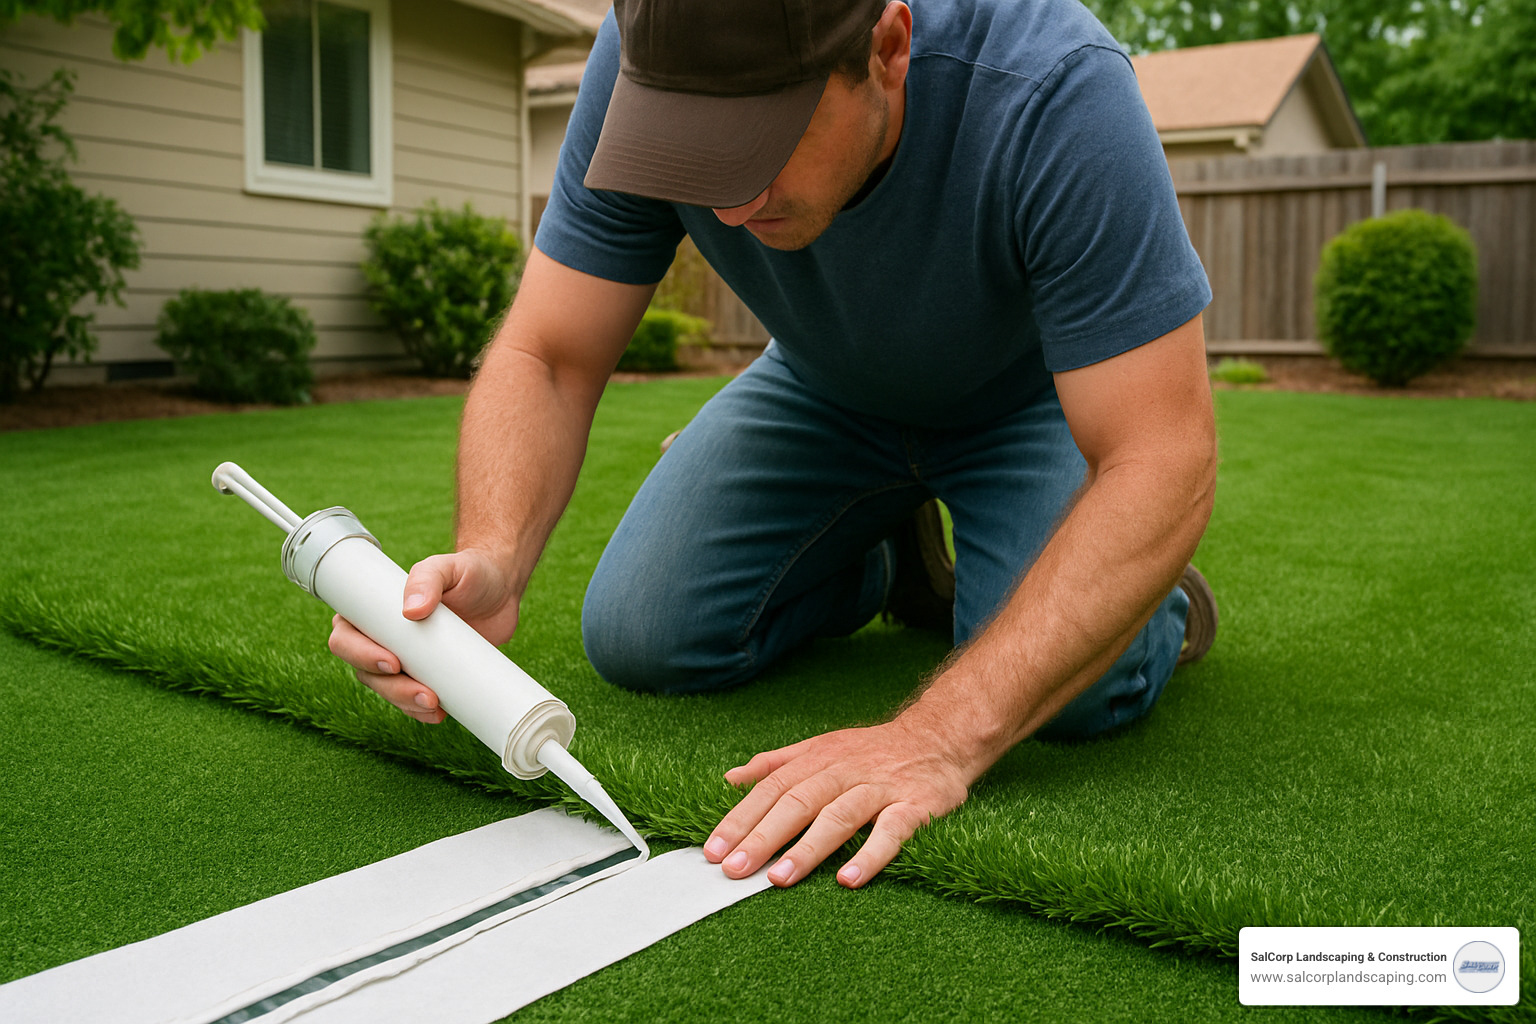
For seaming multiple pieces together (which is almost always necessary for larger lawns), follow this proven approach:
1. Position both pieces with edges overlapping slightly
2. Carefully fold back the edges and lay seam tape between them
3. Apply adhesive to the tape in an “S” pattern – as one of our installers colorfully describes it, “like squeezing mustard on a hotdog”
4. Press the edges together firmly and secure with landscape nails
5. Allow the adhesive to set according to the manufacturer’s instructions – this is not the time to rush!
Secure the perimeter by placing galvanized nails every 3-4 inches along all edges. For the field area (the main expanse of turf), place nails every 12-24 inches in a staggered pattern. Be gentle when driving the nails – pushing them too deep creates visible depressions that can collect water and look unnatural.
After securing your turf, it’s time for infill application at a rate of 2-4 pounds per square foot, depending on your turf’s pile height. Spread the infill evenly using a drop spreader, then brush thoroughly to help those synthetic blades stand upright and proud.

Cutting & Seaming for a Seamless Look
Creating invisible seams is perhaps the most challenging aspect of artificial grass setup, but it’s also where the professionals truly shine. With careful attention, your DIY installation can achieve that same seamless appearance:
Plan your layout strategically to minimize seams. Position turf to require as few seams as possible, and avoid placing head-to-head seams (where the ends of rolls meet) in high-visibility areas. These are typically more noticeable than side-to-side seams.
Make your cuts with precision using a sharp box knife. I recommend changing blades approximately every 3 meters of cutting – it’s a small expense that makes a massive difference in quality. Whenever possible, cut from the backing side for cleaner edges.
Before committing with adhesive, perform what we call a “dry join” test. Position your seams exactly as they’ll be installed and verify perfect alignment. A homeowner in Sharon told me, “That dry test saved me from a very expensive and permanent mistake. I realized my pattern wasn’t quite right and adjusted before gluing.”
Always use quality seaming materials – proper seaming tape (typically 4-6 inches wide) and outdoor-rated adhesive specifically designed for artificial turf. This is absolutely not the place to cut corners on materials.
Maintain consistent blade direction across all seams. Even the highest quality turf will look obviously patched together if the grain suddenly changes direction at a seam.
One of our Framingham clients finded a professional trick: “I left a tiny 1-2mm gap at my seams as recommended, and after adding infill, they completely disappeared. You’d never know there were seams there at all.” This small gap allows for natural expansion and contraction while remaining invisible once properly infilled.
For more insights on proper installation techniques, check out this scientific research on seam strength that confirms the importance of proper adhesive application.
Anchoring & Infill Application
Proper anchoring and infill are what separate a professional artificial grass setup from an amateur one. These final steps provide stability, realistic appearance, and longevity to your installation.
For anchoring, we recommend 5-6 inch galvanized nails placed every 3-4 inches around all edges and transitions. These longer nails provide superior holding power even in our freeze-thaw New England climate. For the interior field areas, secure with nails every 12-24 inches in a staggered pattern that resembles a diamond grid.
Pay special attention to seam nailing by placing nails every 2-3 inches along seams, alternating sides in a zigzag pattern. This prevents seams from separating over time – a common issue with DIY installations. Always countersink your nails by driving them between stitch rows just below the surface of the backing. This simple technique makes them virtually invisible.
When it comes to infill, you have several excellent options. Silica sand remains the most common choice, providing weight and support for fibers. Always use rounded silica sand, not sharp masonry sand which can damage turf backing over time. For pet owners, zeolite is a game-changer – this organic mineral helps control odors by trapping ammonia molecules from urine. Families with children might consider HeroFill, an antimicrobial option that provides additional safety.
The brushing technique is truly essential for achieving that natural look. Start by power-brooming the turf before adding infill to stand fibers upright. Then spread infill evenly using a drop spreader, working in multiple directions to ensure even distribution. Finally, make that all-important final pass standing fibers upright.
A client in Walpole perfectly captured the change: “The difference before and after proper brushing was night and day. It went from looking like green carpet to looking like the perfect lawn. That final power-brooming step is pure magic.”
For those considering whether to tackle this project themselves or hire professionals, SalCorp’s experienced team has installed countless artificial lawns throughout Massachusetts. We’ve refined our techniques through years of experience in our unique climate. For more information about our professional lawn installation services, visit our Lawn Installation Service page.
Costs, Maintenance & Durability Insights
When homeowners throughout Massachusetts ask us about artificial grass setup, they’re often curious about the investment and what to expect long-term. Let’s break down what you should know about costs, lifespan, and care requirements.
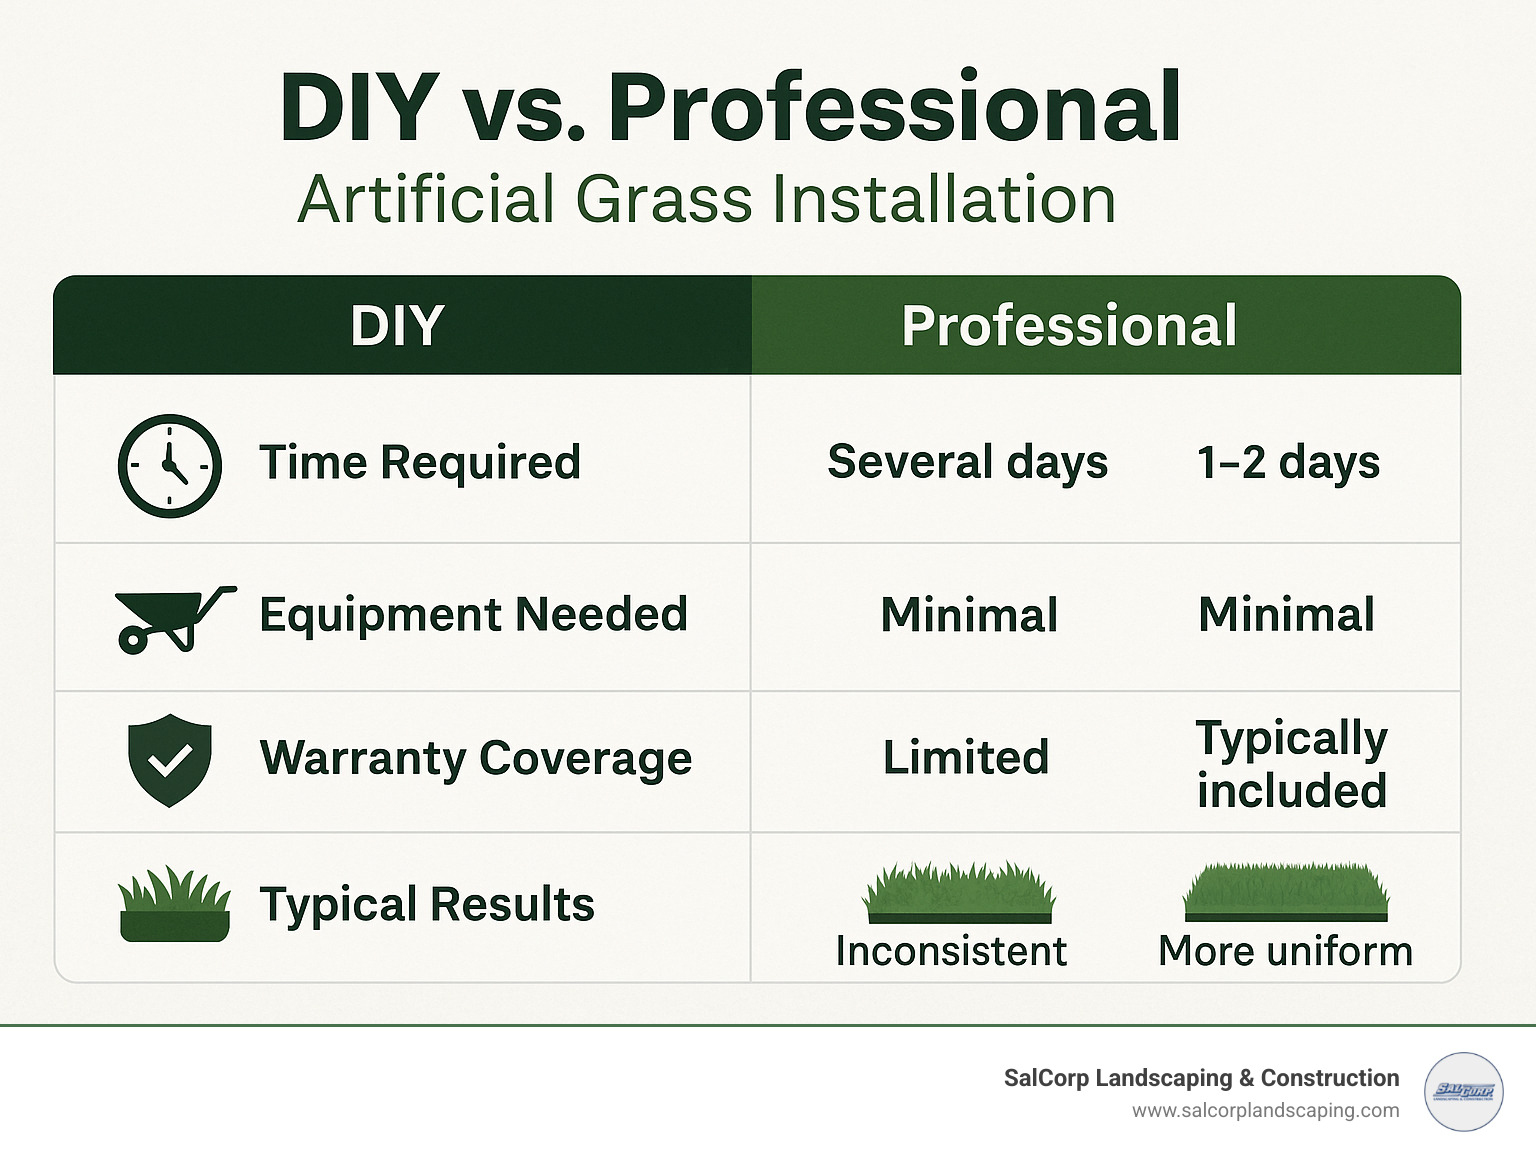
DIY enthusiasts can expect to spend roughly $4-$8 per square foot based on internet averages (not SalCorp pricing). This covers your basic materials—the turf itself, base materials, weed barrier, and fasteners. If you prefer to leave it to the professionals, internet data suggests installation typically ranges from $12-$20 per square foot including materials and labor.
Quality artificial grass typically rewards you with a 10-20 year lifespan. As I tell our clients in communities like Needham and Walpole, several factors influence how long your lawn will look its best:
The quality of materials makes an enormous difference—premium turf with UV stabilizers and quality backing systems simply lasts longer. Proper installation techniques (especially proper drainage and base preparation) prevent premature aging. Your lawn’s durability also depends on how much foot traffic it receives and its exposure to New England’s sometimes extreme weather conditions.
One of our clients in Needham recently told me, “After eight years, our artificial lawn still looks nearly new. The initial investment has paid for itself several times over in water savings and eliminated lawn care costs.”
When evaluating warranty options, be sure to look for comprehensive coverage. Most quality products offer 8-15 year warranties, but the details matter. Check whether materials, fading, and seam separation are covered, whether the warranty is pro-rated or offers full replacement, and if it can transfer to new owners should you sell your home.
For more information about our professional lawn installation services, visit our Lawn Installation Service page.
Budgeting Your Artificial Grass Setup
Creating an accurate budget for your artificial grass setup requires considering several key factors that impact the bottom line.
Material quality significantly influences cost. Premium turf with taller, denser fibers costs more but generally offers better durability and a more realistic appearance. Your specific site conditions determine base material requirements—poorly draining soil might need additional preparation work. Some yards require drainage improvements beyond standard installation, and specialized situations (like pet areas or play zones) might need particular types of infill.
Labor costs vary based on several practical considerations. Is your yard easily accessible, or will materials need to be wheelbarrowed from a distance? Removing existing landscaping—especially established lawns or hardscaping—adds time and expense. Complex layouts with curves, islands, or obstacles around which to cut require more precise work and generate more waste. Multiple seams require additional materials and careful craftsmanship.
Don’t forget to factor in equipment rental for DIY projects. Plate compactors and power brooms are essential but not typically found in the average garage. You’ll also need to budget for disposing of removed soil and vegetation, which can be surprising if you haven’t planned for it.
Smart planning can minimize waste. As a homeowner in Milton shared with us, “I adjusted my design slightly to work with standard roll widths, which saved me nearly 20% on materials.” Artificial turf typically comes in 12-15 foot wide rolls, and thoughtful layout planning can reduce the typical 10-15% waste factor considerably.
Routine Care to Maximize Life
Your artificial grass setup will reward regular maintenance with years of additional service life. The good news? It’s far less work than caring for natural grass.
For weekly and monthly care, simply remove debris with a leaf blower or plastic rake (never metal, which can damage fibers). If you have pets, promptly rinse areas where they urinate to prevent odor buildup. Occasionally brushing high-traffic areas helps keep fibers standing upright for that fresh-cut look.
Each season brings different maintenance needs. In spring, inspect your lawn for any winter damage and address repairs early. During summer heat waves, an occasional light rinse can help cool the surface on extremely hot days—artificial grass can get warm underfoot during peak sun. Fall brings leaf removal challenges; remove fallen leaves promptly to prevent decomposition on the turf surface. Winter snow can remain on turf without harm, but avoid using metal shovels for removal as they can damage fibers.
Stains happen, but most are easily addressed. For food spills, blot with mild soap and water. With pet waste, remove solids promptly, then thoroughly rinse the area. Oil or grease stains should be blotted with paper towels first, then treated with mineral spirits. For sticky substances like gum, freeze with ice cubes, then carefully scrape off.
Once a year, give your lawn some extra attention. Cross-brush against the grain to revitalize fibers that may have become compacted or flattened. Check for any loose seams or edges that might need repair. High-traffic areas often need infill replenishment, and it’s wise to inspect drainage to ensure water continues to flow properly.
A client in Westwood shared this practical tip: “I keep a small broom by the back door and quickly brush up high-traffic areas once a week. Five minutes of maintenance has kept our turf looking perfect for years.”
Common Mistakes to Dodge
After installing hundreds of artificial grass lawns throughout Massachusetts, we’ve seen the same mistakes trip up even experienced DIYers. Here’s what to avoid:
Poor drainage planning tops the list of problems. Without proper slopes or adequate base materials, water pools on or under your turf, potentially causing damage and definitely creating an eyesore. Always plan for water to flow away from structures.
Skipping proper compaction is a mistake that reveals itself over time. When your base isn’t thoroughly compacted, it settles unevenly, creating dips and bumps across your once-perfect surface. Make multiple passes with a plate compactor in different directions to achieve that crucial 90% compaction rate.
Mismatched grain direction creates an obvious patchwork appearance that’s impossible to fix without reinstallation. All turf sections should have fibers pointing in the same direction, typically toward the main viewing angle.
Inadequate securing leads to edges that curl up over time. Follow manufacturer recommendations for nail quantity and placement—typically every 3-4 inches around the perimeter and every 12-24 inches throughout the field.
Visible seams are the telltale sign of amateur installation. Take your time with this critical step, ensuring proper alignment and adhesive application. As one of our Framingham clients noted, “The seaming was where I almost rushed, but taking an extra hour here made all the difference.”
Incorrect infill amounts affect both appearance and function. Too little fails to support fibers properly; too much can bury them. Follow manufacturer specifications for your specific turf type.
Rushing the installation almost always leads to regrets. As a Canton homeowner learned the hard way, “Trying to complete the project in a single weekend led to mistakes I’m still dealing with. Take your time, especially with ground prep.”
Improper cutting techniques create jagged edges that are difficult to seam properly. Keep your utility knife blades fresh, changing them frequently, and cut from the backing side when possible.
By learning from others’ mistakes, your artificial grass setup can deliver professional results that last for years, giving you that perfect, low-maintenance lawn that’s the envy of the neighborhood.
Frequently Asked Questions about Artificial Grass Setup
Does turf get too hot in summer?
One question we hear constantly from homeowners in Needham to Walpole is about summer heat. And yes, it’s true – artificial grass setup surfaces can warm up more than natural grass on those sunny July afternoons.
But here in Massachusetts, this is rarely a deal-breaker. Our climate is generally milder than many other regions where synthetic turf thrives. Plus, there are several effective ways to manage heat:
Modern turf products often include cooling technologies with heat-reflective materials that significantly reduce surface temperatures. Strategic installation in areas that receive partial shade during peak afternoon hours can make a tremendous difference too.
“I keep a hose nearby on those few really hot days,” shares Melissa from Newton. “A quick spray before the kids play brings the temperature down instantly, and in our partially shaded backyard, most areas stay comfortable all day without any intervention.”
For families with young children, scheduling outdoor playtime during morning or evening hours during heatwaves is a simple solution that works beautifully with your artificial grass setup.
How do I handle pet waste and odors?
Pet owners often find that artificial grass setup actually simplifies waste management compared to natural lawns. The non-porous backing prevents waste from seeping deep into soil, making cleanup more effective.
For solid waste, simply remove it promptly as you would on natural grass, then occasionally rinse the area if needed. For urine, regular hosing helps dilute and flush away liquid, preventing odor buildup.
The game-changer for pet owners is zeolite infill – a natural mineral that works at the molecular level to neutralize ammonia in urine. We recommend approximately 0.5 pounds per square foot in pet areas.
“Before our artificial grass setup, our backyard smelled like a dog park by midsummer,” explains James from Brookline. “With three Labs running around our new turf with zeolite infill, there’s absolutely no urine smell anymore, even in the heat.”
For dedicated pet runs, consider these specialized approaches: omit the top weed barrier layer to improve drainage, install additional drainage solutions if needed, and use antimicrobial infill products like HeroFill that inhibit bacterial growth. For stubborn areas, enzyme-based pet odor eliminators designed specifically for synthetic turf work wonders.
Will artificial grass setup affect my property’s drainage?
When properly installed, artificial grass setup typically improves drainage compared to natural lawns, especially in Massachusetts properties with heavy clay soil. Quality synthetic turf is engineered with permeable backing allowing water to flow through at impressive rates – up to 320 inches per hour in premium products.
The compacted aggregate base layer actually improves drainage by creating stable channels for water movement. Proper installation includes slight grading (typically 1-2%) to direct water away from your home’s foundation and other structures.
“Our backyard used to become a muddy mess after every rainstorm,” remembers a homeowner from Walpole. “Since our artificial grass setup three years ago, we haven’t seen a single puddle, even during those torrential spring downpours.”
For properties with existing drainage challenges, we often incorporate additional solutions during installation. French drains along problem boundaries, drain tile systems beneath the base layer, or strategically placed dry wells can address even the most stubborn water issues.
If you’re concerned about specific drainage challenges on your property, a professional assessment can help develop a customized solution that works with your landscape’s natural water patterns. The permeable nature of properly installed turf means you’ll likely see significant improvements in how water moves through your yard after heavy rain.
Conclusion
Let’s face it – a perfect lawn without the hassle sounds almost too good to be true. Yet that’s exactly what artificial grass setup delivers to Massachusetts homeowners looking for a practical solution to our region’s unique lawn challenges.
Throughout this guide, we’ve walked through how synthetic turf transforms outdoor spaces from high-maintenance headaches into worry-free retreats. The benefits stretch far beyond just good looks – substantial water savings, elimination of chemical treatments, and reclaiming those precious weekend hours previously spent mowing and edging.
I’ve seen how properly installed artificial grass stands up to our New England weather extremes. From scorching August afternoons to February freeze-thaw cycles, quality turf maintains its appearance when natural grass would struggle or go dormant. As one of our Wellesley clients recently told me, “I used to dread the brown patches every August, but now my lawn is picture-perfect year-round.”
The secret to long-term satisfaction lies in those critical installation steps we’ve discussed. Thorough ground preparation creates the foundation for success, while careful attention to seaming and proper infill application ensures your lawn maintains its natural appearance for years to come.
While many handy homeowners successfully tackle artificial grass setup as a DIY project, others prefer the confidence that comes with professional installation. At SalCorp, we bring over two decades of landscaping experience to every project across Walpole, Boston, Quincy and surrounding communities. Our owner-operated approach means your project receives direct attention from our most experienced team members.
For families with active children, pet owners tired of muddy paw prints, or anyone simply wanting to reduce their environmental footprint while maintaining a beautiful yard, artificial grass provides a solution that continues paying dividends season after season.
Ready to transform your outdoor space with a professional artificial grass setup? Our expert crew can bring your vision to life with precision installation that ensures proper drainage, seamless appearance, and maximum durability. Visit our Lawn Installation Service page to find how we can help create your perfect low-maintenance landscape.
