Backyard Paver Installation: Top 10 Tips for Success
Transform Your Outdoor Space with Professional Paver Installation
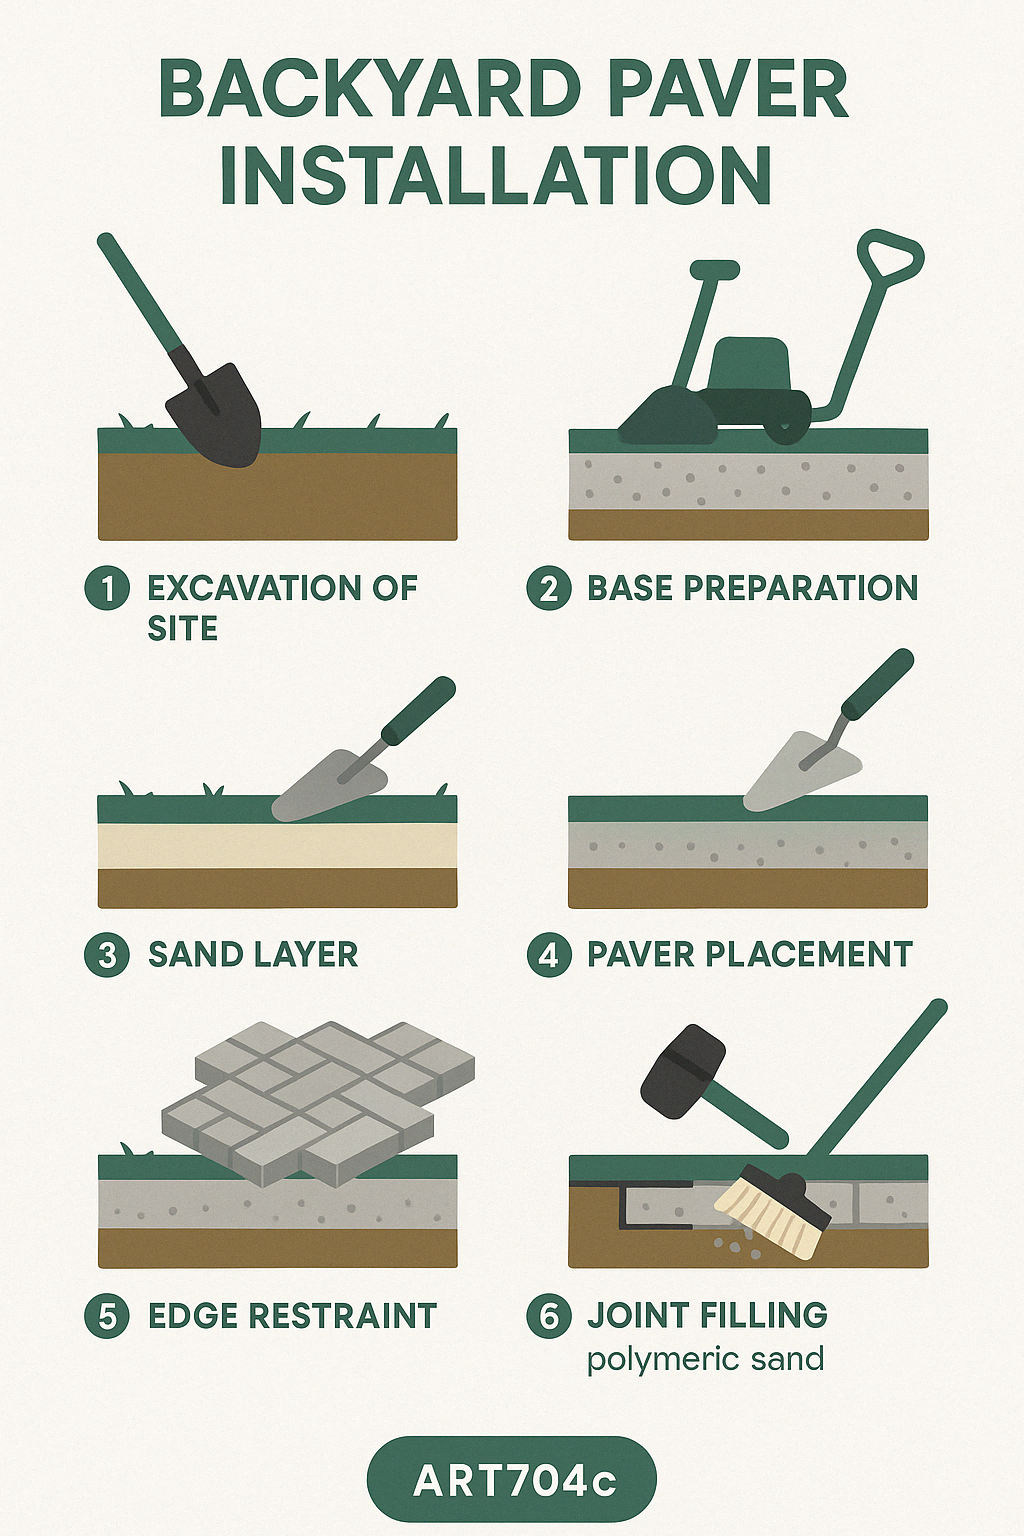
Backyard paver installation is a comprehensive process that transforms ordinary outdoor spaces into beautiful, durable living areas. If you’re looking to install pavers in your backyard, here’s a quick overview of the essential steps:
- Planning: Measure area and choose paver style
- Site preparation: Excavate 7-8 inches deep and remove all debris
- Base installation: Add 4-6 inches of compacted gravel base
- Sand layer: Apply 1 inch of leveling sand
- Paver placement: Lay pavers in desired pattern
- Finishing: Install edge restraints and fill joints with polymeric sand
A properly installed paver patio creates an inviting outdoor space that improves your property’s value and functionality. Unlike poured concrete, pavers offer superior durability, easier repairs, and a wide variety of design options to complement your home’s aesthetic.
“The primary reason for paver failure is a weak base,” according to industry professionals, which is why proper preparation is crucial for longevity.
With the right tools, materials, and techniques, you can create a stunning paver patio that will last for decades. Though labor-intensive, the process follows a logical sequence that ensures stability and proper drainage—essential factors for preventing future issues like shifting or settling.
I’m Sal Musto, owner of SalCorp Landscaping & Construction with over 20 years of experience specializing in backyard paver installation projects throughout Massachusetts. My team and I have installed hundreds of paver patios, walkways, and driveways that continue to stand the test of time due to our meticulous attention to proper base preparation and installation techniques.
Backyard paver installation terms to learn:
– backyard brick patio design ideas
– patio design
– outdoor patio ideas
Planning Your Backyard Paver Installation
Planning is the foundation of any successful backyard paver installation project. Before you dive in with shovels and stones, taking time to create a thoughtful plan will save you headaches, time, and money down the road.
When I meet with homeowners at SalCorp, I always emphasize that good preparation prevents poor performance. Let’s walk through everything you need to know before breaking ground on your dream patio.
Essential Tools and Materials
Creating a beautiful paver patio requires the right equipment and supplies. Think of these as your patio-building toolkit:
For tools, you’ll need a sturdy shovel and rake for the heavy lifting of excavation and leveling. A 4-foot level is essential for checking your slopes and ensuring everything drains properly. Don’t underestimate the importance of a plate compactor – this workhorse compresses your base materials for a stable foundation.
You’ll also need a rubber mallet for setting pavers, a masonry saw with diamond blade for making precise cuts, and measuring tape with marking stakes to lay out your design. A string line will help keep everything straight, while a screed board (basically a straight 2×4) is perfect for leveling your sand layer.
Materials are equally important. Choose your pavers carefully – whether concrete, brick, or natural stone – considering both aesthetics and durability. You’ll need plenty of gravel base material (¾-inch crushed stone works well), paver sand for the leveling layer, polymeric sand to lock everything together, edge restraints to prevent spreading, and geotextile fabric to block weeds and separate materials.
As my colleague Roger Cook often says, “For DIYers, I recommend the running-bond pattern. It requires the fewest cuts, so it goes down the fastest.” This simple arrangement of staggered rows, similar to a brick wall, is both attractive and beginner-friendly.
Calculating Area and Materials
Getting your measurements right is crucial for budgeting and ordering materials. Start by measuring the length and width of your planned patio area, then multiply these numbers to calculate square footage. Always add 10-15% extra for cuts, waste, and potential future replacements.
For perspective, a typical 400 square foot patio (about 20×20 feet) usually requires around 400 standard-sized pavers plus that 10-15% buffer. You’ll also need approximately 6-8 tons of gravel for a proper 4-6 inch base and 1-2 tons of paver sand for the 1-inch leveling layer. Don’t forget 2-3 bags of polymeric sand for filling the joints between pavers.
In my 20+ years of experience at SalCorp Landscaping, I’ve found that a 20×20 patio typically requires about 10 tons of material total. That’s a lot of heavy lifting, which is why planning your material delivery location is just as important as calculating quantities!
Choosing Paver Style and Pattern
The pavers you select will define the character of your outdoor space for years to come. Concrete pavers offer versatility, affordability, and come in countless colors and textures. Clay brick pavers provide a classic, timeless appearance with natural color variation. Natural stone pavers create a unique, premium look but come with a higher price tag.
Your pattern choice also impacts both aesthetics and installation difficulty. The running bond pattern creates offset rows like a traditional brick wall – simple yet neat. For more visual interest, consider a herringbone pattern with its interlocking zigzag arrangement that also provides excellent structural integrity. The basketweave pattern creates a woven look by alternating the direction of paired pavers, while circular or fan patterns make stunning focal points but require more complex cutting.
When making your selection, think beyond just looks. Consider how the space will be used, your local climate conditions (especially if you experience freeze-thaw cycles), and how much maintenance you’re willing to do. Also, make sure your paver choice complements your home’s architecture and surrounding landscape features.
Ensuring Proper Drainage and Slope
Nothing will ruin your beautiful new patio faster than poor drainage. Proper water management is absolutely essential for any successful backyard paver installation.
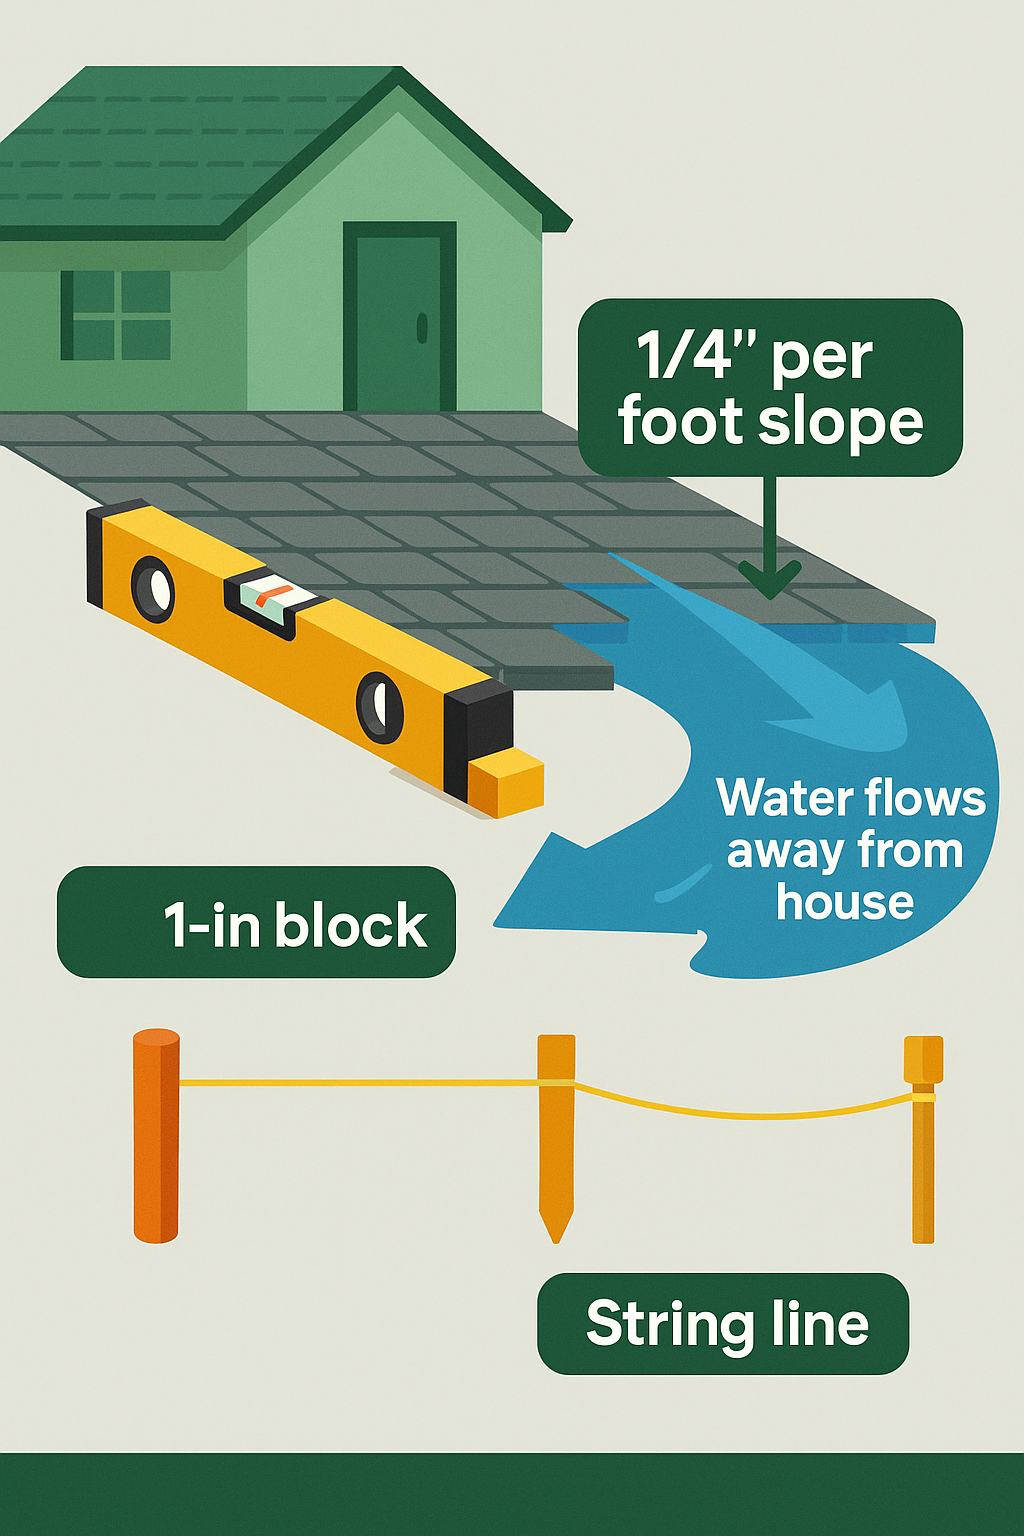
The industry standard (and what we always implement at SalCorp) is a slope of ¼ inch drop per foot away from your house. This means if your patio extends 12 feet from your home, the outer edge should be 3 inches lower than the edge nearest the house. This slight grade is barely noticeable to the human eye but gives water somewhere to go instead of pooling on your patio or flowing toward your foundation.
Creating this slope isn’t complicated, but it requires attention to detail:
- Start by identifying your high point (typically against the house)
- Calculate how much total drop you need across the entire width
- Set stakes and string lines to mark your slope
- Use a line level to verify you’ve got the correct grade
Here’s a handy trick I often share with DIYers: attach a 1-inch block of wood to one end of a 4-foot level. When the bubble shows level with this block attached, you’ve achieved the perfect ¼-inch-per-foot slope. This simple tool can save you from drainage headaches down the road.
With careful planning of your tools, materials, measurements, design, and drainage, you’ll have laid the groundwork for a successful paver installation project. Remember the old carpenter’s adage: measure twice, cut once. In paver installation, I’d say plan thoroughly, install confidently!
Preparing the Site for Paver Installation
Rolling up your sleeves for site preparation might make you question your life choices—it’s easily the most sweat-inducing part of backyard paver installation. But trust me, the effort you put in now directly translates to how long your patio will look amazing.
Marking and Excavation
Think of marking your patio area as drawing a full-scale blueprint on your yard. Start by hammering stakes into the ground at each corner of your planned patio. Connect these stakes with mason’s line or bright-colored string to visualize the perimeter.
Here’s a pro tip we use at SalCorp: check that your corners are perfectly square by measuring diagonals across the layout. If both diagonal measurements match, you’ve got perfect right angles. If not, adjust your stakes until they do—this simple step prevents headaches later when laying pavers.
Once your layout looks right, it’s time for the real workout—excavation. Remove all grass, plants, and organic material from within your marked area. You’ll need to dig down about 7-8 inches for a standard patio (deeper for driveways that will handle vehicle weight).
Don’t skimp on excavation area—extend your dig about 6 inches beyond your planned patio edge to give yourself room for edge restraints. And remember to maintain that all-important slope we discussed earlier as you dig.
“This is honestly the hardest part,” as one brave DIYer put it. “You will be moving tons, literal tons of material.” They’re not exaggerating—for a medium-sized patio, you’ll remove several cubic yards of soil. If your project exceeds 200 square feet, your back will thank you for renting a mini skid steer or similar equipment. In Massachusetts, our SalCorp crews use specialized equipment for larger excavations, saving time and preventing injuries.
Weed Control and Geotextile Fabric
After your excavation is complete, take a moment to remove any stubborn roots or debris you missed during the initial dig. Then compact the soil with a tamper or plate compactor—this creates a firm foundation for everything that follows.
Next comes a critical step many DIYers overlook: laying geotextile fabric (sometimes called landscape fabric). This material is your patio’s unsung hero, performing two essential functions. First, it prevents weeds from growing up through your beautiful new patio. Second, it keeps your base material separate from the native soil below, preventing mixing that could compromise your patio’s stability.
Roll out the fabric over your entire excavated area, overlapping edges by 6-12 inches where pieces meet. Extend the fabric up the sides of your excavation—this prevents base material from migrating outward over time. At SalCorp, we always use commercial-grade landscape fabric for Massachusetts installations because our freeze-thaw cycles make proper material separation even more important.
Dealing with Underground Utilities
Before you get caught up in the excitement of digging, remember this crucial safety step: call 811 before you dig. This free service arranges for utility companies to mark the location of underground lines on your property.
Make this call at least 72 hours before starting your project. When the utility companies have marked their lines with colored paint or flags, take photos to document their locations. If any utilities run through your planned patio area, you may need to adjust your design or take special precautions.
“I cannot stress this enough—always call before you dig,” says Sal Musto, owner of SalCorp Landscaping. “In my 20+ years in this business, I’ve seen too many close calls with utility lines. That free phone call prevents dangerous situations and potentially thousands in repair costs.”
While waiting for utility marking, it’s a perfect time to gather your materials and tools for the next steps. The site preparation phase may be challenging, but it sets the stage for a patio that will look beautiful and remain stable for decades to come.
For more information on safe digging practices and to schedule your utility marking, visit the official Call 811 website before starting any excavation project.
Laying the Base and Sand for Pavers
The foundation of your backyard paver installation determines whether your patio will stand the test of time or become a maintenance headache. Think of the base as the unsung hero of your project – invisible once completed, but absolutely critical to success.
Base Material Installation
When it comes to creating a solid foundation, your material choice matters tremendously. In Massachusetts, we typically use 3/4-inch crushed stone with angular edges that lock together when compacted. This creates a stable base that can withstand our harsh freeze-thaw cycles.
Start by adding your gravel base material in layers (professionals call these “lifts”) of about 2-3 inches each. Spread the material evenly across your excavated area, making sure to maintain that all-important slope for drainage. You’ll want a total thickness of 4-6 inches of compacted base material.
Dave Smith from the Interlocking Concrete Pavement Institute offers this practical advice: “Base material for under a concrete paver job should be the same type as used by the State Department of Transportation under the roads in that area.” This makes perfect sense – if it’s good enough for highways, it’s certainly up to the task for your backyard patio!
Importance of Proper Base Compaction
I can’t stress this enough – proper compaction is absolutely essential. At SalCorp, we’ve seen countless examples where inadequate compaction led to premature patio failure, creating unsightly dips and uneven surfaces within just a season or two.
A plate compactor is your best friend during this phase. Make multiple passes over each area, slightly wetting the gravel to aid compaction. You’ll know you’re getting close when the surface feels firm and doesn’t show footprints. The industry standard calls for achieving at least 95% Proctor density for pedestrian areas and residential driveways.
“The primary reason for paver failure is a weak base,” emphasizes Darrel Silverthorn, a paving expert with decades of experience. This single statement captures why we spend so much time on proper base preparation at SalCorp – it’s simply not worth cutting corners here.
Compacting in layers rather than all at once makes a tremendous difference in achieving proper density. Each lift should be thoroughly compacted before adding the next, building a foundation that will prevent future paver movement and settling.
Adding and Leveling the Sand Layer
Once your base is rock-solid, it’s time for the precision work of adding your sand layer. This 1-inch bed of coarse, angular paver sand serves as the setting bed for your pavers and allows for minor adjustments during installation.
Here’s a professional trick we use at SalCorp: place 1-inch PVC pipes or electrical conduit across your compacted base as screeding guides. Spread your sand between these guides, then use a straight 2×4 board to screed (level) the sand by pulling it across the guides. This creates a perfectly level surface at exactly the right depth.
After screeding, carefully remove the guides and fill in those voids with additional sand. Unlike the base layer, you should not compact this sand – it needs to remain loose to allow for fine adjustments when setting your pavers.
“Make sure to not walk on or disturb the chip stone after it is screeded,” cautions one experienced installer. Any footprints or disturbance will require rescreeding that area, which can be frustrating and time-consuming.
Throughout this process, maintain that critical slope of 1/4 inch per foot away from your house. This slight grade is barely noticeable to the eye but provides efficient water runoff that will protect both your patio and your home’s foundation for years to come.
With your base properly prepared, you’re now ready for the most satisfying part of the project – actually laying your pavers and watching your outdoor space transform!
Installing the Pavers
With all that careful preparation behind you, it’s time for the most rewarding part of your backyard paver installation journey—laying those beautiful pavers and watching your outdoor space transform before your eyes.
Laying Patterns and Techniques
I always tell my clients that this stage feels a bit like putting together a giant puzzle, except you get to create the picture! Start from a fixed edge (like your home’s foundation) or a corner of your layout. This gives you a solid reference point and helps ensure everything stays square.
Work at a 90-degree angle for maximum stability as you place each paver in your chosen pattern. Whether you’ve selected a classic running bond, neat herringbone, or traditional basketweave, maintain consistent joint spacing between each paver—typically 1/8 to 1/4 inch. Some installers use plastic spacers to keep these gaps uniform, but with practice, you’ll develop an eye for it.
Set each paver gently on the sand without sliding them around, which can disrupt your carefully screeded sand layer. Then give each one a firm tap with a rubber mallet to nestle it securely into the sand bed. This simple step makes a huge difference in stability.
“A level base ensures long-lasting paver stability,” notes Jack Thompson, a paving professional we’ve worked with. I couldn’t agree more—keep checking your pavers with a level as you work to catch any high or low spots before they become bigger problems.
Here’s a pro tip we use at SalCorp that makes a noticeable difference: mix pavers from different pallets as you work. Even high-quality pavers can have slight color variations between manufacturing batches, and blending them creates a more natural, uniform appearance across your patio. Your eyes will thank you for this extra effort!
Frequently check your alignment using a string line or straightedge. It’s much easier to make small adjustments as you go than to fix a wandering line later. I’ve seen DIYers get so focused on individual pavers that they don’t notice their rows gradually drifting off course—a mistake that becomes painfully obvious when you step back to admire your work.
Cutting and Fitting Pavers for Edges and Corners
Almost every backyard paver installation requires some custom cuts, especially around edges, corners, or obstacles like posts and planters. This part of the job separates professional-looking results from amateur attempts.
Measure twice, cut once—that old carpentry saying applies perfectly to paver work. Carefully mark the paver that needs cutting with a pencil or chalk. For straight cuts, a masonry saw or wet saw with a diamond blade makes quick work of even the hardest pavers. For complex shapes or curves, an angle grinder with a diamond blade offers more precision.
After cutting, test fit the paver before final placement. There’s nothing more frustrating than realizing your carefully cut piece is just slightly off. Small adjustments are normal, so don’t be discouraged if your first cut isn’t perfect.
Safety isn’t optional when cutting pavers. Always wear eye protection, hearing protection, and a dust mask. The silica dust from cutting concrete or stone pavers can cause serious respiratory issues over time. Use gloves to protect your hands from sharp edges, and follow all safety guidelines for power tools. At SalCorp, we often wet the cutting area to minimize dust—a practice I highly recommend for DIYers.
In our Massachusetts installations, we frequently encounter irregular spaces around existing landscape features like trees or garden beds. I’ve found that taking extra time to make precise cuts results in a much more professional-looking finished project. Those clean edges around curves and obstacles are what clients notice first when admiring their new patio.
For particularly complex cuts, don’t hesitate to make a template first using cardboard or paper. This old-school technique can save you from wasting expensive pavers on trial-and-error cuts. Just trace the shape you need, cut it out, and test the template before transferring the pattern to your paver.
For more detailed information on paver cutting techniques and safety, check out the Interlocking Concrete Pavement Institute’s resources which provide excellent guidance for both professionals and DIYers.
With patience and attention to detail, even DIYers can achieve professional-looking results during this crucial phase of backyard paver installation. The satisfaction of seeing those perfectly fitted pavers come together makes all the hard work worthwhile.
Securing the Edges and Finishing Touches
The final phase of your backyard paver installation might seem like just wrapping things up, but these finishing touches are what transform a good patio into a great one that stands the test of time.
Edge Restraints Installation
Think of edge restraints as the unsung heroes of your paver patio. Without them, those beautiful pavers would gradually shift outward, especially after freeze-thaw cycles or heavy rains.
When installing edge restraints, position them snugly against the outer pavers and secure them with 10-12 inch landscape spikes every foot or so. Then backfill the outside with soil to provide additional support. You’ve got several options to choose from:
Plastic edging offers flexibility for curved designs and won’t break the bank. Metal edging provides greater durability with a lower profile that practically disappears into your landscape. For the ultimate in stability, concrete edging creates a permanent border that can even become a design feature in itself.
Here in Massachusetts, where we deal with significant freeze-thaw cycles, I’ve found concrete edging to be worth the extra effort. As one homeowner told me after we installed their patio, “I’m so glad we went with the concrete edge. Five years later and not a single paver has shifted!”
Polymeric Sand Application
Polymeric sand isn’t just regular sand – it’s the secret ingredient that locks your pavers together while keeping weeds at bay. Applying it correctly makes all the difference in your backyard paver installation.
Start with completely dry pavers – moisture activates the binding agents prematurely. Sweep the sand across the surface, working it into all the joints with a push broom. Be thorough but gentle. Once the joints are filled, remove every bit of excess sand from the paver surfaces. Any left behind can cause hazing once activated.
Next, run a plate compactor with a rubber pad over the entire surface to vibrate the sand deeper into the joints. This step is crucial – it settles the sand and creates a more solid bond. Add more sand if needed and repeat until the joints are completely filled to about 1/8 inch below the paver surface.
Finally, follow the manufacturer’s instructions to mist the surface with water, which activates the polymeric binding agents. Apply enough water to saturate the joints but not so much that it pools on the surface.
“I learned the hard way about removing excess sand,” one DIYer shared with me. “I left some on the surface before wetting, and ended up with a hazy film that took serious scrubbing to remove.”
Maintenance Tips for Ensuring Longevity
Your beautiful new patio deserves proper care to keep it looking its best for decades. Regular sweeping prevents debris buildup that can lead to staining or moss growth. An occasional rinse with a garden hose removes finer particles that sweeping might miss.
Address stains promptly – oil, wine, or food spills are much easier to clean when fresh. For tougher stains, use cleaners specifically formulated for pavers rather than harsh chemicals that might damage the surface.
Every few years, inspect your polymeric sand joints. If you notice sand washing out or weeds appearing, it’s time for a refresh. Similarly, sealing your pavers every 3-5 years improves their color while providing protection against staining and weathering.
For Massachusetts homeowners dealing with our snowy winters, I always recommend using plastic snow shovels instead of metal ones that can chip or scratch pavers. When deicing becomes necessary, choose sand or calcium chloride-based products rather than rock salt, which can damage concrete pavers over time.
One of our long-time clients in Walpole summed it up perfectly: “The little bit of maintenance we do each season has kept our patio looking brand new for over a decade. It’s the best investment we’ve made in our home.”
For more detailed maintenance guidelines, the Brick Industry Association offers excellent resources on proper care for brick pavers that apply to most paver types.
DIY vs Professional Backyard Paver Installation
Deciding whether to tackle your backyard paver installation yourself or hire professionals is a significant choice that affects your budget, time, and the final results. Let’s explore both options to help you make the best decision for your outdoor space.
DIY Advantages and Challenges
There’s something deeply satisfying about building something with your own hands. Many homeowners choose the DIY route for their paver projects and find both rewards and challenges along the way.
DIY paver installation offers substantial cost savings – typically 40-60% less than hiring professionals. For many homeowners, this financial benefit is the primary motivation. Beyond saving money, there’s the pride of creating something beautiful yourself, the flexibility to work at your own pace, and the freedom to make design adjustments on the fly.
However, the DIY path isn’t without its problems. The physical demands are significant – a modest 400 square foot patio involves moving more than 10 tons of material. As one honest DIYer shared, “it’s an incredible amount of physical labor, you will be moving tons, literal tons of material.” Another homeowner candidly admitted they “literally broke their back to put a patio in.”
The time commitment is substantial too, with most DIY paver projects taking 3-7 days of dedicated work. You’ll also face a learning curve for proper techniques, equipment rental costs for items like plate compactors and wet saws, and the risk of making mistakes that could require costly fixes down the road.
Professional Installation Benefits
Hiring professionals like our team at SalCorp Landscaping & Construction brings considerable advantages that many homeowners find well worth the investment.
Professional installers bring expert knowledge of proper techniques honed through years of experience. Our crews work with efficiency from specialized equipment and well-practiced routines. We also provide access to professional-grade materials that might not be available to the general public.
One significant benefit many of our Massachusetts customers appreciate is our warranty protection – something you don’t get with DIY work. There’s also tremendous time savings, as our experienced crews can typically complete in 2-3 days what might take a homeowner a week or more working solo.
Perhaps most valuable is our ability to properly handle unexpected issues like poor soil conditions or drainage problems that often arise during installations. When these surprises occur, having experienced professionals on site can prevent costly mistakes and ensure your patio will stand the test of time.
Cost Considerations
The cost difference between DIY and professional installation is substantial and worth careful consideration.
DIY projects typically cost around $10-$15 per square foot for materials alone. Professional installation averages $30-$35 per square foot, covering both labor and materials. For a standard 400 square foot patio, this translates to approximately $4,000-$6,000 for DIY materials versus $12,000-$14,000 for complete professional installation.
Note: These are average costs based on internet data and not actual costs for SalCorp Landscaping.
This comparison table highlights the key differences:
| Factor | DIY Installation | Professional Installation |
|---|---|---|
| Cost | Lower initial investment | Higher upfront cost |
| Time | 3-7+ days for average patio | Typically 1-3 days |
| Physical Effort | Extremely demanding | None for homeowner |
| Equipment | Rental fees for specialized tools | Included in service |
| Expertise | Learning curve | Years of experience |
| Warranty | None | Professional guarantee |
Your decision ultimately depends on your budget, physical ability, available time, and comfort with the technical aspects of installation. Many homeowners throughout Massachusetts choose SalCorp for our expertise with the region’s unique soil conditions and climate challenges – factors that can significantly impact the long-term success of your paver installation.
Whether you choose the DIY route or professional installation, proper planning and attention to detail will help ensure your backyard paver installation becomes a beautiful, functional outdoor space you’ll enjoy for years to come.
Frequently Asked Questions about Backyard Paver Installation
How Do You Ensure Proper Drainage and Slope for a Paver Patio?
Water is both a friend and foe to your beautiful paver patio. Without proper drainage, that weekend barbecue could turn into a wading pool experience!
The golden rule of backyard paver installation is creating a slope of 1/4 inch per foot away from your home or any structures. This gentle grade—barely noticeable to the eye—ensures water flows away rather than pooling or, worse, heading toward your foundation.
Setting this slope isn’t complicated, but it requires attention to detail. I recommend using a long level with a measured spacer at one end to consistently check your progress. Your entire patio foundation—from the soil base through the gravel and sand layers—should maintain this slope.
Here in Massachusetts, where we deal with everything from summer downpours to spring snowmelt, drainage is non-negotiable. For particularly challenging sites, we sometimes incorporate French drains or subtle drainage channels to guide water away from problem areas. Your patio will thank you with years of trouble-free service!
What Are Common Mistakes to Avoid During Paver Installation?
After two decades of installing pavers across Massachusetts, I’ve seen just about every mistake possible—and made a few myself in the early days! Let me share what to avoid during your backyard paver installation.
Skimping on base preparation is the cardinal sin of paver installation. This includes not digging deep enough, rushing through compaction, or using the wrong base materials. As we like to say at SalCorp, “The part nobody sees determines how long the part everybody sees will last.”
Drainage disasters happen when homeowners create flat or—even worse—reverse slopes that direct water toward their home. I’ve seen basements flood and foundations crack from this simple oversight.
During the actual paver placement, never slide pavers across your carefully prepared sand bed—this creates ridges and low spots. Keep your joint spacing consistent, and always mix pavers from different pallets to avoid noticeable color variations in your finished patio.
Finally, don’t rush through the finishing touches. Skipping edge restraints is like forgetting to button your shirt—everything will eventually come apart! And when applying polymeric sand, be meticulous about removing excess before wetting, or you’ll be dealing with a hazy film that’s difficult to remove.
How Often Should I Seal My Paver Patio?
“Do I really need to seal my pavers?” is a question I hear almost weekly. While sealing isn’t mandatory, it’s like sunscreen for your patio—preventative protection that pays dividends.
A quality sealer improves and preserves your paver colors, fights stains from that spilled glass of red wine, minimizes weed growth, and helps stabilize the joint sand. For those of us in Massachusetts dealing with harsh freeze-thaw cycles, sealing provides valuable protection against winter’s wrath.
For most homeowners, I recommend waiting 3-6 months after your backyard paver installation before applying the initial sealer. This allows any natural efflorescence (that whitish residue) to emerge and dissipate. After that, plan on resealing every 3-5 years for general areas.
If your patio sees heavy traffic or surrounds a pool with constant splashing, you might want to reseal more frequently—every 2-3 years. You’ll know it’s time when colors start fading, stains become harder to clean, or you notice joint sand washing away during rainstorms.
Sealing is a simple weekend project that extends your patio’s life and keeps it looking fresh. Think of it as routine maintenance—like changing your car’s oil—that prevents bigger problems down the road.
Conclusion
Backyard paver installation truly transforms ordinary yards into stunning outdoor living spaces that improve both your lifestyle and property value. Whether you’ve followed along with our guide for a DIY project or you’re considering professional installation, the journey to a beautiful paver patio is well worth the effort.
Looking back at what we’ve covered, your patio’s long-term success hinges on a few critical factors. First and foremost, proper base preparation is non-negotiable. As we’ve seen throughout this guide, what lies beneath your pavers determines whether your patio will remain level and stable for decades or develop frustrating issues within a few seasons.
The time you invest in getting the slope and drainage right pays enormous dividends. A properly sloped patio quietly directs water away from your home’s foundation, preventing costly water damage while keeping your outdoor space usable even after heavy rain. Those seemingly tedious measurements with string lines and levels are truly the unsung heroes of paver installation.
I’ve seen countless patios over my 20+ years in Massachusetts landscaping, and I can tell you with certainty that quality materials make all the difference. From commercial-grade geotextile fabric that prevents weed breakthrough to premium polymeric sand that locks your pavers firmly in place, investing in better materials typically saves money in the long run through reduced maintenance and repairs.
Perhaps most importantly, respect the process. Each step builds upon the last, creating an integrated system designed to withstand Massachusetts’ challenging freeze-thaw cycles and heavy seasonal precipitation. Shortcuts might save time initially, but often lead to frustrating and expensive problems down the road.
A well-installed paver patio isn’t just a construction project—it’s the foundation for countless future memories. It’s where your children will play, where you’ll host summer barbecues, and where you’ll enjoy quiet evening conversations under the stars. When properly installed, your patio can easily last 30+ years with minimal maintenance, making it one of the most valuable additions to your home.
For those in Massachusetts communities like Walpole, Boston, or Brookline who’d prefer to leave the heavy lifting to experienced professionals, our team at SalCorp Landscaping & Construction brings decades of local expertise to every project. As an owner-operated business, we take personal pride in creating outdoor spaces that perfectly balance beauty, functionality, and durability.
Whatever approach you choose, your new paver patio will provide years of enjoyment while adding significant value to your property. The change of bare ground into an inviting outdoor living space is truly one of the most rewarding home improvement projects you can undertake.
For expert assistance with your backyard paver installation or to explore design options for your outdoor space, consider reaching out to SalCorp Landscaping & Construction. Our team’s expertise in Massachusetts soil conditions, climate challenges, and regional design preferences ensures a patio that’s not just beautiful but built to last.
