Poured Concrete Lawn Edging: 7 Powerful Benefits in 2025
Transform Your Landscape with Concrete Borders
Poured concrete lawn edging is a durable, permanent solution for creating clean borders between your lawn and garden beds. If you’re looking to install concrete edging, here’s what you need to know:
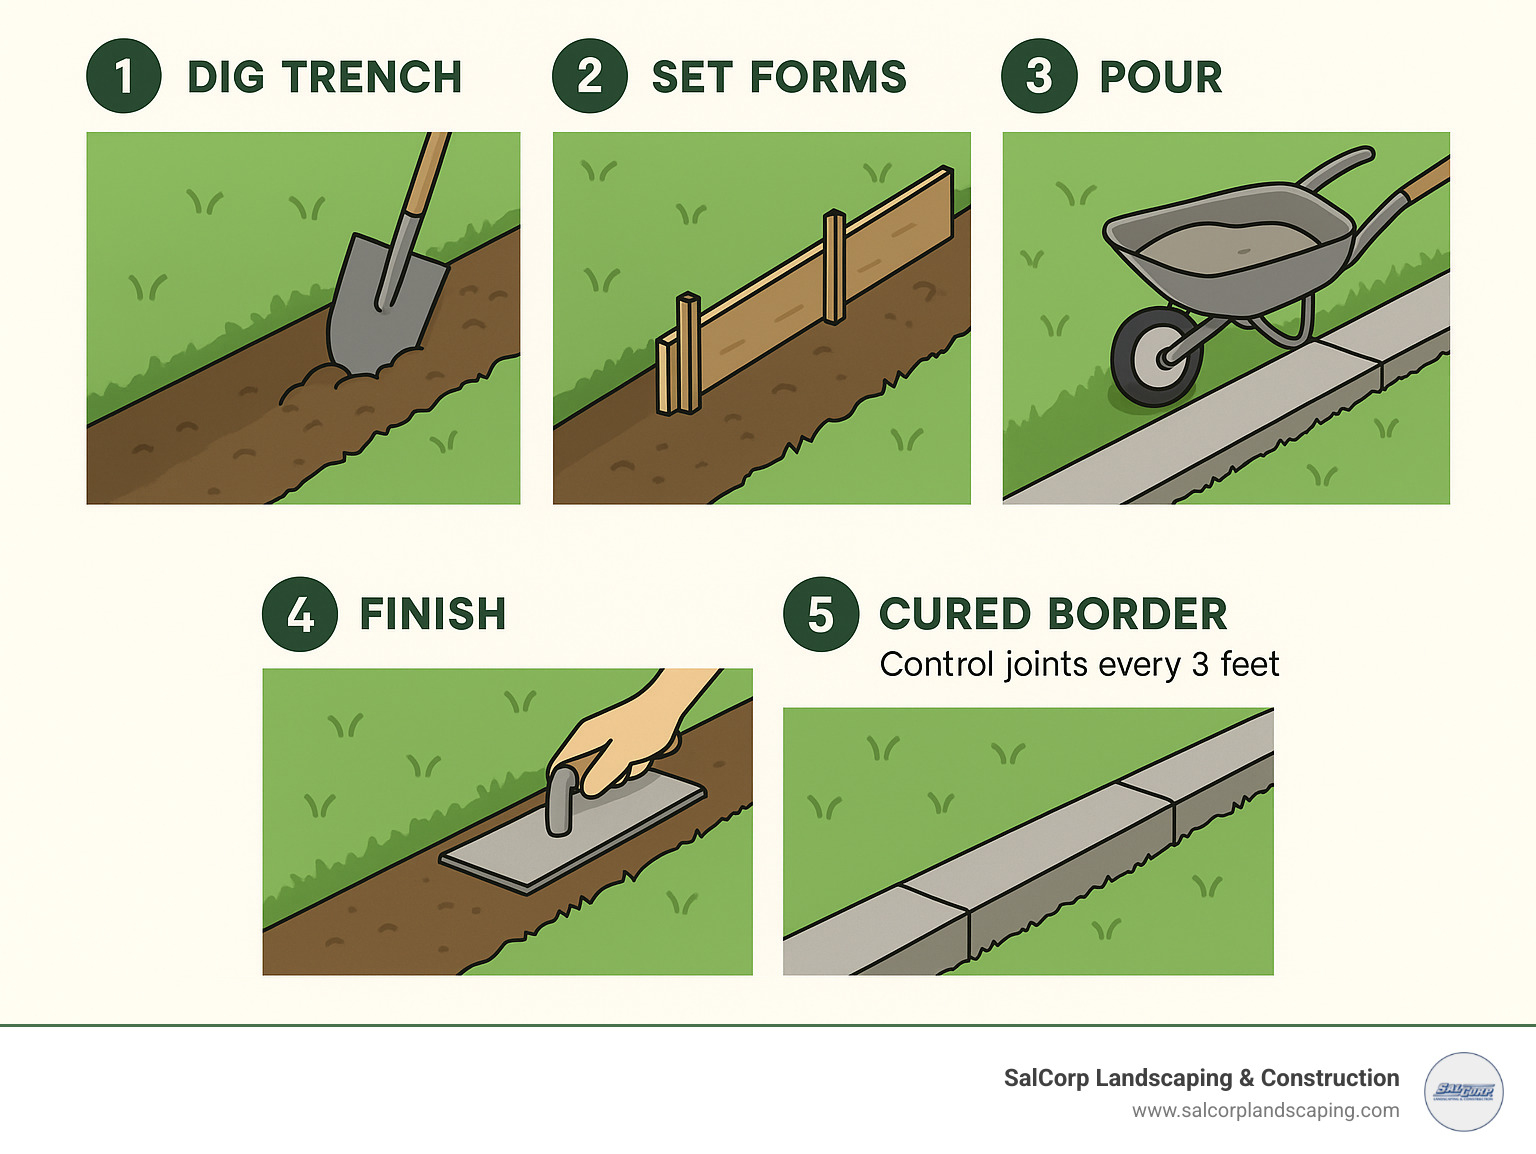
Quick Install Guide for Poured Concrete Lawn Edging:
1. Plan and mark your border layout using rope or garden hose
2. Dig a trench 8″ wide and 4″ deep
3. Install and secure form boards with stakes every 18″
4. Add a ½” layer of gravel for drainage
5. Mix fiber-reinforced concrete (3000+ psi strength)
6. Pour concrete and smooth with a float
7. Create rounded edges with an edging tool
8. Cut control joints every 3 feet
9. Allow 3-5 days for proper curing
Tired of rusty metal edging or plastic borders that crack? Concrete landscape borders offer a clean, permanent solution that instantly boosts curb appeal. Unlike temporary alternatives, properly installed concrete edging can last 20-30 years with minimal maintenance.
When installed correctly, poured concrete edging creates crisp lines between lawn and garden beds, prevents grass encroachment, and provides a stable mowing strip. This practical addition improves visual appeal while reducing maintenance time.
My name is Sal Musto, owner of SalCorp Landscaping & Construction, and I’ve installed hundreds of poured concrete lawn edging projects throughout Massachusetts, helping property owners create beautiful, functional landscape borders that withstand our harsh New England seasons.
Glossary for poured concrete lawn edging:
– cedar lawn edging installation
– installing landscape edging
– lawn installation services
What Is Poured Concrete Lawn Edging & Why Choose It?
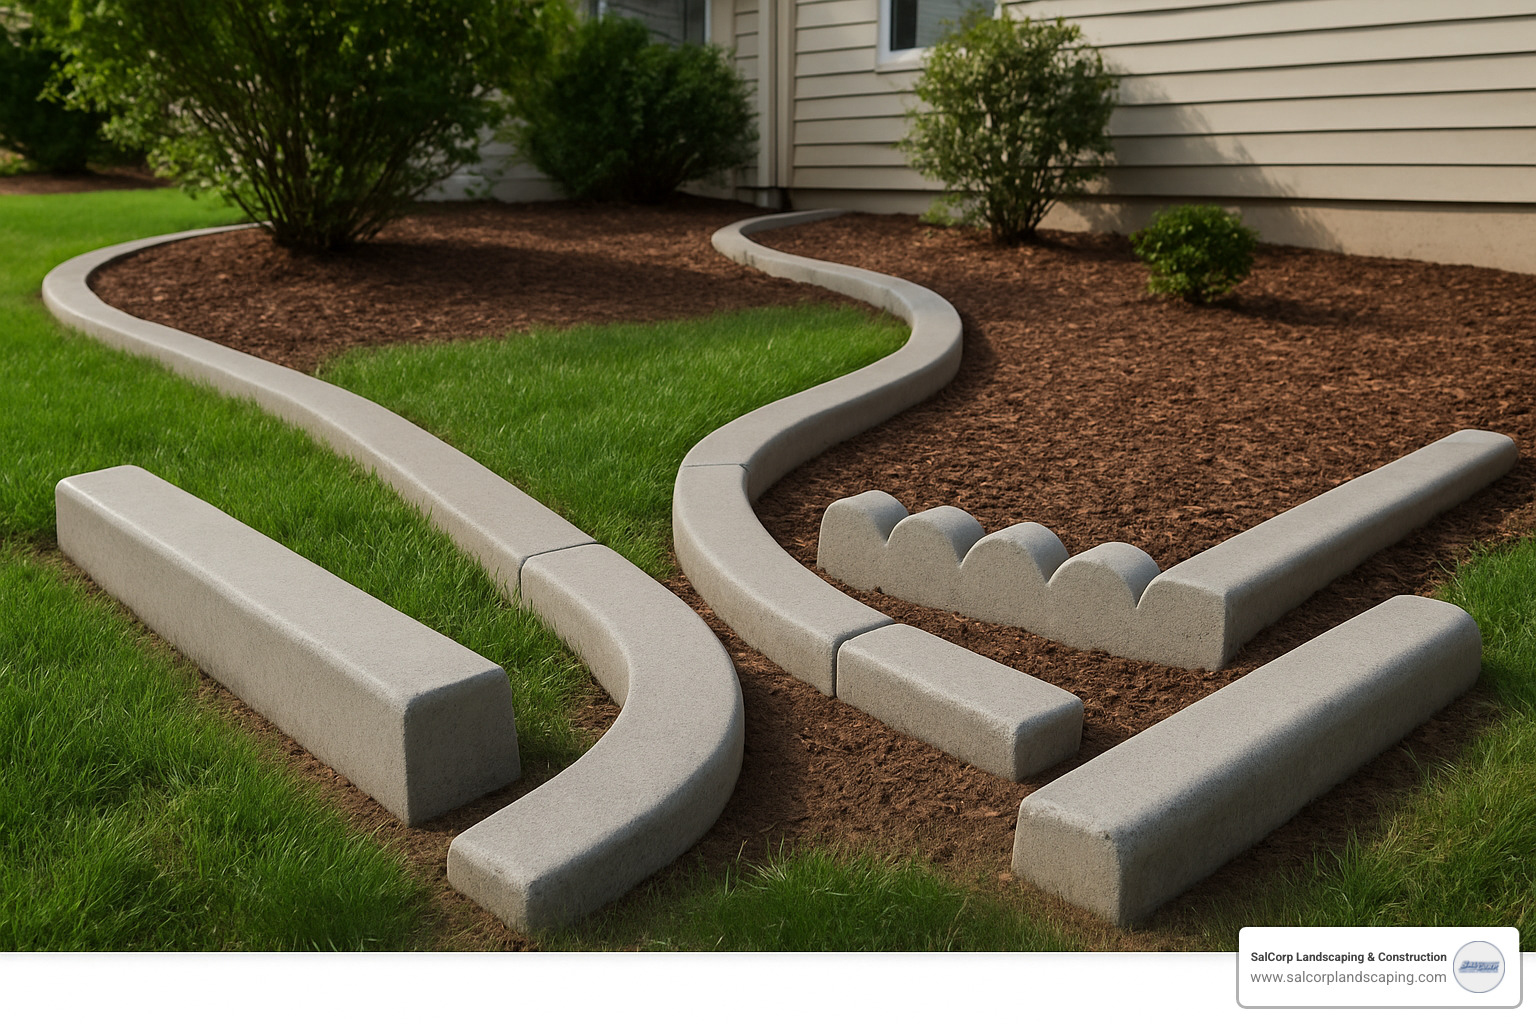
Poured concrete lawn edging is a continuous concrete curb that separates your lawn from garden beds, walkways, or other landscape features. Unlike precast blocks or pavers placed individually, poured concrete creates a seamless border that follows any contour or design.
The key difference between poured concrete edging and other types is permanence and customization. While plastic edging cracks and metal edging rusts and bends, concrete edging lasts for decades.
With a typical strength of around 3000 psi, properly installed concrete edging can withstand the weight of a lawn mower riding directly over it, making maintenance significantly easier.
According to landscape professionals, adding poured concrete lawn edging can instantly boost curb appeal and property value. The clean, defined lines create visual structure and provide a high-end, finished look that potential buyers notice.
Benefits of Poured Concrete Lawn Edging
When considering landscape edging options, poured concrete lawn edging offers several distinct advantages:
- Exceptional Durability: With proper installation, concrete edging can last 20-30 years or longer.
- Minimal Maintenance: Unlike wood that rots or plastic that cracks, concrete edging requires very little upkeep beyond occasional cleaning and sealing every few years.
- Freeze-Thaw Resistance: In our New England climate, properly installed concrete edging with fiber reinforcement can withstand harsh freeze-thaw cycles.
- Safer Mowing: The smooth, continuous border allows mowers to ride directly over the edge, eliminating the need for trimming.
- Improved Curb Appeal: The clean, professional look instantly lifts your landscape design and creates visual structure.
- Strong Return on Investment: While the initial cost may be higher than temporary solutions, the longevity and low maintenance make concrete edging a sound investment.
- Effective Weed Barrier: Continuous concrete edging prevents grass and weeds from creeping into garden beds.
- Design Flexibility: Concrete can be formed to follow any contour, allowing for creative landscape designs.
Styles & Design Options for Poured Concrete Lawn Edging
One of the greatest advantages of poured concrete lawn edging is the variety of design options available:
- Integral Colors: By adding liquid cement color to the concrete mix, you can achieve a wide range of hues that won’t fade or chip.
- Stamped Patterns: Concrete can be stamped while still wet to mimic natural stone, brick, or other textures.
- Brushed Finish: A simple brushed finish creates subtle texture that provides traction and hides minor imperfections.
- Stone Texture: Hand-carved techniques can create the appearance of natural stone at a fraction of the cost.
- Exposed Aggregate: By washing away the top layer of cement, you can reveal decorative stones within the concrete mix.
- Glow Additives: For a unique nighttime feature, glow-in-the-dark additives can be incorporated.
At SalCorp Landscaping & Construction, we often recommend combining a smooth top surface for practical mowing with decorative vertical faces for aesthetic appeal.
Tools, Materials & Average Cost Breakdown
Ready to start your poured concrete lawn edging project? Let’s talk about what you’ll need and what it might cost.
Essential Materials:
Fiber-Reinforced Concrete Mix with a strength of at least 3000 psi. One 80-pound bag typically covers about 2 linear feet of edging (4″ deep by 5″ wide). The Sakrete 5000+ mix is an excellent option for extra strength.
Liquid Cement Color – one 10-ounce bottle usually colors two 80-pound bags of concrete.
Form Materials – ¼” plywood or masonite for curved sections, 2×4 lumber for straight runs.
Stakes and Spacers – wooden stakes (1×2) driven every 18″ and small 1×1 wood spacers.
Gravel – a thin ½” base layer for drainage and stability.
Concrete Sealer (acrylic-based) to protect from moisture and freeze-thaw cycles.
Required Tools:
- Concrete Mixer or Wheelbarrow and Hoe
- Shovel and Trowel
- Level and String Line
- Float and Steel Trowel
- Edging Tool
- Saw with Diamond Blade
- Tamper
- Safety Equipment (gloves, eye protection, dust mask)
Average Cost Comparison
When considering poured concrete lawn edging, you have two routes: DIY or professional installation. Based on internet averages (not SalCorp pricing):

For DIY Installation, materials typically cost between $3-8 per linear foot. Equipment rental might add $50-150 per day. For a 100-foot border, you’re looking at roughly $300-800 in materials plus equipment costs. The trade-off is your time and labor.
With Professional Installation, internet data suggests average costs ranging from $15-25 per linear foot, with premium finishes potentially increasing this range to $45-75 per linear foot. Professionals bring specialized equipment, proper technique, and often a warranty. Our team at SalCorp has installed hardscape elements for over 20 years.
While DIY has a lower upfront cost, professional installation often provides better long-term value through proper techniques and higher-quality materials. When you consider that quality concrete edging can last 20+ years, the annual cost difference becomes quite small.
Step-By-Step Installation Guide
Installing poured concrete lawn edging requires attention to detail. Here’s how we approach this at SalCorp:
Plan the Layout
Use a garden hose or rope to create your border path. Adjust until you find what complements your landscape. Stand back and view from different angles.
Consider functionality – gentle, flowing curves are more visually appealing and easier to mow around than sharp corners.
Mark your design with spray paint or lime marker. Call 811 before digging to have underground utilities marked.
Consider water drainage – your concrete edging should have a slight slope to direct water away from structures.
Check if permits are required in your town.
Ground Preparation & Form Setup
Dig a trench about 8 inches wide and 4 inches deep along your marked path. Level and compact the soil at the bottom.
Add a ½-inch layer of gravel to the trench bottom for drainage.
Use 2×4 lumber for straight sections and flexible ¼-inch plywood for curves. Position forms so the tops sit at your desired finished height. Secure with wooden stakes every 18 inches.
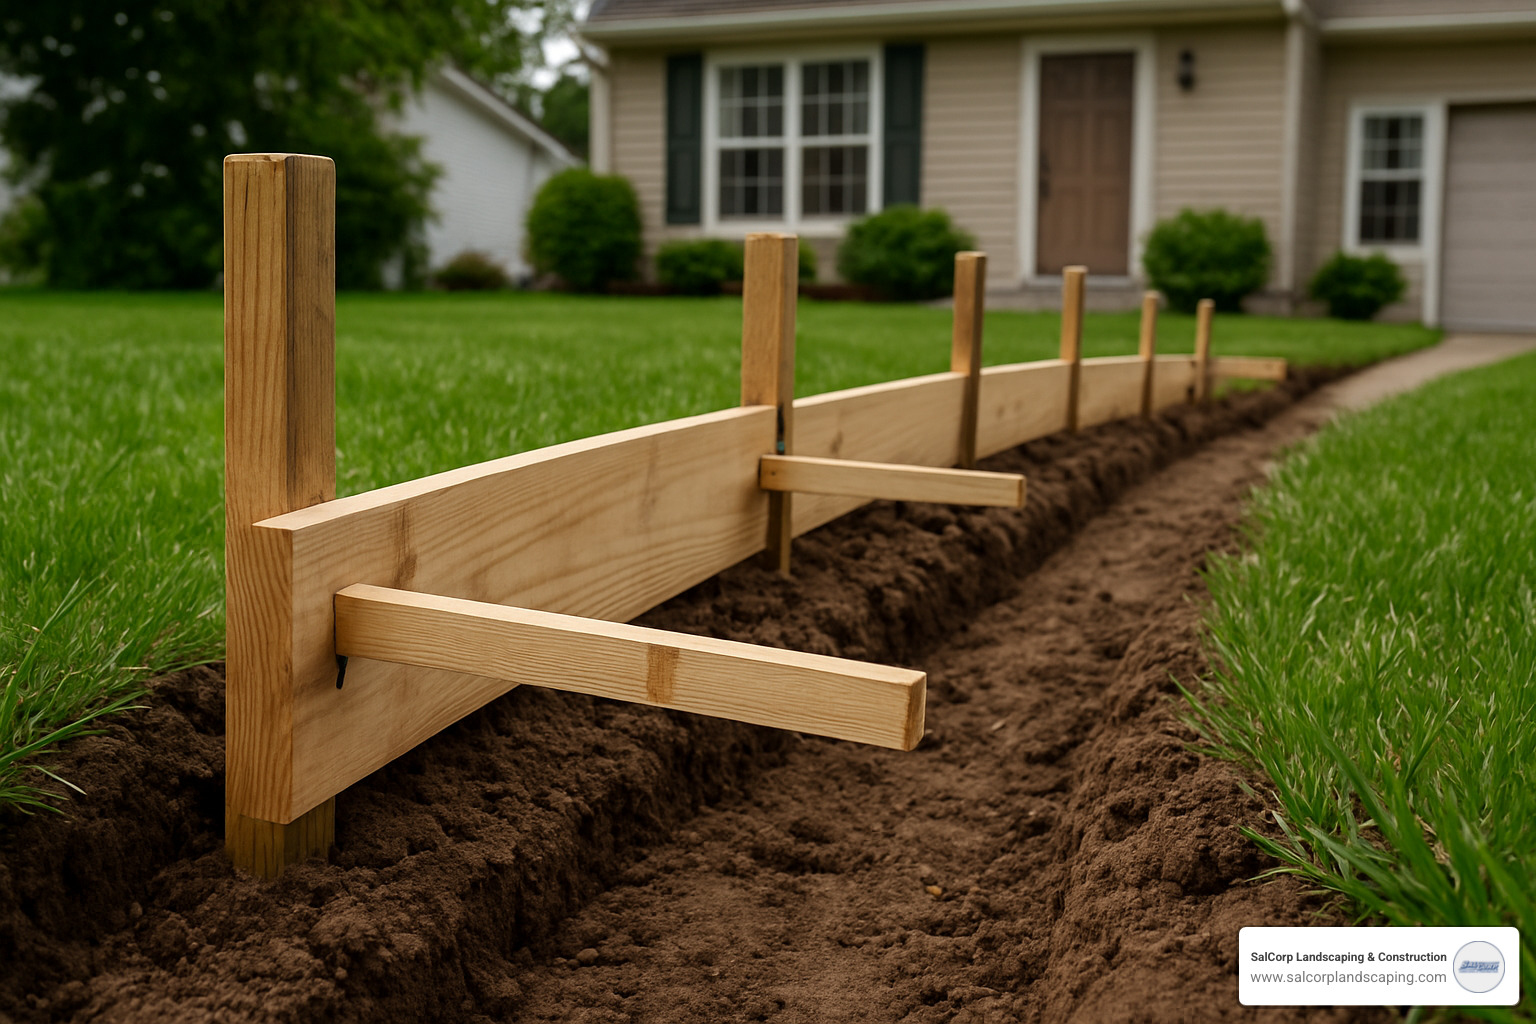
For curved sections, cut small relief notches in the plywood to help it bend more easily.
Use 1×1 wood spacers between forms to maintain consistent width (at least 5 inches). Double-check all levels.
Mixing & Pouring the Concrete
Use a fiber-reinforced, crack-resistant concrete mix with at least 3000 psi strength.
For colored concrete, add liquid cement color to your water before mixing.
Mix to a workable consistency that’s slightly wetter than standard concrete – like pancake batter that’s not too runny but not too thick.
Pour in manageable sections (6-8 feet at a time for DIYers). Fill slightly higher than the forms to allow for settling.
Use a tamping rod or gently tap the sides of the forms to eliminate air pockets. Screed the surface using a straight 2×4 across the top of the forms.
On hot days, dampen the trench and forms before pouring to prevent them from drawing moisture out of the concrete too quickly.
Finishing, Edging & Brushing
After pouring and screeding, wait until the bleed water disappears (15-30 minutes). Then use a wood or magnesium float to smooth the surface.
For a smoother finish, follow with a steel trowel pass.
Use a concrete edging tool to create rounded edges along the top perimeter to prevent future chipping.

For improved traction and a more natural appearance, lightly brush the surface with a concrete broom or chip brush.
Timing is crucial – the concrete should be firm enough to hold a slight thumb impression but not so firm that you can’t make any marks.
Control Joints & Curing
When the concrete has hardened enough (usually 2-3 hours after pouring), cut control joints approximately 1 inch deep, spaced every 3 feet.
Place joints strategically at corners or changes in direction to direct where cracking occurs if ground movement happens.
Keep your concrete moist for 3-5 days by periodically misting with water or covering with plastic sheeting. Alternatively, apply a concrete cure-and-seal product immediately after finishing.
After 3-5 days, carefully remove the forms. Patch any minor defects with concrete patching compound. Backfill soil against the sides of the edging.
Apply a quality concrete sealer after 28 days for maximum protection.
Adding Color, Texture & Decorative Touches
Integral color added to the concrete mix before pouring ensures the color won’t wear away over time. Earth tones typically complement most landscapes.
Color hardeners broadcast onto freshly poured concrete create a denser, more colorful surface layer.
Acid stains and water-based dyes can create unique effects ranging from subtle earth tones to vibrant hues.
Stamping patterns can transform plain concrete to mimic brick, stone, or other textures.
Exposed aggregate creates beautiful texture by washing away the top layer of cement to reveal decorative stones.
Consider embedding decorative elements like glass beads or colored stones in the surface before the concrete sets.
Maintenance, Lifespan & Lawn Care Integration
One of the most impressive benefits of poured concrete lawn edging is how little maintenance it requires over its remarkably long life. When properly installed, concrete borders can last 20-30 years or longer.
Routine Maintenance
Each spring, inspect your edging for any hairline cracks or chips. Catching minor issues early prevents them from developing into bigger problems.
Keep your edging clean with an occasional rinse using a garden hose to remove dirt and debris.
Every 3-5 years, apply a fresh coat of concrete sealer. This is particularly important in our New England climate where freeze-thaw cycles can be tough on concrete.
If you notice small cracks developing, address them promptly with a concrete crack sealer or patching compound before water can penetrate and cause more significant damage during freeze-thaw cycles.
Lawn Care Integration
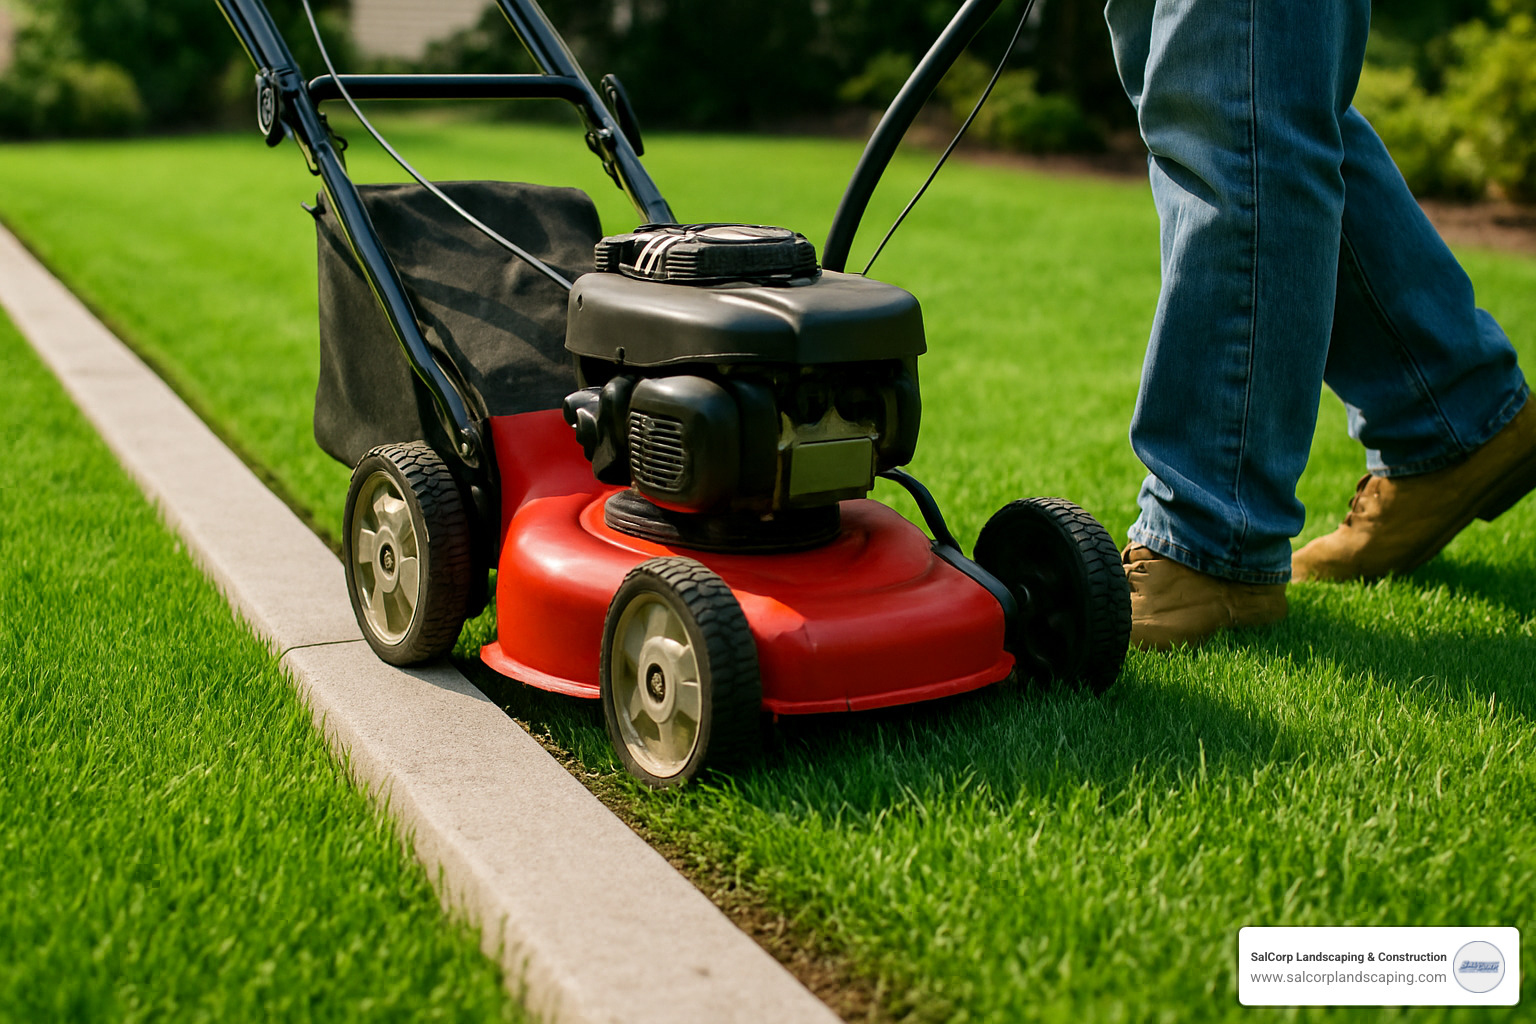
The rounded top edge of properly installed concrete edging creates a “mower strip” that allows your mower wheels to ride directly over the edging without causing damage.
For optimal function, we typically install the top of concrete edging approximately ½ inch above your lawn’s soil level – tall enough to create a clean visual separation but low enough to allow mower wheels to pass over smoothly.
The solid concrete barrier protects trees, plants, and structures from accidental damage from string trimmers. It also significantly reduces the amount of edging maintenance needed throughout the growing season.
During winter months, be mindful of deicing products near your concrete edging. Traditional rock salt can cause surface damage over time. Instead, opt for sand or calcium magnesium acetate when traction is needed on adjacent walkways.
For that magazine-worthy landscape look, run a lawn edger along your concrete border once or twice during the growing season to trim any grass that tries to creep over the top.
Want to learn more about how your landscape features interact with proper drainage? Check out our guide to Types of Drainage to ensure your entire property functions as beautifully as it looks.
DIY vs Professional Installation: Which Is Right for You?
When considering poured concrete lawn edging, one of the biggest decisions is whether to DIY or call professionals like us at SalCorp Landscaping & Construction.
DIY Installation Considerations
The main appeal of DIY is cost savings on labor – you’ll only pay for materials. There’s also satisfaction in creating something with your own hands.
DIY projects offer complete control over timing and design decisions. Want to work an hour each evening or tackle it over a long weekend? The schedule is yours to set.
However, be honest about your capabilities. Concrete work is physically demanding – you’ll be digging trenches, mixing heavy materials, and spending hours bent over finishing the surface. You’ll also need specialized tools that might require rental fees.
The learning curve shouldn’t be underestimated. Professional concrete finishers develop their skills over years. First-time DIYers often encounter issues with consistency, finishing techniques, and proper curing.
DIY might be your best path if you have some concrete experience, are physically up for the challenge, can access the necessary tools, and are working with a relatively simple design. It also helps if your timeline is flexible.
Professional Installation Advantages
Hiring professionals like our team at SalCorp brings significant advantages. Most notably, you’re investing in expertise built from hundreds of similar installations. Our crews understand the nuances of concrete mixing, form setting, and finishing techniques.
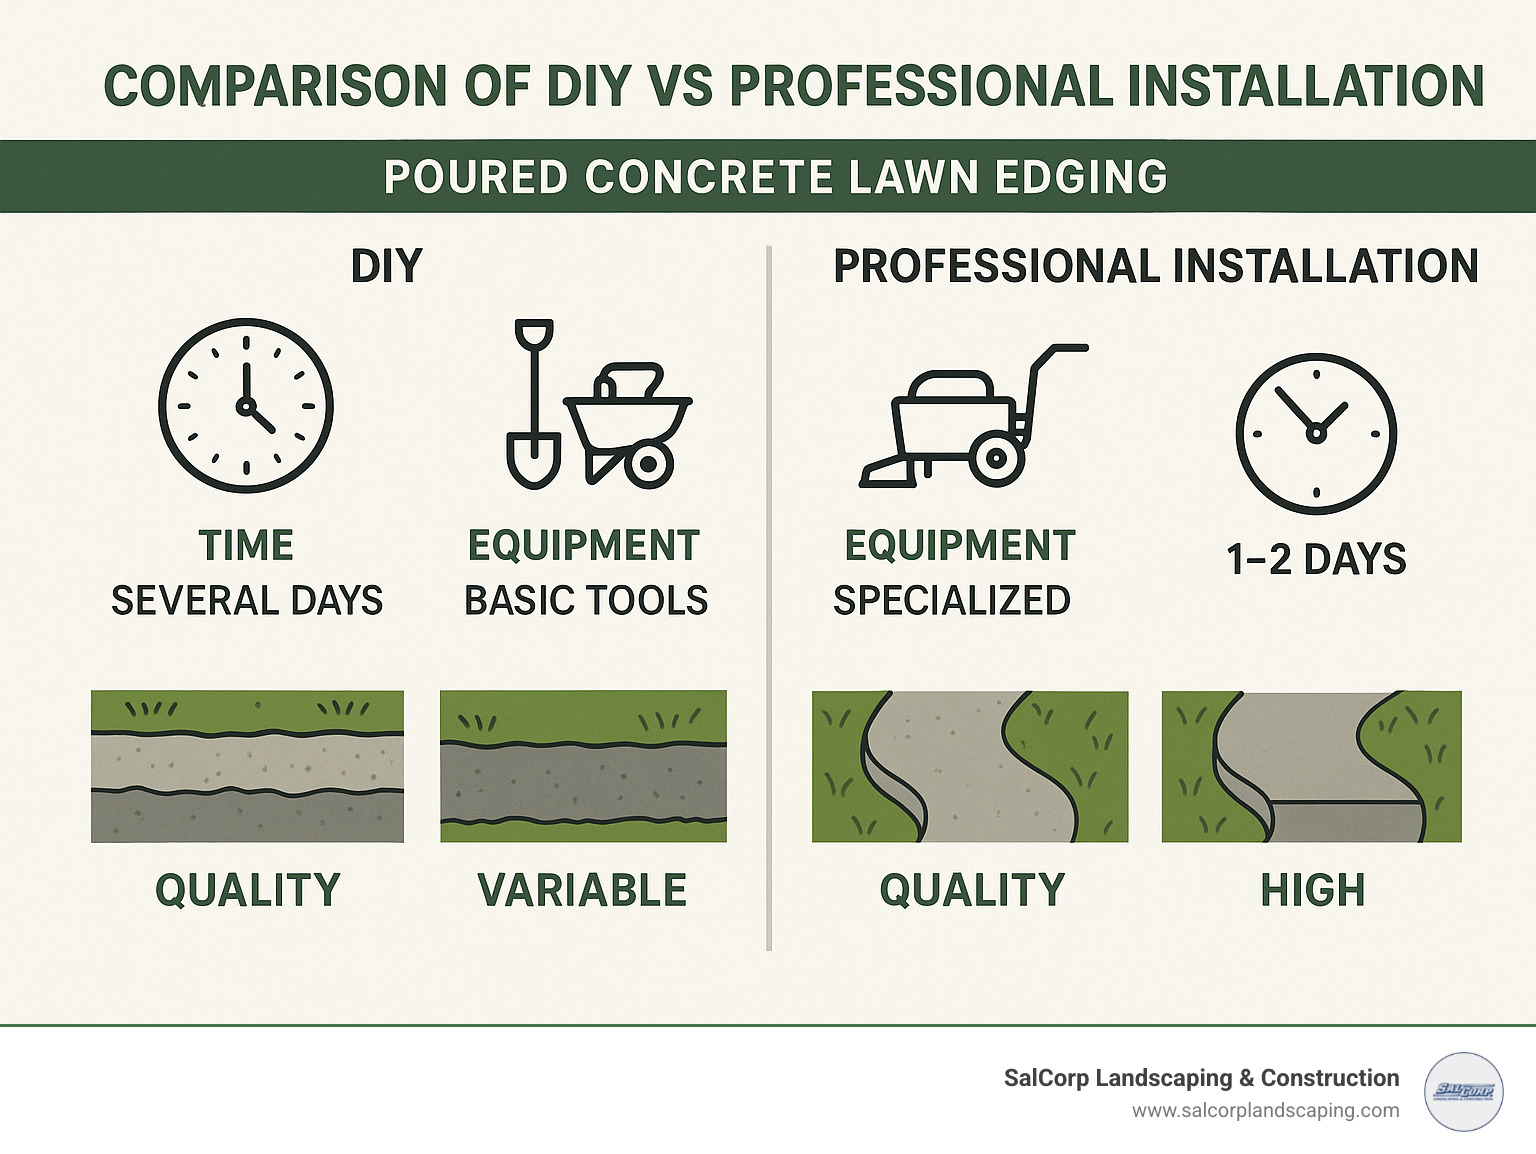
Professional installations typically happen much faster – what might take a homeowner several weekends can often be completed in 1-2 days by an experienced crew. We bring specialized equipment that creates consistent, uniform edges impossible to achieve with hand tools.
The quality difference is usually noticeable, especially in complex designs with curves, elevation changes, or decorative elements. Professionals can execute stamped patterns, integral coloring, and textured finishes with precision.
Perhaps most importantly, professional installation typically includes warranty protection. If issues develop, you’re not on your own to figure out repairs.
The primary drawback is the higher upfront investment. However, many homeowners find this cost justified when considering the time saved, superior results, and longer lifespan.
Professional installation makes the most sense if you value premium results, have complex design elements in mind, want decorative finishes, appreciate warranty protection, or simply value your time too much to spend it mixing concrete.
While DIY concrete edging can be successful, professional installation often proves to be the better value over time. Our SalCorp team brings specialized hardscaping expertise to every project, ensuring your concrete edging will improve your landscape for decades to come.
Frequently Asked Questions about Poured Concrete Lawn Edging
How deep and wide should the edging be?
For poured concrete lawn edging around Massachusetts homes, dimensions matter for long-term durability. A width of at least 5 inches provides stability to withstand our harsh New England seasons.
For depth, aim for concrete that’s 3.5-4 inches thick, with about 2 inches extending below the soil line. When digging your trench, go approximately 8 inches wide and 4-6 inches deep.
Don’t skip the ½-inch gravel base beneath your concrete! This small detail makes a huge difference in drainage and prevents water from pooling underneath.
In Massachusetts, where frost heave is a concern, I sometimes recommend going slightly deeper with your installation in vulnerable areas to ensure stability during winter months.
Why are control joints necessary in poured concrete lawn edging?
Control joints are critical to the long-term appearance of your poured concrete lawn edging. Concrete naturally shrinks as it cures and continues to expand and contract with temperature changes. Without planned weak points, this movement creates random, jagged cracks.
By cutting control joints at regular 3-foot intervals, you’re telling the concrete exactly where it’s allowed to crack. These joints should be approximately 1 inch deep for standard 4-inch thick edging.
Pay special attention to corners and curves, as these areas experience more stress and benefit from strategically placed joints.
The difference between properly jointed concrete and concrete without joints becomes apparent within the first year – one maintains its clean appearance while the other develops unsightly random cracks.
Can I install poured concrete lawn edging during cold New England winters?
While technically possible, I strongly advise against installing poured concrete lawn edging during a Massachusetts winter. Concrete needs temperatures consistently above 50°F for proper curing.
If you must pour concrete in cold weather, you’ll need special precautions: hot water for mixing, accelerating admixtures, insulating blankets, and careful temperature monitoring – but these measures complicate the project and don’t guarantee optimal results.
The freeze-thaw cycles in Massachusetts can be harsh on newly poured concrete. Additionally, frozen ground makes proper trench excavation nearly impossible, and inadequate soil compaction leads to settling issues in spring.
For best results that will last decades, schedule your project between April and October to ensure workable ground conditions and proper curing temperatures.
Conclusion & Free Lawn Edging Consultation
After installing hundreds of poured concrete lawn edging projects across Massachusetts, I’ve seen how these clean, durable borders can transform a property’s appearance while solving common lawn maintenance challenges.
The beauty of concrete edging lies in its perfect balance of form and function. Those crisp, defined lines don’t just look professional—they create practical separations between lawn and garden beds that serve you for decades. With a typical lifespan of 20-30+ years, properly installed concrete borders represent one of the smartest landscape investments.
Concrete edging delivers durability that withstands harsh New England winters, minimal maintenance requirements, and timeless aesthetic appeal. It won’t rot like wood, crack like plastic, or bend like metal alternatives.
What I love most about concrete edging is its versatility. Whether you prefer the clean simplicity of a smooth border or want something more decorative with integral colors and stamped textures, the options are nearly limitless.
Beyond visual appeal, concrete edging transforms your maintenance routine. That smooth edge creates the perfect mowing strip, allowing your mower wheels to ride directly over the border without damage. Say goodbye to tedious trimming!
At SalCorp Landscaping & Construction, we’ve refined our installation process through years of experience in Massachusetts communities like Walpole, Boston, Brookline, Newton, Needham, and Wellesley. As an owner-operated company, I personally oversee each project, ensuring exceptional attention to detail.
Many homeowners appreciate having an expert walk their property before making decisions about edging placement and design. That’s why we offer free consultations for poured concrete lawn edging projects. We’ll help you explore design possibilities, understand the installation process, and determine whether DIY or professional installation makes more sense for your situation.
Ready to transform your landscape with beautiful, functional concrete edging? Let’s talk about your vision. Our team brings the expertise, equipment, and craftsmanship needed to create results you’ll be proud to showcase.
